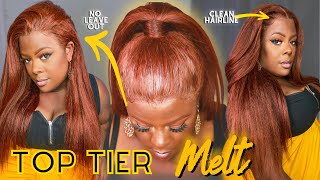
Detailed & Simple Kinky Straight U Part Wig Install. Perfect For The Klaiyi Hair
- Posted on 19 January, 2022
- U Part Wig
- By Anonymous
Get 25% off Off Use Special Code: MY25
●▬▬▬▬▬▬▬▬▬♛#KlaiyiHair ♛ ▬▬▬▬▬▬▬▬▬●
Direct Hair link to the video:➤https://bit.ly/3soBbkq
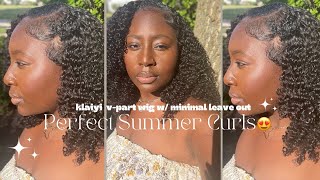
Hair Infor: U-part wig, kinky straight texture, 24inch, 150%density
https://www.klaiyihair.com/ ➤More #ProtectiveStyle V-Part Wig: ➤https://bit.ly/3fT7Adn
Must-Have 13*4 Transparent Lace Frontal wigs:➤https://bit.ly/3nDdBPE
Can't MissLace Front Curly Wig: ➤https://bit.ly/3k1PSqa
Klaiyi Hair Official Website:➤https://bit.ly/3KofUiZ
Aliexpress Klaiyi Hair Store:➤https://bit.ly/3tE9zdj
Amazon Klaiyi Hair Store:➤ https://amzn.to/3jeMnug
YouTube "Klaiyi Hair": http://bit.ly/2zpjQhu
Instagram "@Klaiyihair_no1": https://www.instagram.com/klaiyihair_n...
Facebook "@NO1KLAIYIHAIR": https://www.facebook.com/NO1KLAIYIHAIR...
Contact for Wholesale: +86 18864600633 Email: [email protected]
#vpartwig #protective style
Music: Sweet
Musician: LiQWYD
Hey guys welcome to my channel, i am ash takeoff if you're new here welcome, if you're a returning, um viewers subscriber person stopping by hi. Thank you so much for tuning in to this video um. This video will be an install kind of talk through simple method. U part kinky straight wig and i'm very excited to um to be doing this wig today. This is the box that the way it came in it is from clay eye, hair, clayey, clay, clay, eye clay, hey, you know, that's that's the box, and this is what comes in a box, but you guys we have to get to this point because it doesn't Come out the box like this, it comes out. You know kinky straight beautiful, blowed out texture, but if we want to add some little volume, some juiciness to it, we got to get to that point. So if you guys would like to see how i got to this point with minimum leave out because yes, i do have leave out, but luckily that kinky straight texture, you don't need um a high temperature heat or styling tool to get to this look um. You should just keep on watching because we are bringing kinky straight back baby kinky straight appreciation, because we need to learn to love and embrace our blowed out texture state um, the brushed out state. You don't even have to use heat to get to a state like this um flexi rods, um, bantu knots, there's a lot of things that you can do to get to this state and we need to get back to that all right. So if you guys like to see how i got to this step with these curls and my install with my hair and all that stuff, you should just keep on watching. So this is my hair blown out um. I do need a trim soon. I need to be going to see my petition because baby um, i don't know if i would be doing a middle part or a side part. I think i would like to try a side part with this um kinky straight wig. Let me just show you guys the texture of the wig very quickly, so this is the bag that it came in. This is the u-part wig. This is the parting space and then inside it has the cones comb here, comb here, comb on the side, comb, the middle comb in the back coming home, comb, combs, okay and before i install i always go in and cut off the little extra little pieces. That comes with it me personally, and it's not just with this company and this wig. I don't like how the combs start so far back um to be real with you guys. I either cut that piece of the wig out or if i do anchor braids, i can use that area as um, where i can sew it down at yes, this week can be sold down, but for today's video purposes, um i'm just going to be installing it With the combs only, but if i wanted something more secure, i would um sew it down. So it's not like a flappy part and i'll show you guys that once i install but i'm shooting for a less than 10 minute install and i'm at four minutes and 16 seconds right now, unedited and i haven't even started on my hair. So, let's get to it, i like how it's naturally kind of falling like that, so i'm going to play with that as a parting area and then from here i'm going to part out what i want for this. You know how much i'm going to need to section out. I feel like that, may be good and then for this wig, i'm also going to be putting out my side. You know what peeps, let's just go ahead and do this front leave out as well. I'M gon na, but get this out of the way my leave out is clamped out of the way. Now, as for this hair um, you guys can do like jumbo braids. You can pull it down in a little ponytail. You can do an anchor braid and personally, i'm an anchor braider. So i'm gon na leave out this much on this side for an anchor braid and then i go on the opposite side and do the same thing right. So that's my hair for my ankle. Braids. Now for the rest of this hair, i simply put it in a low ponytail. I brush it out to make it a little more smoother once i do my ankle braids, but for now i'm just getting it out of the way hey. You know just youtubing. Okay, guys, i put some my camera rolls clean that they're leaving on my hair to brush it down, not a lot just enough to get a little bit um in there. For my laser girl friendly the part you part wig installs, i do go in. Let me turn around. You don't see that okay, i go in and i put my hair in a low ponytail. I take my little ponytail, i split it in half and then i plant each side and by putting it down, that's like an easy, convenient, quick, go-to foundation for my bee parts and you pry wigs, try it on slide that back a little okay, no that'll work! She'S on, oh, it fits pretty decent comb comb, oh okay, working with something. No, i haven't put these combs in. Let me take this clip up. Oh it's pretty slow, oh y'all, okay, but so right here. Let me make sure that is. This is what i'm talking about. It has like a little piece um. This one would be okay, but for the sake of this install i'm not going to i'm not going to um, i'm not going to cut it. I normally cut it, but i'm not going to do that because eventually i know how much space i have and i'll simply just um sew it on. So i'm not going to cut it, but that does bother me so, let's figure something out um. Let'S slide it back, how about it? Okay, i slid it back, that's a little better yeah, so i'm just going to take my leave out and just put it somewhere okay. So this is the hair with nothing done to it um, but this is the hair. So this is the hair in this regular texture, i'm going to go in with my blow dryer on um to kind of get some of these kinks out and then i'm going to put some loose little curls in this so um through this part, i'm just going To fast forward it i'm not going to like talk through this part, but i'll be back to you guys with the finished results straight um, not bad, not bad, all right! All right! I'M going to take this piece. I want a little bit more curly and in the front i go backwards and it's still warm so that helps and for my my flat iron curls, they are sometimes a little harder to achieve, but it's kind of like trial and error. In a sense, all right hold it in my hand for a few and then i'm gon na. Let it go, that's actually a very pretty one. So as for this part, i don't know what i call myself doing. I tried to clip it out of the way, but i'm going to take out my leave out and just get the hair and i'm going to trim this. So let's do like a little right layer trim. So i trimmed it, and now i'm just going to take that hair that i just trimmed and i'm going to curl it. So again, i'm going to curl going backwards and then, as for my leave out, i'm just going to simply flat iron it right. On top - and that's it yo that is it okay right here, i'm just going to do this, just gon na flip that again and y'all, so that is it for this install guys. My honest opinion, i love how this hair looks. It is to my waistline. It is 24 inches. It blends very well with my natural texture, and i love that um, because it is thick, it does take a little longer to style. The actual install part of this hair probably only takes less than 10 minutes. I would give it five minutes, but to actually style it and get it like somewhat like this. It'S going to take you about 30 minutes, so all in all, i would say under 40 minute style. If you want to curl it um. I feel like once you curl it. You could probably put some flexi rods in your hair overnight and curl them up and then take them down the next day. That would help save time the next day, but for the initial install, if you want like curls, it's going to take you about 30 minutes, okay, but the straight looking part that literally would be dead in 10 minutes. If you didn't want curls. So thank you guys. So much for watching, if you like this hair or want to get more details about this company, all the information will be in the description box, so please feel free to check it out. You know playing with it, seeing what that kinky texture can do. You know i love it, alright, guys that is it for this video. Thank you so much for watching and tuning in um. You know if you liked it or found anything helpful. You should give me a like comment and subscribe to my channel. It should come. Take off for me because road to 10k, i'm trying to grow i'm trying to do more with this youtube journey and so far so good. I'M very appreciative um for this outlet to do my hair to show simple, diy, simple, easy girl that girl from the girl. Anybody ways to do your hair because i'm not a professional, but it gets job done. It gets it done as always. Thank you guys so much and until next time, bye guys


Comments
Preston Thomas: I love this look! You have great content!
Iesha w: Yes looks great. I’m making my own u part with some gorilla glue! Lol fast method. Every time I try to buy upart wigs is way too big for my little head I’m over it
Prissy Krissy: The side part is really flattering on you. I like that the hair has a natural texture so it blends easier with natural hair
Gill Perry: ♀️This is gorgeous
Alandria Banks: Pretty How long did the curls last ?
None of your business: Yesss no heat.
Tysha mckinny: I just order one haven't arrived yet is the hair like a natuarl black color instead of a reddish brown color?and do they give you a gift bag like luv me hair?