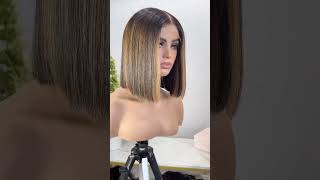
Watch Me Slay This Bob/ Color (U-Part Wig)
- Posted on 27 November, 2017
- U Part Wig
- By Anonymous
Hi guys! I have been wanting to do a short style with my upart wig. It was so simple for me to create this super cut bob. I hope you all enjoy the video and if you have any questions don't forget to leave a comment down below. Thank you for watching and I'll see you on the next video :)
Hi you guys and welcome back to my channel so on this video, I'm going to be taking this. You part right here and I'm gon na be showing you how I cut this thing into a beautiful bob as well as show you guys how I color it. I'M just a little light color so right here I am actually just putting it on my head, not so much making sure it's secure, I'm sectioning off two sections for the front and then one big section for the back just to see where I want the bob To fall once I figured out where I want the Bob to fall, I'm taking this ponytail holder and sectioning it off so that I know exactly where I want to cut it and how it should fall. Then I'm just straightening, the? U part, wig making sure! That'S exactly where I want it. Yours will be higher or lower, depending on the style that you're going for so it doesn't have to be exactly how mine's is so now that I've taken the u-part wig off. I'M just going to take these scissors they're, just regular haircutting scissors and I'm just going to cut straight across again. Yours probably will be higher or lower, depending on how you want your bob to fall, but, as you can see, I just cut it right on off and that's the remainder of it. So now that I do have that middle section cut off, I'm going to use that as a guide for the front and how I want the front to fall around my face and frame my face. So, as you can see, I did cut off just a little bit to begin when you are doing this style or any type of bob. Remember that you can always cut off more, but you cannot put back the hair. So I'm saying that to say, don't go chopping off a whole bunch at first try and take a little bit off at a time. So right here I am going in with the flat iron just to see if it's too long and if I need to take off more hair and comparing it to the middle section that we have previously cut before and once I did that I did notice. I needed to take off a little bit more hair, so that's what I'm using the scissors for I'm just taking off a little bit more. It'S really gon na be on what you like. So I mean you can definitely use this video to use it as a guide on how to do the bob, but if you want it shorter or longer, it's no wrong or right way to do this. So now that I'm done with the left side, I am going back in to do the right side. I do have more of an idea of how much hair to take off, so it was a little bit easier for me without even flat ironing the hair. But of course I probably snip a little bit here and there and just to get it to my liking. But pretty much this is you know what it's looking like so on to the coloring my favorite part, so I'm gon na be taking this Clairol bw2, that's the bleaching powder, and I got that from my local sali. I already had half of a pack, so I'm using the rest of that and then you'll see me use some more from that big tub in the back, along with that, I'm using the salon care xxx cream developer. Now this is gon na be go based off of the consistency that you're looking for. I was looking for a thick and not too runny consistency, but you'll see how it's being mixed together. So here you'll see me going multiple times with the cream developer, and that's only because I am looking for the right consistency. You don't want it to be too thick or too runny, because you do want it to be able to stay in one place and not go all over the years that you don't want it on. So I'm gon na keep adding just looking for the right consistency. Okay, this is going to start the application process, so I did use like a perm brush once I was able to find the correct consistency for the bleach, as well as the cream developer. Now I'm just applying it to the ends of the hair, because I didn't want to die the whole. U part wig, I'm just applying it to the ends of the hair. When you start this process, you do want to set a timer for me and the color that you'll see in the pictures that it took about 15 minutes for it to get that color, and I did kind of I adjust to watch to make sure that it Wasn'T going to light into a color that I didn't want so unfortunately, after I finished bleach in the hair, my camera went completely dead. I wasn't able to show you guys how I shampoo and condition the hair, but it's pretty pretty much self-explanatory. You just shampoo and condition the hair, so this is the end result. I think it came out. Super super good. It looks really natural and I will definitely be doing this again.

Comments
Roxy V.: I love it.
M.Influenceurs: Beautiful
Lydia Brown: I love love love the color and hair, what hair did you use?