How To Make A Upart Wig.
- Posted on 08 October, 2019
- U Part Wig
- By Anonymous
Hey
Watch me me slay this upart wig.
Please, Like, Share & Comment
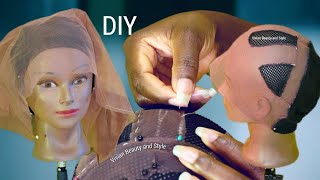
Hey guys, thanks for tuning into another video, so today I'm going to be making a. U part wig, and these are just a couple of things that you will need you're going to need your? U part cap, you can use a dome cap or I like these adjustable caps. They work very well in their mesh material, so you know you can have the breathable scalp, so I'm just pinning that down in the back and in the front on both sides. Now I want to take my sharpie like marker um, I got it from a craft store and I want to mark off extra space at the top, so my part can go back farther and I was show going to detail about that later on in the video. So now I'm just going to start sewing my tracks in the back. You want to make sure that you secure the first stitch and really good so that you don't have to worry about any loose tracks, any loose strings and I'm just going to keep going back and forth all the way up to the top. When you're ending a corner of the track, you son, you want to make sure you go through the web to secure it really good. You want to do that a couple times and tie it a few times just to make sure it's not moving anywhere and now you just want to keep going back and forth up to the top and just fold over making sure that your corners are secure. It down I'm really flat and tight, so you don't have to worry about any bulkiness or slippage throughout your sewing of your tracks. You want to go through the track just to secure it in place and just knot it off just so. You just have that extra security, because you want to make sure your weight can last for a while. Okay, you want to just keep sewing, do not go past that line that you made earlier, and everything should be flat and come out like that. Still at that space right here, that's going to be cut out for your final track. You want to go over it with a couple more stitches like two more over twice to make sure it's just sturdy. Your point should be your middle point. Everything should line up correctly, so this is the way is extremely flat. That'S how you want it to be so it can look as naturally as possible. So now I'm about to take the wig off the canvas head and so on my cones and I just lube and and you can get those at your local beauty, supply store or Amazon, and I place four cones at the top and one at the back. Two on each side - and you just want to slow them down really tightly making sure they really secure. Now there you go is they're all in there and I cut out the piece at the top also. So this is the adjustable band that I like it has to slip grip material on it. That really holds. I just cut them and then measured it here and you know just subtract like a like a inch off. You don't want it to be extremely tight. Like you, don't want your wake to fall off, but you don't want you don't want to pass out either so just make sure that it's not too tight, but it's snug. You want to sew those on each sides, as shown now. I am about to place the way back on and get to styling. So after giving it a press, I'm going to trim the ends, you should always trim the ends when you get it installed done or you know making your wig you just you don't want to leave your ends. Looking then, I know a lot of girls. Think that's you know. Oh, I don't want to lose my lymph. That'S that's not lymph. That'S that's not land! Okay. So now I am about to pin the front two pieces away and start curling. I'M using my things got hot tools: I'm not barrel iron, I'm not exactly sure what inch it is. I know I did get it from. I think that was Marshalls. You just want to pin it. It was really hot. That was make sure you don't burn yourself and you just want to go through doing no big curls. If you want to keep it straight, keep it straight. This is just what I'm doing for my client so right here, I'm taking my god to being just lightly spraying it to give it a hold. You don't want to spray a lot because you don't want it to be crunchy and you know flaky. So I let the pen sit in for like 20 minutes and I'm just gon na take them out and comb through them and there you are you

Comments
OurTruth: Great video straight to the point and very detailed! You also have a very calm voice
MYQUEEN: Beautiful!! Do U Have An Installation Video?
C.LiveBeauty: Love this video! Thank you
Tatiana Watts: thanks! very helpful :)
Quanisha Murphy: You Did A Very Good job !
Carol Mingo: BEAUTIFUL!!!!!!!
Shauna Jones: so helpful!!
Ayanna May: Can you please do a quick video on how to sew the comb pieces ?
Dariyan Dixon: Can I see the video of the wig on? Love the technique, but I need to see ending results
Munch: What kind of hair did you use?
BossyBree TV: So u double wefted it at the bottom ?
Nicole L'Shayyy: How do u know if the wig cap will fit your head
SittingPrettyRashae: Did u turn the cap inside out