Easy Natural V-Part Wig Install *Beginner Friendly* | Ft. Unice Hair
- Posted on 07 April, 2022
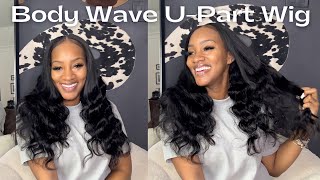
- U Part Wig
- By Anonymous
Within 30 Days, NO Reason Free Return For Subscribers Orders
Using Special Code To Get 10% OFF: myunice
Afterpay & klarna & Quadpay &Sezzle, PAY 4 Equal payment Within 6 weeks!
●▬▬▬▬▬▬▬▬▬♛#UNice Hair♛ ▬▬▬▬▬▬▬▬▬●
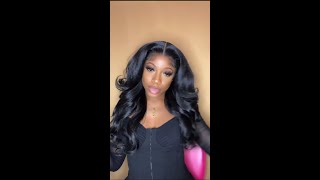
I am using V-part Body Wave wig in video: https://bit.ly/3uXbPeR
☛Hot selling and quick doing V-part wigs: https://bit.ly/3jbYEBc
https://www.unice.com/ ➤HOT 50% OFF: https://bit.ly/3DMaFGV
Hair details: Affordable Glueless V-part Body Wave Wig 24 inches
Thank y’all so much for watching! Feel free to comment any content/videos you guys want to see from me down below! And remember, God is love. Whoever lives in love lives in God, and God in them. His love endures forever.
————————————————————
Let’s get to 20,000 subs !
——————————————————
Business Inquiries
Subject: YOUTUBE
——————————————————
Keep up with me:
IG- janiaaliyah https://www.instagram.com/janiaaliyah
Tiktok: janiaaliyah
My Podcast: https://shepraysfirstpodcast.buzzsprou...
———————————————————
Subscriber Count (at the time of filming): 19,903
——————————————————————
FAQ about me:
Name: Jania
Age: 20
Birthday: December
Camera: Canon G7x Mark II/ Sony ZV-1
Editing Software: Final Cut Pro
————————————————————-
Music by Mayila - Phases - https://thmatc.co/?l=416870AF
Music by Ebony Loren - I'm Good - https://thmatc.co/?l=16772B7B
Music by Marnie Taylor - Mr January - https://thmatc.co/?l=FCD0EE94
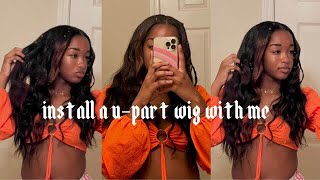
Is what's up beautiful people? It'S your girl, lia and welcome back to another video. So, as you can see by the thumbnail and as you all can see by the title today, we are working with eunice hair and this box is so cute by the way. But they sent me this really cute v, part body, wave, wig and so here's a little v part i'll be working with today and just for, i guess, extra reference. I went through and added two extra clip-ins right here and so they're gon na be ones right here. I just added those because it adds like an extra layer of security when the wind blowing and all kinds of stuff. If you guys watch my acrylic tutorial, then you know what i'm talking about, but for this one i don't think i'm going to leave any hair out like right here. Just because you know i want to leave as as minimal leave out out as possible, and i don't want this part to frizz up and stuff. So that's why i definitely added these so that way, the end, the very front part of this wig is still you know, laid down and secure i'll have all the i have the link and all the information about that hair in that specific unit. In the description box down below, but as you can see, this hair is not going to blend. So with that being said, i'm going to go ahead and blow dry and straighten my hair and then we'll get into this install okay, you guys so just to make it to a blow drying process a whole lot easier. I like to start that off by detangling. My hair, so that way my arm and my shoulders don't go out while i'm blow drying and if y'all want to like in depth tutorial about all the products i use when i wash my hair before i'm straightening and stuff, like that, i have a silk press. Video up on my channel, even though this is not a suit press, but right now, i'm just adding in some heat protectant before i go in through before i go through with my blow dryer and i don't have a special blow dryer or anything, but literally for This style, i'm just gon na blow dry until my arm hurt and then from there i'ma trust that my timer straightener thing is gon na, do the rest and it did so yeah. And so now, i'm just gon na part, my hair down um about four ways, and so this is just to make. When i go through my timer ring straightener and straighten my hair. I just like to straighten it in four sections and it makes this nice quick and easy and yeah at me, god, and so once my hair was straight. I went through my comb and kind of just parted, my hair down the middle, because that's where you know this v part wig is going to go, and so i just have to make sure i perfected that little middle part, and so then i grabbed my v Part wig, and so on this part, i believe this is very important. I like to kind of put the wig next to my part, to just measure out exactly how long the v part on the wig is compared to my actual part and then from there. I just comb back any extra. You know hair from off that part, then i'm just going to go through and actually part out the v and i literally part mine as a v, because i think that's how you can get your hair to blend the best and that's why i really do prefer V parts over: u parts because they require a lot less leave out than u-parts do and they're very, very flat, so you're not having to worry about covering a track more. So just you know covering a little bit of lace and from there this step is kind of optional. Just put on a wig cap. I prefer to wear a wig cap because it helps my hair not itch under the wig, but it isn't like the wig cap is actually protecting anything or anything like that. So if you don't want to wear a wig cap for this style, it's definitely optional, and so now we're just going to go in and start installing this wig and it's so easy, so simple, literally just unclip and clip i like to kind of unclip place. The comb clip it back and then slide down so that way it's already in place when i slide down - and you know that's how i know it's very very secure - and these clips are good, so they always secure, but that's really how i know it's secure and You can probably do this ahead of time, but just going back and tightening your straps on the back, if you need to, i didn't really find it too necessary, but, and so now, for the most important step of this install blending - and you know just going through And straightening my hair, and so first things. First, i just did the middle part to make sure it was at least lined up, and now i'm just going through my flat irons and i'm just laying it straight down like that, because i am going to straighten this wig maybe later on i'll curl it or Something but today i just wanted to wear it straight, and so now i'm going through my flat iron and i'm going to straighten this wig and i'm not even going to hold y'all it took a while to straighten this wig, i'm kind of like wishing looking back. I should have just curled it since it was already body wave, but i really wanted to wear my hair straight. So you know i took the time and i straightened it. Why don't you hold my hand and now i'm going in with this erica j wack stick and i'm just using this to slick my hair down and you guys can use any you know wax stick or whatever, but i used to use these when i had sew-ins And it would help my hair blend very, very good, and so, as y'all can see it did it really helped my hair blend good, but make sure you don't use a lot because this is kind of like oily. So it may, you know, kind of make your hair a little bit stiff, so you know just be a little careful when you're using the wax sticks and when we finally make, and so now my favorite part of this process is layering. I feel like layering, really helps it look so natural and i'm definitely not a layering expert or anything. I just have a little layering comb tool whatever and i just get in there and i play with it so with that being said. I definitely love to do this um. I kind of just went back and forth while i was doing it until i liked it and yeah, and now i'm just going through and doing my edges, which i probably should have did those first, because it would be like a lot easier. If you just do your edges ahead of time, so that way, you're not getting gel or anything on the hair, but it is what it is, i'm just going through and doing my little edge routine with this hair and yeah, and so, like i told you before, I love layering, so i'm just going back through and finishing that up and other than that you know the wig was given so but girl am i addicted to layers. I think i am okay y'all, so that is all i have for this video today and literally now. I got me a nice little nice little straight v, part to wear on a quick little lazy day. You know i like to tuck my middle parts behind my ear, because i think they look really cute that way and that's how you really know when you have a flat install when you can just put it behind your ear, just like this, like, oh, my goodness, But i'll make sure i'll link all the information about this hair about this specific unit in the description box down below. But you already know, click smash smack that subscribe button down below and i will see y'all on my next video now.

Comments
Deja Davis: look at this blend
Petty: Loved this look
Leticia Pruitt: what are your straightening tools?
Missy Moore: How did you get yours to lay so flat? The wig cap on the one I received is HUGE
Jayla: I'm late but what would you define your hair type as? I think we have very similar natural hair type <3
Sakeenah Godfrey: how did you add the extra clips, and where did you buy them?
Lauren Taylor: You are so pretty
Taylor Washington: can you do a side part with v wigs?
Butterfly Taylor: What did you use to straighten your hair? Like not the actual straightener but the tool before that?
Talaya Hagy: What color hair did you use?
Petty: What’s the name of that scissors / shears
Danie ツ: Didn't I just see Ula Hair post this tutorial, well the shorts/tiktok version over on their channel
AvEXCrAzY: Natural>
Cvr tv: ...