Today Only Hair Brazilian Body Wave Virgin Hair 3Pcs Weave Lace Closure | Today Only Brazilian Hair
- Posted on 18 May, 2018
- Lace Closure
- By Anonymous
In The Video (Brazilian Body Wave 3 Bundles with Lace Closure):
https://www.todayonlyhair.com/today-on...
Today Only Hair Official Store: https://www.todayonlyhair.com/
Straight Hair 3 Bundles with Lace Closure:
https://www.todayonlyhair.com/brazilia...
TODAY ONLY Aliexpress Store: https://www.aliexpress.com/store/12960...
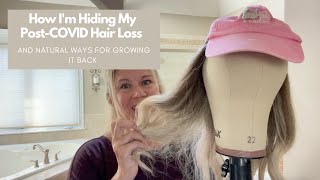
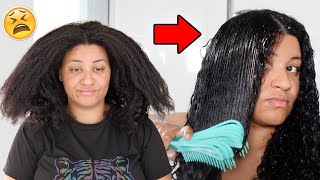
So we're not gon na waste any time we're gon na jump right into it. I am absolutely loving this French braid cornrow wig that I made a couple days ago, I'll have it linked below, but we gon na start off by adding a shower cap to your hair to protect your natural hair. I was gon na. Do two layers of wig caps in brown nude. I thought this would be the best look, but, as you can see, it keeps sliding back and I'm just like no, it's gon na slide back. When I make this wig, it's not gon na be good. So I went ahead and transfer it or switch to a dome cap this one you can pick up at Sally's. I buy these in bulk on Amazon and I'll, have them linked down below. I also added a little bit of my pump it up spritz. This is really good because it's gon na stick to the cap once it dries and help to adhere the glue and the tracks and all that stuff to your head, so we're featuring some hair from today. Only this is our body wave hair. I have three bundles of frontal. It came with some brochure, it came with a wig cap and it also came with some really nice lashes. They sent over a four by four lace closure. I did not bleach the nuts but you're gon na see it's gon na still look flawless and boom. I have a fresh bottle, uh-huh the glue that I'm gon na be using, and I forgot to set the little piece out in the middle cycle. It'Ll. I don't fit plastic or foil, but it's it keeps the glue fresh. I forgot to hit enough so we can squeeze it it kind of busted open. So normally, when doing a quick weave wig, I would always sew the clothes you're down just to make sure that it never comes up. This is my first time actually trying to actually glue it down and it actually worked out just fine. You just want to make sure that you put a nice thick layer of the glue on to the band or the ribbon that goes around the closure. You kind of want to make sure that you have enough on there that it's gon na stick, but you don't want it to be like messy and spill over so kind of try to find that balance. You can use a blow dryer to help seal this down. To the cap, I didn't want to do that this time around, so I just went ahead and kind of blew it and air dried it to make sure it was tacky little bit and then I aligned it exactly to the front of the cap, and I just Hold it down and kind of just press it in and just take my time now I did let this sit for maybe about five minutes before I moved it just because this is the most crucial part. The closure is what bike holds the whole week together. So I just really wanted to make sure it was together and it is at this point again use a blow dryer to help seal it down and we are good to go. If you want to do this step and like add the glue, you can do it and then later back go back in and like sew it down. If you just really want to be sure that it is good now, I'm gon na take my first bundle. This is 22 inches. One way that I judge hair is when I unravel the bundle, if it like tangles up - and I kind of have a clue that this is gon na, be some hair that is not gon na be the best and these bundles unraveled perfectly. So I know it's gon na be some really really good hair. I do have this hair linked down below again. It is from the company today. Only and all the information is in the description bar, but you just go ahead and measure your first piece and then you just like hold it and kind of just pour the glue on I like to lay the track on a flat surface. To lay that apply. The glue and kind of let it sit there for a minute, but I kind of just wanted to show you in a frame a few times me actually applying the glue. So you can see what you do. You want to fill up each track. I, like the weft part of the track to make sure that there's enough glue, but you don't want to like glob it on there tour it's gon na spill over and get messy. This is not gon na be perfect, and it's not gon na be free of mess, but you don't want to make it too messy like making it like way too much glue is not gon na make it stick even more if that makes any sense. So this time around, I tried to add a little bit of that Pump. It Up spray to the track that definitely wasn't necessary, but it is great to try different techniques throughout. You know the process to see what works best for you and I'm gon na hold. It in place, I hold each end down and kind of secure that, and while I hold the instant I kind of go around and press the rest of it in after this. This is like the time. Basically when you would go ahead and blow dry. If you want it to blow dry, but I'm going to conceal the process of adding my tracks now, my hair is in French braids, going straight back. The weather beautician did. Is she kind of like made it a little bit bulky in the back, which I did not like, but we're gon na roll with and you're gon na see in the end that the wigs still gon na come out SuperDuper flat now keep in mind, you want To make sure that you do the tracks close enough, that you know you don't see through the wig but still spaced them far enough apart, that you will not run out of hair and, as you can see, my work is pretty clean. It'S coming together very well. This cap ended up working very amazing. I did not need an elastic being in the end and the wig fit amazing, just an FYI, but I always recommend adding an elastic band even when the wig fits perfect, because you know you out where you're going to a party you get down in a pool. Just a wig, I'm sorry, an elastic band will always help you to kind of keep the wig in place just a little bit better in case it does slide back or you know you want to lift it up. It'S appointed, so our bun. It'S always going to just lay perfectly, and here you see them, it kind of was sliding a little bit cuz. I let it go so I did add a little bit of glue. Don'T be shy. Dan, add more glue if and when needed. So the best way to explain how you want to treat these tracks and the glue when applying is pretty much. You want to use the same technique you would use when you put on falsies. Whenever you put on your false eyelashes, you add the glue to the band of the eyelash, you kind of hold it in place. Sometimes you kind of blow it and let it dry and get tacky before you put it on your eye and if you do it or if you apply it as soon as you put the glue, it's gon na slip and move around, and it's not gon na Stay, but if you wait a good 10 to 15 seconds, it's gon na be tacky enough to apply, and even when you apply it at that 10 to 15 seconds, it still will move, but once you hold it in place and it dries completely, it won't move Like if you try to take that lash off after it's completely dry, you're gon na pull out actual lashes, so that's pretty much the same exact technique or analogy you would use for this when the glue is wet on the weft and you apply it. It'S gon na move. If you wait til it's a little bit. Tacky it'll stay in place, but it still will kind of move a little bit, but it's completely dry. It is going to be stuck and bonded on this cap. Very, very, very well! You just want to make sure that you press the tribe in and the glue in all the way around, so there's no pieces that are not really adhered properly and then once it's dry, it's good. So it takes maybe about. I say because I did not so the closure down, I actually glued it down. I would say this process will take you, maybe about 45 minutes to an hour. If you are a pro it's gon na. Take you 20-30 minutes max and again it's just based on trial and error, and just getting really good at it. Once you get laid the first few tracks down you kind of get the hang of it and you get into like a groove and your going and going and going and going so as long as you have some music on or your Netflix and chilling it where You have a good movie going as I do right now. I'M like staying at a movie. I look like a zombie, but once you get into a grooving you're like watching TV or something to keep you you know entertained, it can get done. Super duper fast. Now we're almost at the top one thing that we'll always recommend is that you check your work. You check your work by basically going it's like your bathroom and you can hold up like a handheld mirror or like a large like college dorm mirror, or something like that, like behind the mirror. So that way, when you're looking in the bathroom mirror, you can basically look behind you guys. No I'm trying to say you basically want to find a way to look in the mirror at your hair and kind of see and make sure that there are no like. You can't see the scalp through, or the cap through, the hair, that's kind of what we're gon na check right now. I did off-camera have to go in and use that last piece to add two more tracks in because there were a few pieces that, as you can see, it was not. I didn't space them close enough together and that's the only downside to doing a wig on your head. You can't see you just feeling also once it was done. I did go ahead and start to comb the hair out. I decided to stop combing the hair out and just take um the wig off and kind of remove everything and allowed them what how much fun to say, allow them to continue to dry. That way, I wouldn't pull any tracks, because again, you want to make sure the juror tracts are completely dry. So I went ahead and cut out that excess cap beneath where the closure lays - and I'm gon na, show you here how flat this sucker lays you guys can see like how that closure just lays I'm gon na add a little bit of mousse or a lot. Actually - and this is just gon na just mold to here - how I want it to look - it's gon na give the hair a nice salon-quality shine. It'S gon na get away like the flyways and the baby here, and all that and just tame everything together. Now this little piece right here, I did get a little bit of glue on it. So, rather than trying to remove the glue, then I cut that piece of hair out and that's what you will find when you're using this kind of glue. Sometimes it's easier just to cut the piece out than it is to try to remove the glue, but if you have obviously glue in like a large piece of the hair, you definitely don't want to just cut out a huge piece of your hair. I'M gon na use my Doug bug clips to go ahead and hold the hair back. While I get the excess lace off so now you guys can almost see how amazing this wig lays again. I did not need to add an elastic band, but I definitely want to add some baby here and kind of make this wig look more like a frontal opposed to a closure. So I'm gon na take out a generous amount of baby hair, hold the hair back. So that way, it's not in the way and kind of just pulling like using the pull method to pull a little bit of that baby hair out that I made just so that it's not too thick and bulky we're gon na use these guys to be glued. I am using a generous amount because, when I don't have makeup on, I usually use a lot to make sure that I can mold the hair exactly how I want it to go. I kind of let that dry and get a little bit tacky a little bit dry as well, and that's the easiest way to go ahead and make your baby here without it like moving around too much, and it basically will form the baby hair. Exactly how you want just go ahead and let the baby here or the glue the gel glue dry a little bit before you go ahead and start doing your little swoops and, as you can see, this looks amazing. Another step you can do is bleach. The knots also you can tweeze between the baby hair and where the actual hair starts. So it looks a little bit more realistic and like a hairline, I did not do that here, but that definitely is two different ways to make it look even more flawless than it does in this video. I also added a little bit of powder to the partying feel free to add a foundation powder, a liquid concealer. You can use an eyeshadow whatever you find that works amazing with your skin tone, apply a generous amount and use your fingers to kind of blend it out. Then we're pretty much done. I use my blasts freezing spray from got to be glued and a little bit of more foam motion just to be able to go ahead and set the hair and get it ready to be laid now off-camera. I did go ahead and go wash the hair and I added a little bit of my Sebastian's wet to the end. So this is what the ends of the hair look like in their natural state. I have not washed or co wash them at this point. I'M going to go ahead, off-camera style the ends and add my

Comments
BiancaMaree: This was so much help
lps wild swift foxy: What was tat sound?!?!?!?