Make A Wig In Minutes | ( Machine Sew Method And Diy Closure)
- Posted on 25 August, 2020
- Lace Closure
- By Anonymous
In this video I will go through an easy to follow step by step process to machine sew a wig in minutes. And how to make you own diy closure. The process is easy to follow and the results are great. You can machine sew any wig any style using this method. You can make curly hair, wavy hair or straight hair wigs all using the same techniques.
I would love to hear if you use these techniques to make your own wig. And if you need any extra help leave a comment and I will help get great results.
#diorastyles #machinesewwigs #handmadeclosure
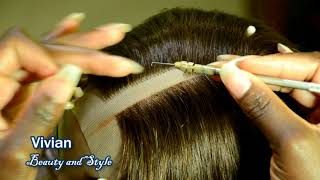
Hey guys, thank you so much for joining me in this video. I'M going to show you a step-by-step guide on how to machine sew your very own, wigs, Okay, i'm starting off with pinning the hair to the bottom of the wig cap. Okay, so at the sewing machine, one bit of advice here is make sure that the pin heads are facing towards you so that it's easy for you to take them out. As you sew, I work slowly and make sure that I stop the machine as many times as I need to, whilst i'm taking the pins out. So, if you're new, to sewing with a sewing machine, my advice would be just to practice. Just get some hair a wig cap You're not actually making anything. You're just practicing and practice makes perfect.. I didn't start out knowing how to do this. I just practiced as I went along, so my advice is practice practice practice practice before you make your finished wig. Okay, so now i'm removing the last pin - and i'm gon na just do a little bit of freehand sewing keeping the hair in place using My fingers rather than pins. Okay. This is a halfway checkpoint, guys, I'm just showing you how your wig should look halfway through. I'M showing you the line, spacing the spaces I've left between the tracks. This hair is really really thick, so you don't need to put tons and tons of hair. It will make the wig too big and too dense Here, where i'm just drawing with my finger, i'm showing you where my next track is going to lie. Okay, so this is where i'm up to it's not too full, Not too heavy. Just a good density at the moment, I'm about to sew this last line. Here. You can see where the pins are, I'm going to sew that last line and i'm then going to carry on maybe one Row here and then the last row on this dark black crown section and that will finish off the sewing for now and then i'm Going to Concentrate on doing my side parting, so I want my left side parting, I'm going to put my parting here, Okay, so i'm moving on now to showing you how I ventilate i've slowed the video down so that you can actually see where the needle goes In And out of the holes, how I attach the hair And how I Gather the tension., So what i'm doing is i'm pulling with my left hand to give the hair tension whilst pulling through the hole with the right hand, You can see i've got a bit Of a seesaw motion going on there., I'm gon na hook now, with my right hand, hook the hair Turn my needle around and pull The hair through with the right Hand. At the same time, when I want to release the hair, I pull with my Right hand, and I release my left hand. Okay, so i'm just continuing ventilating, adding small strands Of hair to the lace, be careful not to pull too much hair onto your needle, because the more hair you put in the thicker, the closure will be Okay, just a tip here. I work in a triangle pattern. I Don't put hair in every single hole just so that the closure is not so thick and I can get through the ventilating As quickly as possible. So I've finished the back section of the closure. I just want to move forward So that I can create a part, So i'm moving down on one side, creating a straight line And then i'll swap over to the opposite side and do exactly the same thing. So Just a reminder guys Give me a thumbs up. Like this video., Let me know in the comment If you've tried to make this wig using the tips that i've given you and also, please don't forget to hit that subscribe button Once i've got the line exactly the length I want it to be. This is the full length of my parting Once i've got that in place. I just flip the hair over and start working underneath, Okay, so i've got one side of my closure done. I'M now working on the opposite side, I'm using exactly the same techniques, Doing exactly the same thing as I did on the first side. Also, I should have mentioned earlier that the thing that you can see in the screen the white thing on my head - It's a magnifier.. I need this because the holes are really really small.. You'Ll need one.. Also, it's very very beneficial. It just helps magnify everything.. It does have a light on it, So it can beam the light straight onto the lace, which just makes it a lot easier for you to see. So now, i'm at the very very last part of my closure. I'Ve just got a few knots to add and then i'm all finished ready to attach to my wig cap. At this point you just want to pin your closure on whichever side You want your parting to be now. I want a left side part. So i'm pinning The closure right onto the left. Side. I've tried to make it like a curved Shape really, rather than just straight back and i've put the pins in the middle of the parting just so that it stays in place And what i'm going to do. After this is i'm going to go over to the sewing machine, I'm going to sew around the edge of the lace just to keep it firmly in place. Okay, so at the sewing machine now, i'm just gon na stitch around the lace just to make sure that it's firmly in place. Okay, so going back to sewing your tracks on continue working up to the closure in a horseshoe shape. Okay. So at this point you should have your last track sewn up right up until the closure. You can't see any lace. This is the final track and your wig is complete Okay.. So this is the final wig.. It looks really really nice The hair on the top, where the closure is, is a little bit matted. So what I decided to do was just wet it down with some water and then use a little of the shea butter detangler. Just to add a bit of moisture to the hair, So now i'm adding the detangler and what this did was it just defined the curls and made them really really Pop. Now I would say from start to finish: it took me about five hours to make this wig. That includes the closure. That includes all the sewing, and it was really really easy. So i'm recommending that you give it a go. Once you get to the sewing machine, you can make any style that you want Okay, so i've added pictures at the end so that you can see how the final look turned out. I'M really pleased with this wig.. It'S beautiful, Thank you so much guys for joining me today.. Thank you. So much for watching. Take care and see you next time.


Comments
Mageorgiba Lawson-Jack: This is a very detailed tutorial. Thanks for sharing. I haven't tried making a wig before, I may try it out now
Noon Love: Wow, I would never be able do that! You're very talented ❤
Fashionista Neelu: Well explained, detailed tutorial, you did a superb job
Laura Leanne: Thanks for this lovely ❤️
Frapps & Scraps: Thanks for sharing
Dogan: What a beautiful
Dogan: I'm proud of you Sister
Joy Cromwell: I didn't even know this was possible. Have to try
Christina LeAnn Taylor: Wow that is awesome do you make and sell wigs I am looking to buy if you do
Mika Harrigan: Good video
Kayla Kam!: ☺️☺️☺️