Full Lace Closure Wig Tutorial Ft. Lisa Virgin Hair Co
- Posted on 08 February, 2015
- Lace Closure
- By Anonymous
will fill in later! FULL Lace Closure wig tutorial Ft. Lisa Virgin Hair Co AliExpress Brazilian Deep Curly 24" 22" 20" 18" 16" lace top closure Link to the hair: http://www.aliexpress.com/store/produc...
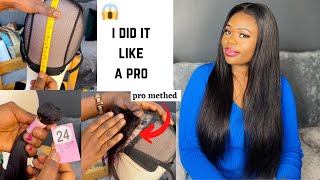
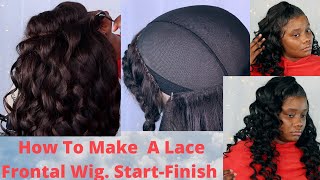
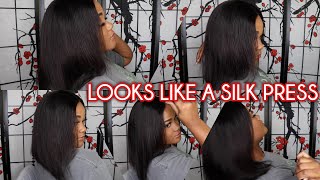
Hello, ladies all, right so we're going to get started by just putting your lace closure, pinning it down at the front to your spandex cap and, put it all the way through your phone head and then you're, going to pin all the way around the back as Well so you're going to pin the entire closure down nice and flat, then the next thing you're going to do is just grab a clip or something to hold the hair away while you're starting to sew it down. Do you go ahead and start sewing your closure down, just like you would so any other tracks and use the reinforced lace area. So it's a lot easier for you to sew and go ahead and sew all the way around and make sure you make your stitches a little smaller around the curves so that it lays nice and flat. So there I'm coming around to the other side and, like I said you just slow it down like you, would any other tracks and just put a knot right at the end, so that it's nice and tight, then you're going to take the pins out and readjust Your cap for me personally, I know that my cap has to be all the way down for it to measure around the foam head to fit my head. So that's why I readjusted the cap so that it's wide enough to fit my head. I take one of my shortest tracks, so my shortest length was 18 inches and I measure that to go all the way around from one end of the closure to the other. And then I sew that down right along the edge of the cap and that's to make sure that my we twig is completely seamless and you're, not seeing any of the other tracks and stitches. You'Ll only see that that hair all the way around the edge of my week so sorry my lighting, was so bad guys. I did turn on my light here. So now you can see a little better while I'm sewing, and I just wanted to show you that in the beginning, when I start sewing, I just go straight across. There is no diagonal. There is no you shape. I just sold my tracks literally straight across. I also use these. I'M sewing straight pins to help hold my tracks on the ends. You see the little yellow straight pin there so, like I said I just so straight across there's no particular shape here or anything just sewing straight across the back of the head. Flip the track over stitch down the flipped area and then keep on going straight across now. Here you can see, I didn't go all the way to the end of the other track, now's, where I start to kind of change. The way that I'm sewing, you can see I'm kind of lifting the track up and making that into more of a curve, almost like a bell curve, it's hard to explain the shape that I'm creating, but I'm trying to make sure that I take up more space On the cat, so I'm trying to fill up all that back area of the cat, because if I continuously go straight across, it won't fill up all that space and it will just look kind of funny. So I start to do this sort of a curved shape where it's higher in the middle, where you saw that red pin, I kind of lift the tracks higher there and then kind of slow pit down. If you can see the shape that I'm creating. So I'm not um! So now I'm going to cover those folded tracks to make sure that you can't see any of that holding and then just continue, selling as usual and so just continue making that you shape until you start to get closer and closer to your closure. Make sure you cover up those folded tracks when you can so that it makes sure I'm install and your wig a lot more neat. Looking so now, i'm laying the second-to-last track and here's the completed wig i'll, show you where the tracks meet up to the closure and it's really nice and clean. So then just let the closure down and now it's time to start fixing your closure. But before you start working on your closure, definitely take your wig off and now it's time to cut away the excess cap underneath the closure so grab you a pair of scissors and really neatly start to cut away that excess closure, be very careful not to cut The lace from your closure so really pull that area away from your lace and make sure that you don't cut your stitching as well, because it will release your closure and then your closure will just be hanging. So really take your time. You don't want to waste all that time. You spent making this gorgeous. We buy and then turn around and cut your closure. You will be very upset so take your time here. So just check your closure make sure everything is still intact and you haven't cut any of the threads away. So now it's time to start working on that closure for real, so grab yourself a comb and start making your part. However, you would like your part to be this part I think is going to be somewhat of the L part. So I'm going to do a straight part down and whenever I do my parts I always add a little bit from the other side, and it just allows the hair to look a little natural. So you see how I curve that part a little in the front. It just allows it to look a little more natural in the front and then I always make sure to have a part in the back as well. Just just so, you can see a little bit more scalps. Sometimes I think people go wrong when they try not to show any scalp at all, but there is a way to make it look a little more natural, of course, for your closure to set. You do have to wet it, so just dampen it a little bit with some water, then you're going to add some makeup or concealer to your part. I did not bleach my knots. I don't really do that anymore, so I do just use the concealer method. That'S just some wet and wild cheap makeup that I used for my closures, so go ahead and apply that directly to the lace and it's okay. If someone some of it, gets on the hair as well, that's totally fine, it will um. You know, wife away later. It won't stay on the hair forever. It will just adhere to the lace more so than the hair. So don't get too worried about that and I like to use a concealer brush because it lets it be a little more precise. I hope in this lighting you can still see. I know the light is so bright, then I just add a little bit of hairspray to make sure the hair is truly laid in the areas and the directions that I wanted to go and there's no flyaways, and this is the final look it's the finished product. I hope you guys like this wig, I absolutely love it. I will be using it for a celebrity. Inspired, look coming up very soon, thanks so much for watching. I love you guys.

Comments
Deja Major: Freakin love Curly hair on you boo! ❤️
Lauren Brady: This is an excellent tutorial! I'd like to know how long it takes you to make your wigs? And also you make wigs for other people?
ItsGorgeousEverything: This was so helpful. This is the first time I actually get how to sew around the edge.
Mi Lisa Hair: love this video ,very helpful ,I will try to make wig in future
MsAvalon25: Gorgeous! I love this wig. Come make me one...lol. xoxo
Juleen Forbes: Beautiful curls
Berickia Morris: this hair is beautiful
Hillary Osei: Did you straighten this hair?
Anael Dancy: I Like That Hair. Can't Wait To See What Else You Do To The Wig Unit!