Closure Quick Weave Wig Tutorial Ft. Curly Hair Ft. Amazon Hair
- Posted on 21 May, 2021
- Lace Closure
- By Anonymous
OPEN ME
HEY BABES !
In this video I will be showing you a START TO FINISH CLOSURE QUICK WEAVE WIG TUTORIAL ON NATURAL HAIR using some affordable bundles that I found on Amazon Prime.
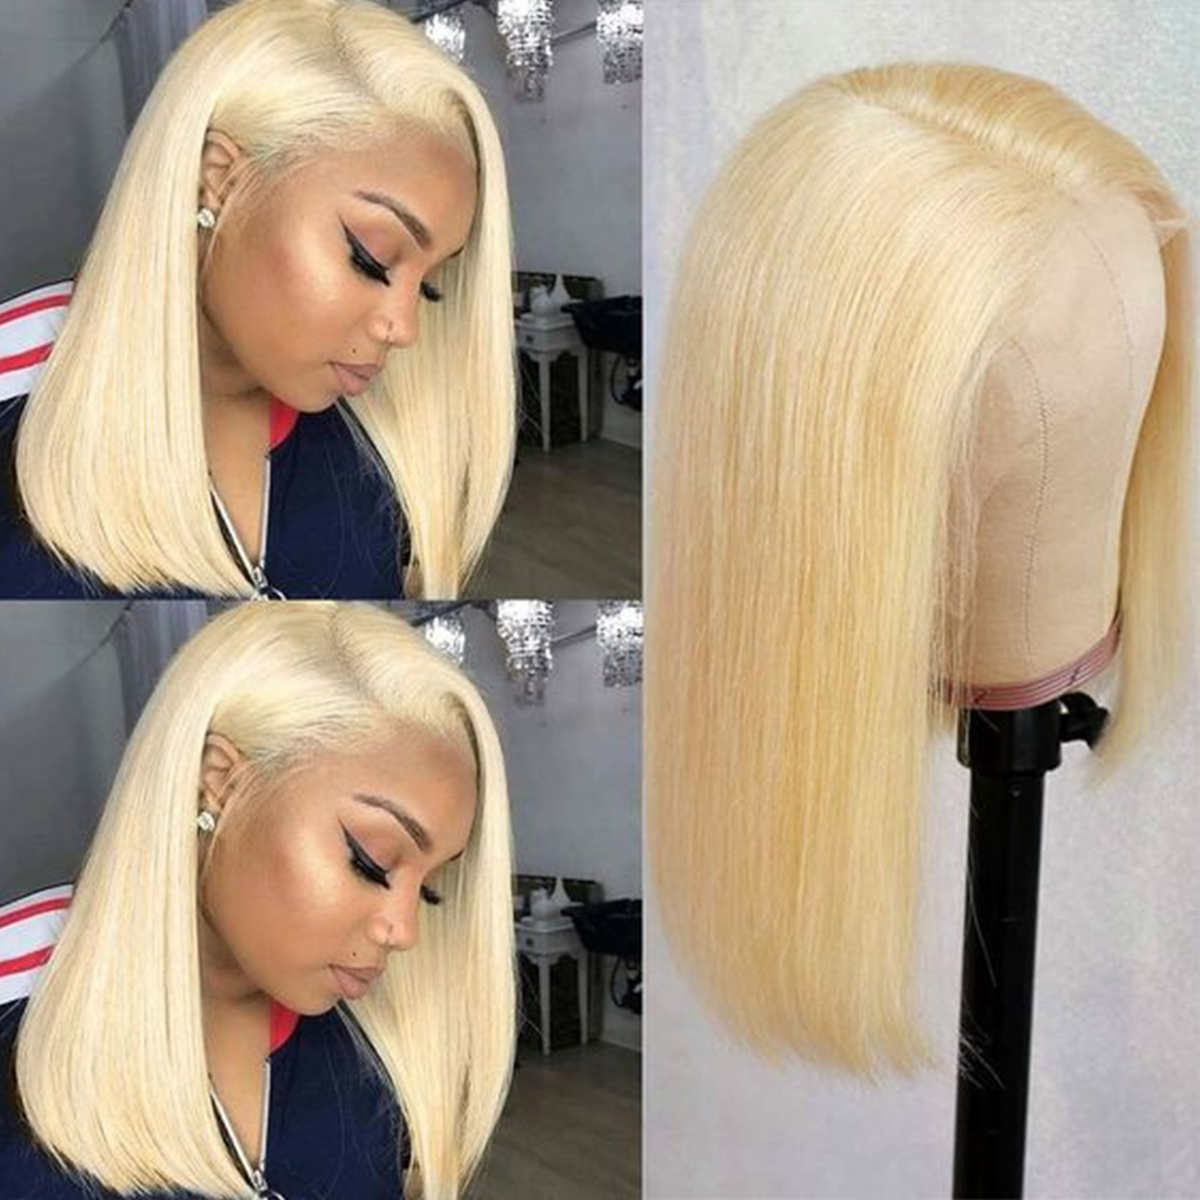
HAIR DETAILS:
14, 18, 20INCHES AND A 12 INCH LACE CLOSURE.
The closure wasn’t as good as the bundles (not bad for price) but I absolutely LOVED the bundles. Check comments for updates on longevity
❣️ Model Model Cocktail Synthetic Half Wig - Supermingo - 1B
CONNECT WITH ME:
INSTA: https://www.instagram.com/brittanylas...
BUSINESS EMAIL: brittanylashellinfo@gmail(.)com
❣️ HAIR MQYQ 9A Brazilian Deep Wave 3 Bundles with Closure (14 16 18+12) 100% Unprocessed Human Hair Bundles with Lace Closure Free Part Loose Wave Hair Weave Bundles Natural Color
https://amzn.to/3wmxEDG (please select the correct curl pattern)
❣️SALON PRO HAIR BONDING GLUE
https://rstyle.me/cz-n/ev48tydadgp
❣️NAIROBI MOUSSE
❣️CHI SILK INFUSION
❣️HOT COMB
*ALL PRODUCTS WERE PURCHASED WITH MY OWN MONEY*
About Me
Height: 5’5
Ethnicity: ✨ MELANIN MAGIC BABY ✨
TECH:
: IPHONE 11 PRO
Editing Software: IMOVIE
✨Lighting:
Neewer Ring Light Kit:18 https://amzn.to/3o7uSi2
ESDDI Softbox Photography Lighting Kit 800W
Music by Jaylon Ashaun - Pop Off - https://thmatc.co/?l=B46B7D5B
Music by Ryan Little - Loveseat - https://thmatc.co/?l=4927B49C
Music by yitzzak - Forbidden Fruit - https://thmatc.co/?l=67DC073E
Thanks For Watching
❤️❤️❤️❤️❤️S U B S C R I B E ❤️❤️❤️❤️❤️
**LINKS PROVIDED ARE AFFILIATE LINKS TO SHOW YOU WHAT THE PRODUCT IS AND WHAT IT LOOKS LIKE. YOU CAN PURCHASE DIRECTLY THERE IF YOU CHOOSE, I WILL RECEIVE A PORTION OF THE SELL IF YOU CHOOSE MY DIRECT LINK LISTED.
What'S good babies and welcome back to my channel so we're going to dive right into this video? I have another gym for you all. This is a wig that i created using some affordable amazon, bundles y'all, there's a company i've had on amazon. I have affordable, hair and virgin hair, and this is a wig that i created. So if you would like to see how i achieve this look, definitely stay tuned, all right, my beautiful babe, so jumping right into this video. The first thing you want to start off with doing is getting that closure together, whether you have a lace, closure or frontal, you want to make sure that you customize it pluck it bleach it put makeup on it. Do whatever you need to do to make it look as natural as possible, it's for it to match your hairline okay. So what i like to do with my closures, is i like to pluck my closures to look like my actual hairline boom here? Is the closure plucked and i'm going to show you what it looks like when it's not plugged see how unnatural that looks? It just looks super unnatural. It looks like a wig hairline nobody's hairline is super perfect like that at least mine ain't. So i have to pluck my closures and please do that and make sure you don't over pluck now. This is the hair, so i'm going to leave all the details about this hair in the description box below also the link will be there so make sure that you look into the description box to get detailed information. Just a heads up, if you decide to order from this company, definitely be careful with ordering their closures. The closure had so many short pieces of hair in it. I don't know what it was, but it had a lot of small hairs and i had to really really really finesse this closure to get it right. So the bundles, though, love these bundles, what's good babe, so i am behind camera, showing you guys what i got going on about to go ahead and get started and complete. My quick weave wig, but i wanted to come on here and tell you guys what i just did so i just pretty much sewed on my closure pulled my hair out for my baby hairs. As you can see here - and i also plucked my closure so make sure you guys pluck your closures, because if you do not pluck your clothes, they will not look natural at all. You do not want a wiggy looking wig, okay and i also went ahead and i sprayed down my cap with some hairspray and today i used a mixture of i usually make sure to pump it up. Oh gee pump it up y'all, i'm sure all my girls out there are familiar with the og pump it up and i sprayed it with some got to be as well. So i used two different ones, just testing out to see which one you know just i'm just testing stuff out. Y'All trial and error is what it's all about. Okay, guys, this hair is so so beautiful all and for all the information on this hair will be listed in the description box down below so make sure you guys check that out. This is a deep wave and i love this curl pattern. It'S so pretty also for the first extension we're gon na bring this one all the way up to the top up here and we're gon na bring it all the way around to the other side of the wig. So you're gon na go down and all the way around and we're gon na glue it like that now. The reason why we're gon na do that is because, when we have our wig on and the wind blows, we don't want any of our tracks on the side to show that's where we're going to do that. So we're going to go ahead and get started all right so, like i said, babe you're going to go ahead and lay down that first track. You want to measure it out cut. It apply your glue. Okay, make sure you apply a good amount, especially when you're doing this wig. You want to apply a good good amount of glue um if we were doing this on our actual head and i would say, do not apply that much glue. But since we're making a wig, we want adhesive baby. So you want to apply that track and you want to start at the tip tippity top of that wig right. Underneath the closure apply some pressure on your fingertips and just push that extension onto that wig cap make sure you know you hold it as you're going because it's not completely dry. It takes a few seconds for it to completely. You know dry in here and also keep in mind. We did spray down our caps, so we wanted to um stick to that as well, and you want to just pull it to the other side and boom. Then, when you go on with your next track, you're going to just repeat that process, so i like to lay two tracks down all the way around like this and then the rest of the wig i created you know doing it. The normal quick weave method, all right, babe, so now that we got those first, two perimeter tracks laid down: we're gon na go ahead and start building our wig. So we're gon na go in and follow the same process measure out cut, apply your group glue and apply it to the wig. So right now you just see me at this point going from right to left or left to right. Whatever you decide to do, it doesn't matter as long as you go from either direction to the other, and as long as you apply enough glue - and you know laying your tracks straight, you'll be fine, and you want to repeat this process until you reach the top Of your wig here we are voila magic. I have finished constructing my wig and i did go in and spray the hair down with some water leave-in conditioner, and i used some nairobi mousse to get these curls popped, because i wanted to see how this wig would look as the wet look. Absolutely love the wet look. Y'All know this is this gives me uh? I don't even know this gives me um on the beach in the standby, so anyways. Now i'm about to go in and get my foundation together. I'M just going to put my hair into two sloppy looking cornrows going straight to the back. Nothing too crazy, nothing! Fancy yeah, i'm not a braider! So doing two simple braids going straight to the back, and now i'm going to go in with some got to be glued. To get my edges out of the way you don't you want to make sure you go in and pull gel your hair back, because you don't want any of your edges in the way when you apply your wig, because that's how your edges get ripped out and We need those, so i'm just using a mixture of hairspray and the gossip glue gel to brush my edges out of the way, and then i'm also going to go in with a wrapping strip to make sure that they lay down while they dry. Now i'm going to go in with some alcohol and a cotton pad to wipe off my area where i'm going to be laying my closure, you want to make sure this area is squeaky, clean, no makeup, no oils or anything, because you want to have a clean Foundation to adhere your wig too, and now you see me applying my wig and y'all. Look how crazy this wig look like y'all y'all can't just be slapping your wig zone. You can't do that because this is how it's gon na look crazy, crazy. So please take time to customize your wigs y'all. So again, like i told you earlier we're not using any glue to adhere this wig we're going to be using hairspray y'all. Yes, you can use hairspray to glue your wig down. You don't have to use actual glue. I like to use hairspray because it is a temporary hold, so i can keep my wig on for, like you know three days and take it off easy, easy peasy with just water without having to really like really do too much. So i did three layer or four layers of the hairspray blow dried it let it dry and then you want to put your wig on and then you want to put a scarf on top. It'S up tight, tight tight, let it sit and let it set for maybe about 10 to 15 minutes. However long you can take it because we're going to tie it tight if your ears aren't hurting when you're done, then you can tie it tight enough and you're gon na get this mess. I know it look crazy trust. The process. Okay, when you use hairspray to lay your wigs down a lot of people, don't show this part, but this is what happens when you lay your wig down, but don't get scared trust the process you want to go in with your comb like i just did there And you know kind of loosen up the hairs and get those dried up, particles sprayed and crusted and get all that stuff, scrape it off with your comb and then mousse y'all. You see how i applied some mousse on there and it's not as visible anymore. Take your hot calm and continue: you know to comb out the mess, but heat and mousse will help get rid of the white residue. Also reapplying some more hairspray will get rid of the right residue. The residue is there because it was drying and it had traction or it had tension up against it, so it turned to white um, so yeah get rid of it, applying some more product and see while i magic trust the processes, it's a process. Everything is a process. Everything in life is a process. You just got ta trust it. So now i'm gon na go in and just style the hair i'm going to go in with just strictly water and deep conditioner leave-in conditioner. That'S all i have in this bottle here is water and deep conditioner, i'm going to go in with some of that to make these curls pop, and i'm also going to add in my nairobi mousse to hold the curls in place once they pop and then i'm Going to show that, for you guys, i'm also going to show how this hair looked when it dried completely without the wet look, i preferred it when it was completely dry but y'all i'm going to shut up. Unless i finish watching the video, i hope you guys enjoy this and i'll see you all in the next one love y'all stay beautiful and blessed. Do you


Comments
Deloris Fultz: You go baby that's Beautiful ❤️
Lyntona Rodgers: I live it baby girl
Lisa Williams: Hey sugar kcmo is in here your number one fan is here queen ✨✨✨✨