How To: Versatile Quick Weave *Beginner Friendly*
- Posted on 23 July, 2022
- Lace Closure
- By Anonymous
Shake-N-Go Organique Synthetic Weave Hair Extension - BREEZY WAVE 30" (1B Off Black) https://a.co/d/1DxSGux
HOW TO: VERSATILE QUICK WEAVE *BEGINNER FRIENDLY*
hi everyone! hope you enjoyed this video! Don't forget to like comment and subscribe, and ill keep making content for you guys!
FOLLOW MY OTHER SOCIAL MEDIAS:
INSTAGRAM: https://www.instagram.com/liichanell/
TIKTOK: https://www.tiktok.com/@lichanel?lang=...
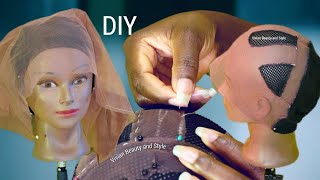
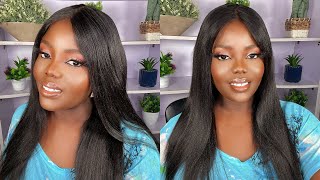
Hey guys and welcome back to my channel, okay, okay, i'm gon na be showing you guys how i did my versatile, quick weave for the first time so keep watching until the end to see how i did it: okay, guys, let's go ahead and jump right into It so i'm going to be using my freshly blow-dried and washed hair. I already sectioned off leave out in the front, but of course i have to do both of my sides and in the back as well, but i'm just showing you guys how i parted it. In the front, first now right here, i'm just basically braiding the leave out in the front just so, as i am sectioning off the rest of my hair, it doesn't come in the way. I don't mess anything up. It'S just for organization reasons. So now that we already went ahead and sectioned off the front of the head, i have to go ahead and section off the sides and this part is very optional for you guys um, i just sectioned off how much hair i want to section off, but obviously, When you're doing your own hair go ahead and section off how much you would like to so right here, i'm just mapping out and sectioning off the back of my hair, i'm just literally just filling it up um. I don't have like a mirror behind my head or anything, hey yo. I look at myself and why do i look like that? Black barbie meme, literally exactly anyway, okay guys. So this is basically how my entire head is looking at the moment, everything is sectioned off right. Now, i'm just going to go ahead and go all around the leave out that i just sectioned off and braid it is um is uh, okay guys. So this is how i braided my hair. I really did that, like i didn't notice how well i actually rated it and how fat i did, but that's pretty good. I'M not gon na lie so right. Now i'm just gon na go ahead and put a bald cap on and now i'm going to be mapping out where my leave out is sectioned off. You could literally use anything, i'm literally using my pink highlighter just to map out my leave out um i mean it worked, so i'm not complaining, but after that i'm just going to be going ahead and going i'm going to use this barrier between my ball cap And the actual glue that i'm going to be using to glue on the hair tracks with i've never done this before obviously like. This is my first time doing like a quick weave, but, according to you know the tutorials that i've been seeing um. They always have like a barrier where they put on this stuff on their ball cap, and you know it just kind of helps. It prevents the glue that you're going to be using to glue the tracks on to like go to your actual head and everything um. So yeah. That'S why i'm using this and then you have to basically just wait until it completely dries and hardens. So this is basically how my hair is looking after i put the barrier on my ball cap um, but y'all, so we're gon na get into the nitty gritty. So one of my mistakes that i did is, i cut the ball cap before i glued the tracks onto it, and i'm going to tell you why. This is a mistake because, when i started to like you know, obviously cut the ball cap and everything around the perimeter of my leave out um, i noticed that the barrier that i put on, like the barrier glue that i put on my ball cap. It didn't completely dry, it's either it didn't completely dry or it didn't um. I didn't get like really saturated. I didn't saturate it into like the ball cap like that much um, but i would if i could go back. I would definitely put the ball cap on put the barrier and everything and then cut after i already glued the tracks onto the back cap. I just feel like that's way, less risky and it's just way better. So, as you can see right here, like you know i, i was just kind of fidgeting with the ball cap, because that's when i noticed i was like dang like it's, not it's not all the way like you know, covered and everything, but you know an easy Fix for this, though, if you have like another ball cap, i would definitely recommend you putting that over the old one and mapping it out just like what i did with the highlighter and just gluing the tracks straight on to the new ball cap and um. Just cut it right after just cut the ball cap after you glued on the tracks, but you know over here you can clearly see you know. I was kind of fidgeting with the ball cap. I was like. Oh, no, it's not like all the way covered and everything but um you know i did. I did work my magic. I did what i had to do and everything so we're all good. So we're all good okay, okay guys, so i am going to go ahead and start gluing on the hair bundles to my actual bald cap, i'm going to be using the organic synthetic body wave, hair bundles! If this is in the length 30 inches, i'm gon na be using the salon pro hair bonding glue to use for the bundles and yeah, i'm just showing you guys how flowy and how nice it is. But i'm just going to be going on. You know the hair tracks and what i did just now. I basically just measured on. I think it's called the whiff i've been kind of looking at hair tutorials before i even did this and they called it a whiff i've been like. I was measuring the width of the hair track, so i'm just gon na be going ahead and going on my first hair track and you know it's up from there. So let's go ahead and continue uh, okay guys. So i finished gluing all of the hair bundles onto my head and i'm going to obviously unbraid the leave out. You know what guys, for my first time doing a quick weave. I think that you know this has been a pretty educational and smooth process for me. Obviously, with my mistakes, i know better next time when i do my click weaves like how i should do them, and you know how i can better myself with my quick weaves and basically master it um yeah. So right here i did have a little bit of the product of the barrier glue on my head on my hair, but it wasn't crazy. I just combed it out. Simply but yeah i mean so far. It'S been pretty good. I'M gon na go off camera and kind of just like flat iron, the leave out of my head and i'm going to come right back. Okay guys, so i kind of straightened my hair off of camera. But i did end up doing like these two braids out of camera. It looks really good, but i didn't do my baby hairs yet so i wanted to do it on camera, for you guys so um. The gel that i'm going to be using is the 24 hour edge, tamer hair gel, but we're gon na go ahead and get straight into hey. You, hey, yo, okay, guys. That is pretty much it for this hair tutorial. I hope you guys love it. I definitely am so in love with this hairstyle y'all. I'M definitely going to be doing this more often because this is just so cute. I hope you guys got a lot of information from this video and i hope to see you guys probably do this hairstyle and tag me if you guys do but go ahead like comment and subscribe for more hair videos, but i'll see you guys in my next One bye


Comments
Jaden Greene: I just cant stop watching lili's videos
L4NAV1BEZ: Thank you so much :)
sorayah guillaumette: Chanel.family when is the grand opening for the beauty salon