How To: Bleach Knots + Cut Lace - Omgherhair Sexy Loose Curly 360 Lace Frontal Wig
- Posted on 03 March, 2019
- Lace Frontal
- By Anonymous
#wigreview #howtobleachknots #howtocutlace #360lacefrontwig #loosewave
HOW TO: Bleach Knots + Cut Lace - OMGHERHAIR Sexy Loose Curly 360 Lace Frontal Wig
Direct link to this wig:
https://www.omgherhair.com/sexy-loose-...
USE CODE CAM10 TO SAVE $10 off orders over $100
Products used in this video:
Clairol Professional Shimmer Lights Conditioner 16 oz. https://www.amazon.com/dp/B000EVIVR4/r...
Clairol Professional Shimmer Lights Shampoo blonde & silver,16 fl.oz by Clairol https://www.amazon.com/dp/B01LMNA3LY/r...
Clairol Bw2 Powder Lightener, 8 Ounce https://www.amazon.com/dp/B0009QZYLU/r...
Ion Sensitive Scalp 40 Volume Creme Developer, 32oz https://www.amazon.com/dp/B005NISXHG/r...
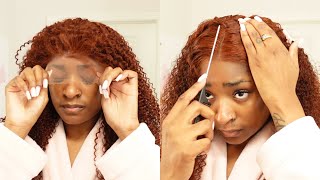
Hey guys welcome back to my channel, it's cam today I'll, be showing you guys how I bleach the knots and cut the lace on this oMG, her hair three-sixty lace front away. I also try to give you guys a quick review. Let'S get into the specs real quick, the wig has a pre plucked hairline baby hairs are included a light. Brown lays 12 inches, it's the 130 % density and it's a 360 lace. Frontal wig, the wig name on the site is sexy, loose curly and its CLW 0. 8. Ok! So here I'm showing you guys how I bleached the nuts I used a Clairol bleach powder and the Forty developer by ion - and I got this at the Sally Beauty Supply Store. I am creating a very semi thick mixture and I kind of get it to a consistency where it's not running and it's not extra thick and then I put on a thin layer onto the lace and I try to work very quickly because I don't want the Hair to over bleach, so I set my timer and I did this or I let it sit for about 4 to 6 minutes, because I find that with oMG, her hair, the lace seems to bleach very fast. So I I only bleach this for 4 to 6 minutes, so here, as you see, I am adding a light layer, a thin layer. I should say so. I can prevent over bleaching and I make sure I set my timer so once it's fully applied just let it sit for a second and you can even lift the lace to see how quickly it's turning and when making the mixture. I did not measure anything. I just eyeballed it so here I am using the shimmer lights shampoo. I also got this from the Sally's Beauty Supply Store. I still have the lace turned inside out and I am washing the lace. First, I put shampoo on there and I washing all the bleach off and wash and shampooing the lace. I then turn inside out, as you can see, and I am about to shampoo the actual hair just to ensure that there isn't any bleach on the actual hair. So I kind of give it a good, shampoo or good washing just so. I can assure that I won't bleach the actual hair now once I am done with the shampooing of the hair. I go ahead and I use the shimmer lights conditioner and that's also found at your local beauty supply store. I actually got it from Sally's and they were very inexpensive and I bought the bigger bottles just so I'll have more to last me since I'll be bleaching and a lot of different wigs. So I'm going ahead here as you can see and use the shimmer lights. Conditioner and I just went ahead and conditioned the hair and that helps it to prevent the brassiness that may happen to the lace when bleaching so just go ahead and when you're shampooing it, I always cut it like squeeze dry and I try, as you can see. I try not to take away from the the curl pattern, so I just kind of squeeze dry it when I'm, when washing as you can see, I just kind of so I don't take away from the curl pattern. I don't want to. I try not to mess with it too much and then I kind of blot it dry. Okay. So here I'm going to show you how I cut the lace and it's very simple: you just get a pair of scissors and you just start at the forehead, and I just cut the lace as close to the pre plucked hairline that they have on there. I cut it as close to the the baby hairs as possible without cutting the actual hair. I now have learned a different technique where I actually will show you in another video that you can also cut the lace while it's being on your head on your actual head, and that way you can follow your own natural hairline. That technique seems to work really well, but this is also okay. You can go ahead and cut it, as you see how I'm doing here with with the wig in your hand, as you can see, I am following the hairline, and that is the lace that was cut off and I'm just trimming it up and getting anything that Wasn'T cut smoothly and there you have it simple. Now I'm using pressed powder - and I got that pressed powder from Miss a and they can be found online on Instagram, miss a Mis s, capital A and I just used the pressed powder - and I add the press power to the inside part of the lace. And this will give you a more realistic, um scalp for your for your lace um. I just feel like it brightens it up and I actually like putting press powder in addition to bleaching the hair just because I feel like it brightens it up so much better. So, as you can see here, I'm just showing you how you can get your pressed powder and you just put it pretty much across the entire lace frontal and with this wig it has four and a half inches of parting space, because it is a 360 in The front and that's what I do like about 360s: it gives you a lot more parting space, and this is the finished product. I didn't really pass the Flatiron through it too much it just kind of just I just kind of bumped it a little bit just to see what the curls would look like. I didn't want to take away from the natural wave, so I just kind of bumped the ends just a little bit just to see if the hair was still a little damp and I just wanted. I was too excited, and this is the finished product before I actually installed a wig. I just put it on just to see what it looks like, and here is the once I actually flat ironed it. So, thank you guys for watching and make sure you subscribe and if you have any questions, feel free to drop it into the comments section below


Comments
Muva Bonita: Def needed to see this video ‼️