How To Make A Hair Bow And Headband Holder - Theribbonretreat.Com
- Posted on 23 April, 2015
- Hair Accessories
- By Anonymous
Learn how to make a Hair Bow and Headband Holder out of ribbon! Perfect for storing all your bows and headbands! Don't forget to check out our SPECIALS! https://www.theribbonretreat.com/custo...
Learn how to take the backs off flowers:
How to Attach a Gerber Daisy to a Clip: https://www.youtube.com/watch?v=LdP-eq...
Links to supplies used in this video:
Ribbon: https://www.theribbonretreat.com/Catal...
Metal D Rings: https://www.theribbonretreat.com/Produ...
Flowers: https://www.theribbonretreat.com/Catal...
Scissors, Glue Gun: https://www.theribbonretreat.com/Catal...
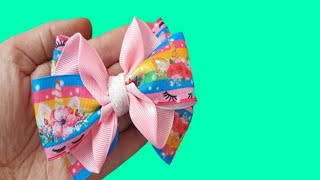
Take your one-and-a-half inch ribbon and cut it to 36 inches, and you can do that longer or shorter, depending on what you like and make sure to seal your ends. And now we're going to take our printed ribbon and I'm not going to cut it a certain amount, I'm just going to leave it rolled, so I can have enough and make sure to seal your ends as well on this ribbon, the one end and we're going To pin this to our bigger ribbon, so get your pins out and we're going to make a loop we're going to make about a 4-inch loop, all right, 4-inch loop and then we're going to bring the back of that around so fold it down and make sure That everything is lined up along the ribbon like that. We'Re going to take that and we're going to pin it in the middle of the one-and-a-half inch ribbon make your pins like this. So when we sew it it'll be easy, just sew over all right. So that's our first loop and now we're just going to do our second one. So doing the same thing we're going to make a 4-inch loop, that's flinches, and then we want the top of this loop to go under the bottom of this loop. So you can do about an inch or so underneath so take your pin and make sure this is flat against the one and a half inch ribbon and in the center and pin this down as well like that and then we're going to do the same thing. All the way down to the bottom and I'll show you what to do when you get to the very end when you get to the end. So I've made my last loops and when you get to the end, just cut the printed ribbon flush with the one and a half inch ribbon and then make sure to seal your ends and now we're ready to sew the loops down all right. So we're going to take our first loop right here and we're going to stitch it so starting just right at the top right before the printed ribbon. We'Re going to put our needle in you so I'll show you the second one. So just go ahead and do this going all the way down when we get to the end line it up to be centered and then we're going to fold it over all right. You can fold it once or twice. I'M just gon na do the same thing and that finishes the bottom of it cut out a piece of your printed ribbon to four and a half inches and then have your d-ring ready as well. So we're going to thread the printed ribbon through and then we're just going to sew it to the back so I'll, just line it up with the printed ribbon and then I'm doing the same thing. We'Re just going to sew it on, and you can use a one and a half inch ribbon here as well. You can also use round rings, or you can even just leave the loop just like that, these beautiful flowers we carry right here at the ribbon, retreat com. They come with a back like this, and we want to make them have a know back and have it all be together in a flat surface and so to do that check our video description for a tutorial on how to do that. So once you've done that and you have that that flat back we're just going to hot glue it right on to our folder. So what I like to do is put the hot glue onto the holder first and then just place the flour on, and that finishes the headband folder. So cut your printed ribbon to 36 inches on your one and a half inch ribbon to 36 inches, and I'm going to show you a different way to do the d-ring so placing your ribbons right on top of each other, we're going to put on the d-ring. So take the ribbon, I'm going to pull it down quite a bit, so we can get it under the needle. I would say about 3/4 of an inch or so and then slide it under and we're going to sew all the way across, and that is a different way to do the d-ring. You can see there and this will be covered by the flower, and now this part is really based on what your preferences we're going to sew on the ribbon and certain increments. And this is so. You can slide your bow on and if it's a heavier bow, it might slide, but the sewing it will we'll stop it and so, depending on how many you want to put on there, we're going to do probably about every three inches or so so. Taking my ruler just come to about three inches and we're just going to sew right on the printed ribbon and not across the blue ribbon, and because you can see this thread, it's really important that it coordinates like you're not going to want to use a green Or yellow on this, the white works. Fine, though so go ahead and sew all the way down every three inches or, however many you want, and that will create our hair bowl holder. You, you

Comments
Sandy: This is really nice (both of them) thank you for giving measurements and not rambling! Can't wait to make them both!
Luci Soares Gonçalves: Amei ainda vou ter uma maquina pra fazer assim e enquanto não chegar vou a mão mesmo e vai ficar belo. Obrigada
Rebecca Pinckney: Excellent instructions! Great video.
Vandana Malhotra: Great Effort young lady