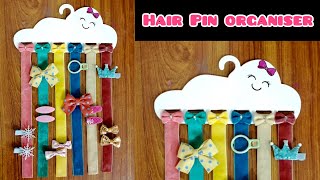
Diy Hair Pin Accessory Holder
- Posted on 11 June, 2014
- Hair Accessories
- By Anonymous
If you're like me and lose/misplace your bobby pins/hair clips all the time, I swear this is a lifesaver! #reallifeprobs
BTW, if you plan on making this to hold metal hairclips or hairbows make sure to use a magnet sheet with strong magnet strength.
Materials:
→ Shadow Box
→ Magnet Paper/Sheet (You can also use magnet strips)
→ Multi-purpose paint
→ Mod Podge/Glue
→ Scissors
Instructions:
1. Remove any stickers from shadow box
2. Paint your shadow box with the color of your choice
3. Let dry and apply a second coat
4. (Optional) Apply a coat of Mod Podge for a glossy finish
5. Measure and cut your magnet sheet/paper to fit inside of shadow box
6. Apply a thin layer of Mod Podge/glue to the back of your magnet sheet
7. Place magnet sheet inside of shadow box and allow time to dry
Then you're done! Enjoy being able to find bobby pins and not having to constantly buy new ones! :)
Lets be friends!
INSTA || @500daysofmarina
TUMBLR || http://marhino.tumblr.com
Buy my high waisted shorts! :
http://etsy.com/shop/awfullyfawned
♥
Hey guys today we're going to be making a diy hairpin accessory holder. Why am i doing this if you're anything like me, i'm constantly losing bobby pins? I take them out of my hair, throw them on the floor. Leave them in my bed. Leave them in my mom's car, whatever it is, i have them everywhere and i'm constantly losing bobby pins by the second, it's a hassle to have to go to the store and constantly be re-buying hair pins. When i can just make something, that'll help organize and leave. My body pins accessible for me anywhere, so i thought this would be a perfect diy to share with you guys to keep everything organized and it's cute in your room. So that's a plus! So, let's get right into the video supplies you're going to need for this diy are a shadow box, magnet paper scissors paint, brushes paint of your choice and mod podge or any other type of glue. The first thing you're going to do is remove any stickers from your shadow box, once you've removed as much of the sticky residue as possible. It'S time to paint. If you are using a shadow box like mine, you don't have to paint the back of the shadow box because you're going to be placing the magnet sheet onto the back, which is going to cover this uncolored space. I also didn't color the back of the shadow box because you're not going to see it once you hang it on the wall, for a more vivid color, make sure to let your paint dry and follow up with another coat. This step is optional, but i am now going to apply a thin coat of the mod podge over the shadow box. To add a glossy finish after your shadow box has completed drying. The next step is to cut your magnet paper to fit the inside of the shadow box. You'Ll just take out a magnet sheet from the package. If the magnet sheet is a little bit too big, then the inside of the shadow box you'll just measure out like i did here on where you need to cut once you finish: cutting your magnet sheet to fit the inside of your shadow box, you're, going to Put a thin layer of modge podge on the back of the magnet to adhere to the inside of the shadow box once you finish, gluing the magnet sheet to the inside of the shadow box. This is what it should look like. I hope you enjoyed this diy. I hope you guys make these at home and help you guys keep track of your hair accessories and bobby pins so that you don't lose them like me. I hope you guys have a wonderful day i'll see you guys next time, bye,
Comments
Tsola Amanda: Love it
ArtisticPainter2364: So cute!!! And I definitely loved this day!!!!☺☺☺☺☺☺☺
Ayesha Angel: Hey... From where did u got that magnet paper/sheet?
Rebecca Ortiz-Calderon: Marina! You are so pretty, I love your smile.
Beauty Care: Waw......
Cadence Vogt: Can you please start a storytime
ArtisticPainter2364: Diy***