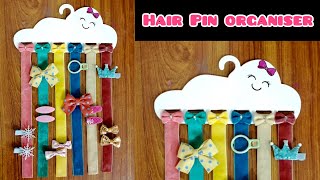
Diy: Easy Frame Hair Bow Holder
- Posted on 24 June, 2016
- Hair Accessories
- By Anonymous
DIY: EASY Frame Hair Bow Holder
Hey Guys!
Check out this super easy DIY hair bow holder! If you decide to make one, please comment pictures of your finished product down below or send them on Instagram to just_callme_d
Also if you'd like to check out some of the bows that I've made follow me on Instagram at BusyBee_Bowtique
-Thanks for watching and don't forget to like and subscribe.
Products in video:
Spray paint is from Walmart, color Seaside Gloss
Frame is from Family Dollar
----------Follow me-----------
Instagram: just_callme_d
Instagram: BusyBee_Bowtique
Hey guys, thanks for watching busy with D today, I'll be showing you how to make this super cute super easy DIY, hair, bow holder using an old frame, and I actually decided to make this because I make hair bows and I make all my daughter's hair bows And they were starting to collect a lot and I really didn't have a place to put them. So I thought this would be perfect. The first thing that you do is you choose a frame. You can use an old frame that you don't want to hang anymore or you can even go to maybe the dollar store and get a frame, and I chose this frame because of the nice detailing that it has around the edges. What you'll need to do is you can turn the frame over unscrew the latches of the frame, if it has any and then peel off the backing peel off the paper, take out the picture and then take out the glass if it has any glass in it. Now this next part you can actually skip if the frame that you chose is already the color that you'd like, but I decided to spray-paint my friends because I don't want to need to match the color of their bathroom. So if you decide to do this, the first thing you need to do is wipe the frame down, make sure doesn't have any dirt fingerprints, smudges or anything like that, and then dry it off, because you don't want to paint over a wet free and the color That I chose is called seaside and I can leave the detail gotten to you description box below here, I'm just bringing the frame making sure to cover it completely. I just want to make sure that it's evenly coated and I don't have any brown left on there. You know just making sure that it's covered in the color that I chose and also the color that I picked has a gloss finish and that turned out really nicely. Next, I'm just going over the frame showing you the the final product, kinda sort of, and what you need to do is just let your friend dry for about three to four hours. It actually depends on how big the frame is. I let mine dry for about three hours and this next step. You should actually do before you paint the frame, but I forgot so I'm just going to measure the inside of the frame just so I can know how long to make the ribbon, and do you see this little intention. That is where the picture of the frame set, that is where you want to measure, absolutely do not measure the frame from top to bottom, because if you will your ribbon on the top of the frame all the way to the bottom, once you hang it, you Won'T have any room to click on your hair bows. There won't be a space between your frame and the wall so just measure the inside. You can use measuring tape or you can actually just grab a piece of ribbon measure all the way down to the bottom and make a fold, and then you can cut the ribbon right there and that's a lot easier. Now. The white ribbon is 7/8 sandwich and the pink ribbon is 3/8 and I chose to double up the ribbon just to make sure that the hair bows don't slide off. You already have the white ribbon cut, I'm just showing you how I cut the pink ribbon just place, one piece of we're going on top of the other and then cut where you know your sample ribbon ends that way you don't have to keep using a ruler Or anything like that over and over again and once you've cut the ribbon, make sure to burn the ends of the ribbon with a lighter, and this is just to make sure that the ribbon doesn't break while it's hanging on the wall and make it. You know you may have this frame for a very long time, so you don't want it to break going to last for a long time now, the next step of how I double up the ribbon, how I glue one piece onto the other is actually pretty simple. I'M going to show you two ways that I decided to do it do it, but I prefer the second way, because it's a lot easier and a lot less, you know work. You can absolutely you know, choose any way you want. This is your DIY. The first way, I'm just placing a dab of glue in the center of the larger piece of ribbon and then I'm placing the smaller piece on top of the glue and pressing it firmly just to make sure that it sticks. And then I'm going to place on the entire piece of pink ribbon, which is my smaller piece of ribbon and then press the ribbon down unto the white ribbon. The reason why I didn't really like this way is because I found that the glue dried before I could stick it down to these white piece of ribbon, which you know, causes more work. I have to go back and regroup, so the second method is definitely better. One that I prefer, but either way you want to make sure that once this glue, you press the ribbon down firmly just to make sure that it's completely glued together and it dries that way that way, it won't pillow and that's how it should look now in The second way, you can just add about two inches of glue onto the larger piece of ribbon and place the smaller piece of ribbon on top of the glue press it down, and then repeat that, so you just glue press down and then fold up the ribbon Glue and press down until you glue it all the way to the end of the ribbon and that's how it should look, and I did eight of these - I really didn't need to do that. Many I didn't use them all, but I just wanted to be sure that I had enough. The next step is where you're going to place the ribbon onto the frame, and this way on this stuff, you can actually do it any way that you'd, like it just depends on the size, hair bow that you have, or if you just want to space the Ribbon evenly apart, it's whatever you'd like to do. I actually put some of my ribbon close together and then other pieces further apart, because I have a three year old and I have a seven year old and my seven year old has really big bows. My three year old has smaller bows, so the ribbon is spaced further apart it's for my seven year old and then the one that's closer together is for my three year old. So you can just really do it any way that you like I'm just marking here where I like to place my ribbon and then I'm gluing it down and that's basically it. You know you have a really quick and easy DIY and a storage place for your girls, hair bows or whatever you like to clip onto there. The next step. You just add your hair bows and that's about it. So thanks for watching this video, don't forgive me. Don'T hurt, don't forget to give it a thumbs up and also subscribe thanks for watching busy with D and I'll see you guys next time.
Comments
Sara Proulx: This is exactly what I was looking for! Thank you so much for the great tutorial!
Our Blended Life: That looks so beautiful and easy thanks!!!
debbo: This is So Cute! im asking my mom to buy me a frame !! <3
Erica Jimenez: Thank you. Really nice & cute!
Sugar & Spice: I looooooove this!! Thank you!!
melissa rolfe: I can't wait to try this
Rachel louise Barley: this is great i really need this because i have lots of jojo bows there great we want some more ideas about bows plz busy with d
mayfl0w3r: Thank you for sharing!! :)
Syann Curley: I have over 150 jojo bows and wanna hang all them so may find a big one lol
colormeoopsie: how did you hang it to the wall
Flaka ochoa: Nice gd idea n really pretty gd job gril
Kim B.: very cute idea
FallenDawn855: thx