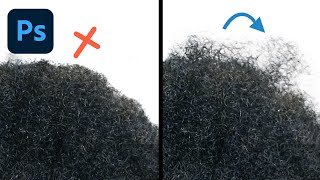
Grow Hair On A Bald Head With Photoshop!
- Posted on 07 January, 2022
- 6D Hair Extensions
- By Anonymous
One hair growth product, that will undoubtedly work 1000% of the time, is yours truly, Photoshop! In this lesson, we will learn the most realistic way to add hair using the fundamental principles of compositing. From understanding how lights and shadows play a major role in making the new hair look realistic, to advanced masking and matching techniques, we will cover it all.
We will also learn how to use professional hair brushes to add more realism and create the most precise masks. I hope you enjoy this video. Thank you so much for watching :)
► Support the Channel & Gain Premium Access: https://www.patreon.com/piximperfect
► Watch for Free - The First 3 Classes of My Ultimate Online Photoshop Course:
► Timestamps:
00:00 80% Of the Work
00:24 Copy & Paste
01:15 Remove the Edges
01:31 Hair Tuck-ins!
02:06 Matching
03:10 Refine the Mask
03:41 Using a Hair Brush
04:50 Conclusion & Summary
► Recommended Software & Gear:
✅ My Graphic Tablet: https://pix.live/wacom
✅ Recommended Budget Tablet: https://pix.live/wacomlite
✅ Try Photoshop for Free: https://pix.live/photoshop
✅ Artificial Intelligence Photo Editor: https://pix.live/luminarai
✅ Unlimited Photoshop Actions, Plugins, and Stock Photos: https://pix.live/envato
✅ Best 300+ High-Quality 50MP Skies for Sky Replacement: https://pix.live/skykit
✅ Primary Microphone: https://pix.live/mic1
✅ Second Microphone: https://pix.live/mic2
✅ Audio Interface: https://pix.live/audiointerface
✅ Filmed with: https://pix.live/camera
✅ Lens: https://pix.live/lens
✅ Music: https://pix.live/music
✅ The App I Use for YouTube Growth: https://pix.live/ytapp
► PiXimperfect Merch Store:
https://teespring.com/stores/piximperf...
► PiXimperfect Actions:
https://gumroad.com/piximperfect
► Recommended Videos:
1. Cut Out Hair from Extremely Busy Background! - Photoshop Tutorial: https://youtu.be/42JXjWZ5fII
2. Precisely Cut Out Hair Using Color Range in Photoshop!: https://youtu.be/8nk1KkLn3CM
3. The BEST Way to Select Hair in Photoshop!: https://youtu.be/T2D8EIh9Gus
4. Cut Out Dark Hair from Dark Background in Photoshop!: https://youtu.be/G030sJcK9oA
► Downloads:
1. Sample Image: https://bit.ly/3F2zfCz
2. Hair Brushes: https://pix.live/pixhairbrush2021
3. Finished PSD: https://bit.ly/3G66mXw (Only for our Patreon Family)
► Share: https://goo.gl/IUhnUl
► Let's Connect:
Instagram: https://www.instagram.com/piximperfect...
Facebook: http://facebook.com/piximperfect
Twitter: https://twitter.com/piximperfect
Today we are going to learn how to add hair in photoshop and trust. Me 80 of the work is done if we find the right candidate or, in other words, finding the right match for a transplant, as you can see in this case, the light is coming from the right hand, side and it's a natural soft line. Similarly, i found the candidate for transplant, have a look at it. There'S soft natural light and the light is coming from left. It doesn't matter. We can always flip it so, with the help of the lasso tool, just make a selection of the hair and a little bit of the surrounding areas, press, ctrl or command c. And let's get back to our subject and press. You already know this ctrl r command v now before we do any adjustments. Let'S not forget press ctrl or command d right click on it and then let's flip it horizontally, because we need to match the light right now, let's match in the jawline from here and then you can move the anchor point right there and one quick trick here Is that you can hold the alt key or the option key and click to move the anchor point right there, and then you can rotate from that point and he can also make things larger or smaller from that point by holding the alt key or the option. Key and then making it larger or smaller, so i'm just going to rotate it a little bit more and now this part is matching, so we can move the anchor point right there and control it from there. I think this looks perfect, hit, enter or return and then create a mask by clicking on the mask button right over there take the brush with black as the foreground color make sure you have selected a soft round brush just erase the extras in the mask. So remember black heights and white shows now. I know what you're thinking that part of the hair just looks a little crazy, so, let's simply tuck it in and to tuck it in just simply select the layer and then go to filter liquify with the forward warp tool shortcut w, just nudge it slowly and Gradually inside once, it's all nicely tucked in hit okay, i know, there's a gap right in here, not a big problem. Let'S just zoom in take the brush white as the foreground color this time make sure the mask is selected and just paint in these areas now erase the extras with black. Now, if any of the hairline areas look as if they have been masked, no problem just fine tune, it now comes the matching part, have a look at the hair. It is a little bit greenish and not that red. If you look at the original skin tone right over there, the skin tone of the subject is a little more pinkish than that of the new hair guys. So we need to remove the greens and add a little bit of reds so hold the shift. Key click on the mask to turn it back on and now let's create one of our favorite adjustment layers. You guessed it right curves. We definitely do want to limit the curves just to the hair, so click on this button that way they will be limited. Let'S reset it first of all: let's go to the red channel by clicking on the drop down right there and choosing red and just take it up with the help of the hand right there, you can just click and drag it up. That looks about right and also it's too much green, so we're gon na go to the green channel and just click and drag it down slightly and also, if you wish to add a little more yellowish tint to it. Let'S go to the blue channel blue is the opposite of yellow click and drag it down very slightly. Let'S take a look at the before and after here's the before, and here is the after. The hair is warm and nice and goes with the entire ambient lighting and color now. Finally, it's time for us to do the hard work, and that is going back to the mask, taking the brush black as the foreground color and just remove the extras of the background. Now you can use any of the hair selection techniques here you can use just the brush, you can use blend modes, it's all up to you and it all depends upon the situations. There are lots of videos on hair selections linked up in the description in this case, i'm just gon na erase the extras and maybe paint some hair back in with the hair brush. I brought back a little of the original background on the left hand side because it was matching with the current background now for the right hand, side, let's take a hair brush by the way you can download these hair brushes, using the link in the description and Just open up pics, imperfect, hair brushes and let's go with any one of these. I'M going with the intense simply take white, adjust the brush size and just paint back in a few hair. Now keep in mind these hair brushes only work well with a pressure. Sensitive graphic tablet, if you're using a mouse, do watch this video on how to customize your own hair brush. Now these hair masks that we created are very fine and have so much details, but there's a shadow depth of field, so we need to blur it so select the blur tool it should be in the smudge sharpen blur group strength about 20 is fine and just Start painting over these areas as a little blur makes it more realistic on top of it. If you want, you can take a single hair brush and create a layer at the top and then just take a sample and start painting single hair strands to make it even more realistic and there you go my friend the hair transplant is simply done. So that's how to add hair in photoshop. I hope this video helped you and if it did make sure to give us a like and also don't forget, to subscribe and not just subscribe ring the bell so that you, my friend, don't miss any other feature. Tips tricks or tutorials. Thank you. So much for watching i'll, see you in my next one till then stay tuned and make sure that you keep creating

Comments
PiXimperfect: ► Link to the reference hair image: https://bit.ly/3397mvm
Senor Sol: Unmesh, your tutorials are some of the best out there by far! You explain everything so clearly and concisely, you never go too fast and you take nothing for granted, even for a novice like me!! Glyn Dewis was right when he said you were killing it! Keep up the excellent work!
Scott Baker: That is stunning work, and I never would have guessed you could do it in 5 minutes. I know, it may take time to find the candidate images, but the blending together is incredibly impressive!
CREEPY: directly to the point, nice and easy, thanks for the amazing tutorial!
Aivaras Šatikas: It would be really amazing to see how you restore old photos and bring them back to life using anything that could help (AI, apps, photoshop plugins). With your photoshop skills you should be able to do it like no other. I practice restoring old photo's about half year and I would really like to see how you are doing that
Andres Valdevit: Big fan of your channel keep up to great work. I did a couple of courses on graphic disigning for work but I concentrated mostly on vector images for commercial and industrial purposes, so even if I studied extensively Photoshop I didn't work on it that often and tend to forget a ton of stuff. You channel is great to keep up with new features and remembering old concepts. At the moment I'm working on personal project, scanning and restoring a massive lot of old photos of my family going back to the beginning of the 20th century, gives me the chills! I already know the basis to restoring old photos but I'd like to know your tips and tricks that I may not know on the subject, especially if you know any way to automate basic restoration functions like adjusting tilt, dirt removal, sharpen image and color adjustment to apply on all photos at once since I have more than a 1k photos to work on individually. I'd really aprociate it, thanks.
Ojaswi Verma: Hey Unmesh, it's been 2 months since I have subscribed to your channel. I am binge watching all your videos. Still many are left and now that I have been studying Photoshop, your videos makes much more sense now. There are many videos which I have rewatched several times and no matter how many time i rewatch them, I always learn something new. Your "Keep Creating" line keeps me motivated and your videos just bring knowledge and happiness. You enjoy making these videos and it seems that teaching is what makes you happy. And probably that is why it makes the viewers happy. You definitely have the talent to teach, which you once mentioned. Okay now enough with the buttering... I don't know if it's a good time to make a request, or you even take video requests, but if you do, can you make more videos on Manipulation or Matte Painting.
GKOALA7: Thank you so much for this tutorial! I wish I could give you 10 or 1K Likes or more! I've been looking how to do this and asking various Photoshop gurus like you or Nemanja Seculic. You guys are awesome and you both come through for your viewers.
LIZARD1582 ➊: Even when I know how to do this stuff already, I still find some great tips I hadn't known yet through watching your own method.
Elliot Marks: Don't know how this looks so easy. Could have sworn I have done this before and it was a lot harder! If only all my school teachers were that good...
Lincoln2030: Muito bom!
Ian C: Another awesome tutorial thank you!
Sampson S. Garyezon: Pixi makes everything easy and simple in Photoshop. I like how you illustrate this lesson. Thanks to my Consultant Piximperfect
Tawa Mugabe: You are really being helpful I really do appreciate your work
Joan Carulla: You’re the best with Photoshop tutorials! Amazing! And Thanks!
Ekram: Fan of your tutorials. You are the best mentor ❣️
Taufiq Abbas: thanks a lot Unmesh, youre my number one Guru in photoshop. Loved your videos!!
chirag khandelwal: Amazing video!!! I learnt all of the photoshop from you, Thanks a lot
Meu PC Novo: Nice, fast and easy!
Exzo Bree: I wish my hair magically grows like this in real life.
Praveen UPwala: you're the one of the best photo editor. love you bro ❤️❤️❤️
مرتضى صبري: amazing work well done
Gil Aroma: Amazing tutorial !!! WOW
MAGO Gráfico: what about the pixelation when you scale up the hair part? I would instead, reduce the bald guy photo, and maybe fill with background
RhomZone: Wow, You did a great Job. You deserve more views.
notes anom: Awesome tutorial brad, keep happy :)
nandapunyayoutube YT: I would like a tutorial of blending photos with celebrities. It would be sick!
Graphic Zone: Love it ❤️❤️❤️
TheMotivation: You are virtual hair transplant doctor
Steven Muncy: Wow, did I need this! Thanks.
Kostas almas: absolutaly awesome sir. thank you !! what about removing hair? like how you turn someone completely bold ?
Rakibul Hasan: Really amazing.
Steven not found: I learnt new things here!!! amazing video
safeer khan: Very Nice bro You Doing very well and Easy to understand
Ameer Ali: Amazing!
Stacey Schwark: How did you get liquify to show both layers? I can only get it to show the current layer which makes it difficult.
UncleZ gameplays: Can you make a tutorial on how to make realistic sun glasses?
Otsutsuki Boruto: Hello Sir , it would be much appreciated if you could make a tutorial on how to add teeth to an image
niha george: Hi! Sir which photoshop version you are using? Is it photoshop cc2021?
Alex Kurnia: perfect... absolutely perfect
Cereal_Qilla: How do I collapse all my FX details expanded in the layer at once time instead of double clicking the little ^ on each layer?!!?
Rocky Playz: Finally sir you made this video i was so confused on this type of editing
Viktor144: Насколько чувак доступно объясняет, что я не зная английского отлично всё понимаю.
MD Rasel: very helpful
ankushjoy: Nice and a useful video sir thanks
Serigne Mouhamadane Diop: Hi Unmesh could you do a tutorial on fixing wigs frontal lace please?
ikhlas_.x: This feels illegal to watch also the editing is great!
asksharma photos: Good Job Not only hair Transfer done in ear also ,
Nevzat ŞANLI: after i watched unmesh this is the before: and this is the after:
Jayanth G: Wow, u are the BEST! Also, can you please let me what do you use instead of mouse, you use some pen right? Can I know which brand is it? And also the pad? Thank you
Anand Jobanputra: I needed this!
FiSH Pale Ryder: The magician! Well done.
Chaer Vang: here I am agonizing over how to draw real hair on photoshop, I forget that in photoshop you can simply cut and paste!
trending videos: Soo perfect .... I am fan now .
Defocus: i wish it worked this way in real life
Jobayer Rahaman: you are really great man
SIGNIX.: 고맙습니다 선생님.
sumair afghan: HI SIR I AM FROM AFGHANISTAN I AM NOT KNOWN ENGLISH BEFORE YOUR VIDEOS NOW I UNDERSTAND ENGLISH VERY WELL THANK YOU SIR❣❣❣
Madani: I like it
Pea Shooter: Wowza this is a very good tip Thanks man! Now imma give the Rock some hairdo xd
NNNedlog: Epic tutorial
Coffee Scribe: LOVE THIS!!! ☝️☝️☝️
punkgate: whats the best drawing tablet, which is also quite affordable?
Александр Шабанов: perfect Tutorial xD love u Unmesh!
Nang-oo Sari: Can u give the specifications of your computer?
stockerman77: As a baldie I wish I could do this in real life
Dip Dey: Wow
sumair afghan: so nice sir ❣❣❣
Naeem Kabbo: Hair transplant without costing money wow ..
Mr.Crafter: Any questions you have for photoshop this guy has the answers.
U A: Amazing
S3lk Aleksander: Great video Unmesh.
Photo Restoration - Duoc Vang: Amazing Hair Photoshop
Philord Rubis: This guy is the creator of Photoshop
kittu visal: Bro I have a issue that how to change the layout means all element change to 1080x1920 to 1920x1080 in Photoshop is there is a any easy way to do it
James Ernest Vargas: can you travel here from Philippines Unmesh? people need you here to teach us more about Photoshop!
M: Now we do not need to pay doctors thousands of dollars for hair transplants. We have piximperfect
Aman Kothari:
チューリ: hi, can you do a tutorial about how to add clothes in photoshop?
Ở Nhà Vẫn Vui: Hay quá ^^
Fahad khaleel: Good
Sky Studio: You are the best mentor
M Shamsuzzoha: Where to find the hairbrush? Can you please send the link of the brushes you have used?
amritverse: This is super amazing trick man hats off, but what if I don’t want to change the original ear how to tackle with that ¿?
KJT: It actually IS a real "hairbrush" ! hahaha
Vivek Singh:
Stan95: killing it bam !!!
Raag Darbar: Thanks so much
Olender: Magic!
Ajins: How can download your sample images
Zamieyoshi: Now imagine the model of this photo watches this
UA TECHY GRAPHICS: The Hardest Thing A YouTuber Can Feel Is When You Wake Up And Nothing Has Change Your Channel
Basir Editz: Trick ❤️
Princess Sara: Best channel ever
Rehan Arain: Super teacher
gpm bh: Please make photo editing video. ❤️❤️❣️❣️
Dubai Life: Umeish u are awesome
Harsh Galve: ❤❤❤❤❤
Sharman Satyakumar: thanks sir
SSGaming: You won't believe, I got a hair gain formula ad in this video. Really