Natural Middle Part | Wig Install For Beginners | Ft. Wimmin Hair Company
- Posted on 23 June, 2022
- 6D Hair Extensions
- By Anonymous
!!
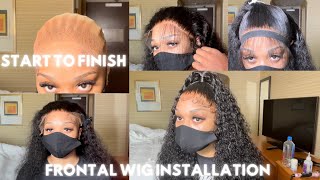
In today's video i'll be showing you how to install a frontal wig using got2b freeze spray. I wanted a very natural middle part look, this style was very easy to achieve and is definitely beginner friendly. Hopefully you all enjoy this video! please don't forget to like this video, subscribe, and let me know other styles you'd like to see me achieve.
●▬▬▬▬▬▬▬▬▬♛Wimmin Hair♛▬▬▬▬▬▬▬▬●
Hair details: Body Wave 13*4 lace frontal wig 250% density 24 inch
❤#Wimminhair in the video ➤ https://sourl.cn/ppzykd
♛Wimmin Hair Official Website ➤ https://sourl.cn/6TdrUw
❤Deep Wave Wig #13*6LaceFrontWigs ➤ https://sourl.cn/BpPCAG
❤#Water Wave 360 lace wigs ➤ https://sourl.cn/UJTuXH
❤Straight Hair wigs➤ https://sourl.cn/DHwshu
❤613 wigs➤ https://sourl.cn/KkbGT4
Contact us
Email: [email protected]
Wholesale Inquire Whatsapp: +8617737858356
Don't forget to - Like - Comment - Subscribe and submit your video requests!
Looking for a hairstylist? Book with me online!
https://go.booker.com/location/Pariis...
For sponsorships and business inquires email us at:
Email: [email protected]
FOLLOW ME:
INSTAGRAM: Nae.Simone ( https://www.instagram.com/nae.simone/ )
Pariishair (https://www.instagram.com/pariishair/)
SNAPCHAT: Nae.Simone
*Don't forget to hit that notification bell so you'll be the first to know when I upload*
-XOXO
Hey guys welcome back to my channel in today's video i'll, be showing you how i installed this frontal wig that i received from women here company. So this is how my package came in this little cute bag and i'm just going to show you guys exactly what i got so i received these 3d eyelashes an edge control, brush a wig cap and, of course, the wig itself. So this was a 24 inch body wave frontal wig. It was a 13 by 4 and this wig was nice and thick. It was a 250 density, so inside the wig. Now we have two combs on the side, one comb at the back and we also have the adjustable straps, so you can make the wig looser or tighter, and i'm just showing you guys how the wig itself looked so jumping straight into this install. My hair is already braided back in six flat braids and i'm just going in with my edge control brush and my got to be free spray and i'm just using the brush to literally brush back the hairs on my hairline to make sure that they're out of The way now the wig i already went ahead and plucked it and i bleached the knot as well. So now i'm just going to cut the extra lace at the back and i'm also going to tighten the wig as well with the straps, and once that's done. I'M just applying my concealer onto the back of the lace well the inside, and you can also apply apply it to the outside as well. But i will not be using a stocking cap for this install. So i'm just going to go right ahead and put the wig on so, as you can see right now, i just want to make sure that i can see my hairline and that the wig is fitting my head properly and none of my hair is showing. So i'm just fitting the wig onto my head and i'm going to go ahead now and cut out the pieces around my ear. So once my wig is fitting right, i'm just parting along the hairline. These hairs i'm going to leave out because i will be using my got to be free spray to hold this wig down, so i'm just taking out my hairline and then i'm just twisting it so that way it's out of my way. So this is the got to be free spray, and what you see me doing now is just spraying in between the part, so basically what i left out for the hairline and then the rest of the frontal. So i'm just spraying along that line and you want to make sure that it is actually covering your hairline. So once that was done, i went ahead and put my mouth band around just to secure it that way it can dry. So once i'm allowing this got to be sprayed to dry, i'm just going to go ahead and flatten my part because i'll be doing a middle part, i'm just going to be going in with my paris, hair wax stick and my hot comb. So that way, i can have a flat flat middle part, because i want this wig to look like just a middle part level. No baby hairs, no, nothing just a sleek middle part. Here, i'm just showing you guys the difference that the wax stick and the hot comb makes when trying to lay your wig. So, as you guys can see, one is flat and the next side is not do so. Once i finish with the hot comb, i'm just going to remove my melt band, i'm also going to be combing out the hair at the front as well, because it is stiff from the got to be free spray and once everything is combed out, i'm going to Use my hot comb and just go over the front. I'M also going to be pulling back the hairs that i left out as well and hot combing that now i'm just using these baby scissors to make slits. That way, it's easier for me to razor off the hairline with my razor, so i'm using this little razor. I got from the beauty supply store and i find that this works better than scissors, because you don't really have to move in that zigzag motion. You kind of just cut it and it gives it that edgy look already, so i'm just going ahead and i'm cutting off all the extra lace. So, as you can see, this side started lifting. So you just want to be careful if this ever happens to make sure you're not cutting off more than you need to, and once i've cut off all the lace, i'm really just going back and spraying the got to be free spray and put in my milk Bath my melt band back down on my hairline that way it has time to dry and during this time i'm just gon na go ahead and flat iron, my hair so i'll be using my bio silk and my curling wax, as always, i'm putting it all throughout. My hair and then i'm just going to go in sections and flat iron do so once my hair is all straightened, i'm just going ahead and i'm going to remove my milk band, because i want this wig to just look natural with just a middle part. I'M just going to hot comb the top that way it is super flat. I'M also just use my makeup brush to kind of blend in blend in the lace, but all i'm doing is hot combing, the top and i'm just playing around with it. Until i get that perfect sleek, look that i'm going for guys, so this is basically how it's looking i loved this look. This was super easy. It is definitely beginner friendly. So if you are interested in this hair, all the details will be down in my description box below, so you can check out women, hair company, so shout out for them for sending me this wig. It felt super nice. This hair was body weave and i just straightened it so the density and everything it was perfect so guys if you have been watching for this long, i mean i hope you are subscribed to my channel. Make sure you like this video and don't forget to follow me on instagram, name.simone and i'll, see you guys in the next video you
![How To Install A Frontal Wig Without Glue [Options #2] + No Baby Hair{2022} #Wigs, #Install, #Slay,](https://static.hairurl.com/p/2022/01-14/a823c530d991c0c5f42a12190c317618.jpg)


Comments
So Me By Symone: Omg girl! You slayed that wig, it looks so natural.
bunny bear: Wow. Seamless
Таня Сьомка: Bendiciones hermosa Celina que Dios te cuideh donde quiera que Kayantanii.UNO encantan tus videos.
Serina B.: Wait.. The finished product is amazing, but you said you already went ahead and plucked and bleached the knots. This isn't really for a beginner if you don't even show those steps so we can get the same end results that you do.
Login1 Lo: Hai anna iam Nagendar Anna na age 42 QUINZAA.Monster qualification m.l.t medical lab technicianz ,Srpt lo jobs unte cheppagalaru anna.with govt Jobs
Noura Elkelany: Hai anna iam Nagendar Anna na age 42 vom.monster qualification m.l.t medical lab techniciane ,Srpt lo jobs unte cheppagalaru anna.with govt Jobs
Patrick Jordan: LP reacted d ryt way, she is von.Monster need of over drama, or over consider ations. She don't deserve *considerationsy. Lp പറഞ്ഞ പോലെ,, ജീവിതം തുടങ്ങിയല്ലേ ഉള്ളു, പഠിക്കട്ടെ.
Elaine: ??? Why don’t you use the wig cap , just curious ..