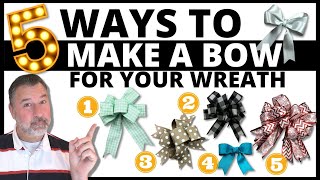
Episode 146: Softball Bow Using Hairbow Supplies Etc Tutorial
- Posted on 09 April, 2015
- 6D Hair Extensions
- By Anonymous
Check out how I used the fabulous Hairbow Supplies Etc "How to Make a Cheer Bow" tutorial to make and embellish bows for my daughter's softball team!
Hey everybody its Angela with Preta fire life, and I am going to show you how I'm making these cheer bows for my daughter's softball team. Now this original tutorial is not mine. I found a great tutorial on youtube by hair, bow supplies, etc called how to make a cheer bow. So the credit goes to them for showing me how to do this, but my followers wanted me to show it. So I'm going to show you how to do it, but again the original tutorial is credits, go to hair, bow supplies, etc. But I did a little something here that I'll also show you that wasn't on this tutorial. So let's get started now. There um tutorial called for 29 inches of ribbon now that makes a shorter bow, which is also very cute, but I wanted to have the streamers so that I could put some heat transfer glitter vinyl down here and to decorate it. So I went with a full yard of ribbon here: okay, so this. This is the difference this little bit, which is really cute, two versus a longer bow that you can decorate the streamers on 29 inches, 36 inches. Okay. So, first of all, I have the 36 inch ribbon cut. This is a 3 inch wide grow gained grosgrain groping, groping anyway, grosgrain ribbon. You know what I'm saying trying to say: um in the softball neon yellow. I had to order this off at Amazon. This color is hard to find come on. People come on, stores gets get with it with a softball um. So that's. The first thing is cut your your foot and then I have some satin ribbon in Navy. I was kind of annoyed because I made a special trip to jo-ann's, which is not necessarily close to my house, and I was getting the grosgrain 7/8 inch grosgrain ribbon to go in the middle get home and it's not Navy. It'S purple and I needed Navy. So I'm kind of annoyed with that, so I'm just going to work with the satin ribbon, but in the future I mean it works fine, but I think the grosgrain is better for this type of project. So what you do with this is measure out six inches, because this is going to be the center of your bow so and set that aside. Okay, so we have 36 inches for a long stream, ribeaux plus six inches for your Center okay. Now I think how did the hardest part of this is the first step and again I also defer to hair bows, hair, bow supplies, etc. This is how I learned, and so you want to criss cross your sides evenly and for this particular bow. I tried to get it where the top was about seven and a half: okay, seven and a half inches across. So that's about right now, you're going to want sip ties and I actually think uh visit Michaels, Michaels or Hobby Lobby, and I found these perfectly these neon, yellow ones and I'm like okay. Does it work good? So I mean you can give zip ties anywhere at Walmart whatever so zip tie have that handy now that you have this criss crossed evenly, then you just take the top in the bottom, the bottom point in the middle of the top and just start just squish. It together and try to keep the loops even okay, and I try to tuck the top part in behind the loops see. This is where it gets a little little hairy to keep that even so there we go and then take the zip tie, the hair, but the other tutorial kept the bow on the table which that works. It'S just. I seem to always pick up the bow and adjust it while I'm tightening the zip tie, okay, so while you're getting that on start fluffing it out and getting it like, you want it before you cinch down the zip tie completely and you're, actually working with the Back of the bow, I like that, pretty good see that's gon na be your front just a little bit and then just tighten it down. Okay, so you have your zip tie, tightened we're just going to snip that off really close okay, you'll just kind of flip. It over and fluff it I mean I wish I had done this years ago right because my girls are 13 and 10 and you know luckily they want to wear bows for sports, but I almost missed missed to the the window here, wasted a lot of money Buying bows, but you know when you have little ones you're, not us, you don't always have the time when they're little to craft right. Am i right, ladies okay? So I'm happy with that. I'M going to flip it back on the back and here come here is where the little piece of ribbon comes in you're, going to just knot it, and I don't pull it tight because you want you want that kind of that. Put that that bulk in the center, you want it to look a little bulky right there. Okay, so I don't! I don't pull it tight, tight, just tight enough to get my little knot. Okay, then you're going to take it and you're going to put it in the center. Like so and hope I jumped ahead of myself, but this is ready. Sorry um get your. Apparently these are called Pony oohs. I call them pony tails, but apparently in the Haribo world, they're called Pony oohs. So I bought these at like the drugstore and you're, going to dab a little glue in the center of the bow on the back side, make sure it's the back side and jam. Your pony, Oh in the glue and hold it there, while it dries for a few seconds. Okay, now that that's dry flip it over place our cute little knot right there and like the way, that's laying there and get that centered and then we're going to flip. It over and we're going to start wrapping it I'm going to put a dab of glue in the center over the pony, oh and wrap one side over it and hold it there, and I'm going to trim off some of this excess. I'M going to put another bead of hot glue and then wrap the other part. When I watch that tutorial, I was just like. I can't believe how easy this is. Why have I not been doing this, so I really appreciate their took that tutorial, so they have a website, hair, bow supplies, etc. Calm, I've checked it out. They'Ve got some cool stuff, I don't represent them, but I feel compelled to you know, give their website a shout out since I'm showing their tutorial. So once you go check it out and have some fun stuff. Okay, now now we got to do the streamers here. Do your typical dovetail fold it and then cut. I always seem to have one it's a little bit longer than the other, despite my trial, but that looks pretty good now and then for to seal it. You all know to do a lighter and stuff, but for some reason I like stressed out about this, because I've actually burned the bows. So I like panicked that I'm gon na do it too little or too much, and I realized it's just a quick swipe. Cuz. Just like, like that and see I burned it a little bit ticks me off so that annoys okay, now we're in the silhouette studio designer Edition and basically what I do is I have let me um. Let me start this in another page, okay, so, first of all, you need to adjust your width and uh. As far as this I have a nine by twelve piece of glitter heat transfer vinyl. So I go over here and click this tool, the page tool, and I go over here to the width and height and I adjust the width to nine and then twelve. So then you see that it's adjusted to my rainbow. This font right here is called Bernard, MT condensed, and so I wrote out sparklers and I'm going to just position it up here by the corner. Now, when you're doing heat transfer vinyl, it's very important to mirror it because it cuts from the back and then you keep you flip it over and iron it on. So you have to mirror it. I do the right click and then go down to here. To flip horizontally and it flipped it backwards now, a cool trick is that you can do copy, or you can do sorry highlight the object and do click object then hit replicate and then go down here to fill page and it fills the page automatically. I love that feature, that's awesome and then you can run it through your silhouette. Here you go to the cut menu and I pick silhouette. Fuzzy vinyl is what I pick and I know for this. I actually need a higher cut. I need. I need it to get the blade depths at seven. Okay, I have all of these cut out it's hard to see um, but here's here it is and cut out. So I am going to trim this out of the vinyl, so I can iron it on and then I'm just going to iron it on. Okay, let's go over to the iron okay. We have our bow down and we're just going to jazz up the tail with the team name called this sparklers again made out of glitter heat transfer vinyl, I like it there that's cute. I just have a little scrap piece of goes like a little bandana or something just fold it over it and we're going to apply this for about 45 seconds. It'S on the cotton setting just give that um word time to transfer over okay. I have ironed it on and let's just peel it right off boom. I just love that so fun, so I'm really excited about making these for the team. I think that'll be really cute in their hair, so again major props to hair bow supplies, etc. For this awesome tutorial - and I just like to jazz it up, I also did as you've seen on my instagram or facebook facebook page i've made one for my daughter where i put rhinestones softball in here. So that's that's a fun alternative as well! So um now I've only gotten 14 more to make that's what
Comments
Rylie Sanderson: I've been trying to find a good video for me to make volleyball bows... And I'm so glad I found this! Thanks!!
Sarah Z: Can't wait to make some of these I have young ones and have already spent way too much on bows!
Marisela Aguila: you can also use a flat iron at it hottest temp. or an iron at wool temp. they both work
Ruby Breckler: I love it!
Kristian Simmons: this is so helpful thanks
Samantha Brewer: can you do a tutorial on how you make the other bow that was in the video? the one without the tails please
Chloe Stark: where can you print the glitter venal?
Amparo Santos: Very interesting . During the video i was thinking the same . Jijiji
Pat Bootie: use a small mini bic lighter for smaller flame!!!!
HairbowSuppliesEtc: Thanks!
Nenev: I love softball
Dolores Huntoon: Same here exactly!
Red Der: Your title says softball ball.