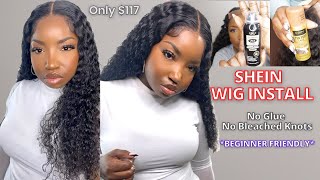
It'S Giving Natural Hair Vibes !! Shein Wig Kinky Straight #Shein #Sheinwig #Sheinwiginstall
- Posted on 13 March, 2022
- Clip-in Hair Extensions
- By Anonymous
HEY LOVES !!!! I'M BACK WITH ANOTHER SHEIN WIG INSTALL!!! IT'S GIVING NATURAL HAIR VIBES.
HAIR SPECS
TEXTURE : KINKY STRAIGHT
LENGTH : 24 INCHES
FRONTAL : 13X4
LACE : TRANSPARENT
HAIR LINK : https://us.shein.com/13-4-Lace-Front-S...
EMAIL : [email protected]
DON'T FORGET TO LIKE + SUBSCRIBE TO MY CHANNEL
CAMERA https://amzn.to/3tDxFEK
Hey loves, i'm back with another video. This wig is from sheen again. Yes, i put another sheen wig. This is a kinky straight wig. It looks very natural. It looks like my hair and i tried it with this little dutch braid. So if you guys like this, look, continue watching so this is a 13x4 frontal, kinky straight lace. Wig, look how it looks straight out the package. It looks like natural hair, okay, so here's the front, here's the lace and inside the cap. Now i did bleach and pluck the hairline. I blew out the hair. Now i'm gon na apply my powder, my morphe shade 11 powder all over inside the cap and we're just gon na measure and make sure everything's fit where it's supposed to be now don't come for me. I could not find my shears whatsoever, so i had to use these big scissors. Listen, we got ta, do what we got. Ta do okay! I could not find my shears for nothing, so we just had to work with what we had. Okay, i was feeling this hair. This hair definitely felt like a blowout with my natural hair. I just i really like this texture. It was really nice, but let's get into it. Using bold hold apply three coats until it dried clear and then now i'm adhering the wig. Now i'm using the back of my comb and really pushing the wig to the adhesive and making sure it really stays and sticks, so i'm just taking it pushing it pushing it. Yes, we got to make sure that it doesn't lift. There'S no ripples, there's no bumps. There'S no lumps i'm trying to get it as flat and seamless as possible. So now i'm going to put my elastic band and use cool heat for like five minutes to make sure it really lays. So now i'm using my t3 on cool and just making sure that it really adheres yeah. So you see it's melted now so now we're going to go through and cut and use the razor, the eyebrow razor to make sure that we have that jagged edge to make it as natural as possible. So i'm using my got to be spray and just spraying the edge to make sure it's really flat and then use my elastic band. I really want it to be secure, no lifting, and that is flat as possible. Yes, it's melted. Look at that. I am going to put a little bit of powder just to blend it a little bit more see. That'S what i get for doing my makeup. First, it's better! It'S always better! If you do it before, you apply your makeup, see now, i'm rubbing it, but it's better when you do it before you apply your makeup. So now i'm doing the baby hairs, i'm just tweezing and making sure i'm thinning out that section and then we're gon na cut, use a small flat iron and shape the baby hairs. So i've learned this combination. I use the got to be spray and the argan oil moves from cream of nature and i kind of mix the two to kind of swoop and lay my baby hairs. I feel like it's easier that way. For me, it's not as crunchy and hard, but then it also stays in place when i use this combination. So if anyone tried it before, let me know because i really like the two i'm starting to get used to the baby hairs and getting used to how to lay it better, so yeah so so i was contemplating if i should put it in a pony. I was thinking that would be a cute little style like the front and a pony and then the back out, but then i was like you know. I just want it to be natural, so i'm just gon na do a middle part and do a little braid. So i'm just gon na put the band over the baby hairs and just let that rest we're going to do a middle part to find the part and then i'm going to go into the braid. So i'm tweezing a little bit opening up the part. And then i'm gon na apply my powder afterwards. Now i'm attempting to do this braid, i am not the best braider, but i tried. I realized at the end of the video that one side was over and one side was under, so it made the part. Look uneven in the video, but i didn't even notice that while i was recording - but here i am attempting to do this girl see i took it out - i had to redo it again. It took a few tries hey so now, i'm about to flat iron. The back to make sure it's smooth and then connect the two with a little rubber band and then tie it together. This style came out very cute. I really liked it. This might be my new go-to everyday style. Now i'm just putting a little powder in the part but yeah this hair was so cute. It looks very natural, i'm just pulling to make sure that the ponytail is really tight and then combing it out. But let me change my clothes, real, quick and just show you the final look so yeah, it's very natural, very sleek. I did straighten it out and blow dry it out, but it gives a really natural relaxed look. So this is one of my sheen tutorials. If you like this click on this button right here, so you can see my other sheen wig tutorials, thanks for watching bye, you
Comments
proverbs31woman31: I like it because of the price, it definitely needs customizing you made it look beautiful
Taylor Nicole: Can the entire wig be curled?
Danni F: How did it hold up?
Amanda: update on the hair sis