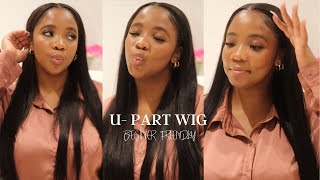
Silk Press In 10 Minutes! *Detailed* U-Part Wig Install + Customization | Beginner Friendly
- Posted on 24 January, 2023
- Clip-in Hair Extensions
- By Anonymous
Hair: 16-18” Straight U-Part Wig https://sheslaysfirst.com/products/str...
Thank y’all so much for watching! Feel free to comment any content/videos you guys want to see from me down below! And remember, God is love. Whoever lives in love lives in God, and God in them. His love endures forever.
————————————————————
Let’s get to 40,000 subs !
——————————————————
Business Inquiries
Subject: YOUTUBE
——————————————————
Keep up with me:
️SHOP “She Slays First” Hair: sheslaysfirst.com
IG- janiaaliyah https://www.instagram.com/janiaaaliyah...
Tiktok: janiaaliyah
My Podcast: https://shepraysfirstpodcast.buzzsprou...
My Amazon Storefront: https://www.amazon.com/shop/janiaaaliy...
‘Wig Money’ Ebook: https://payhip.com/b/nMmO1
———————————————————
Subscriber Count (at the time of filming): 35,779
——————————————————————
FAQ about me:
Name: Jania
Age: 21
Birthday: December
Camera: Sony Alpha A 7iii/ Sony ZV-1
Editing Software: Final Cut Pro
————————————————————-
What'S up beautiful people, it's your girl, Shania Leah and welcome, or welcome back to my channel now at this point in the game, y'all should kind of be used to me getting a hair looking to miss so just give me a pass because you already know what This video is about so with that being said, as y'all can see by the thumbnail and the title today, I'm going to gon na be walking y'all through my. U part wig, install process and give me your all the little juicy details that I feel like some people kind of like jump over when they do these videos that y'all need to know so before we go ahead and get into everything. Of course, I'm going to show y'all the way they're working with today, so the hair is from she slash first hair, which you can find all the details in my description box down below, and so this is the you part wig that we're going to be working With today - and this wig is the is a straight - you part wig in 14 - inches, because you know I, like my wigs straight and natural, I feel like the straight hair. I have like the shorter. The hair kind of gives me a more like natural look and I'm kind of in my short hair. Your face right now so come back to me about about 35 business days and I'll be wearing like 22 inches anyways. So before we go ahead and get into this install y'all, as you can see, I'm already wearing wig, but I just decided you know what it's about time. I give this one a break, because the reason I ride, for you part wigs so hard is due to the fact that I've had this wig on. For honestly, I've been wearing this wig itself for about a month. Now, obviously I have been taking it out to you know just take care of my hair. Do all that good stuff, but let me get this wig out and I'll be right back, okay, y'all! So I'm back as y'all can see. This is how the hair is. Looking now hear me out so, as you can see, I already just took up my u-part wig, which kind of makes this breakdown a little bit easier for me to explain to y'all, because I won't be doing it at the same time. So if you look here, this is literally my leave out and although it is a little sloppy right now, I try to kind of part out my weave out in at least like a U-shaped. So let me clean up the part okay, so there it is try to find my um leave out in a u-shape right here and then literally, I don't feel like doing a whole Braiding on my head. So I literally just do two anchor braids on the front which I'll explain later and then I put the rest of my hair and a little low bun right here, and sometimes I bobby pin a little wig cap just so that way. The wig doesn't like make my scalp itch or anything but other than that. That'S all I do now the key to having your u-part wig be able to stay on all day. Is these two braids right here in the front and I base my brain placement based off of where I like to wear my part and right now, I'm rocking you know side, part Vibes. So that's why I have one anchor braid right here and then another right here, but the thing you have to remember about this anchor braid and the u-part wig is that due to the clips it has you don't want to really cause too much tension on your Hair, so let me go ahead and show you all the clips. So these are the clips that come inside the wig and they have five Clips all around. That really gives you a nice little secure type thing. So: ain't, no ain't, no tugging ain't, no falling off! There'S no such thing, so what you want to do is when I do my braids I like to make the braid just as wide as the clip is and that kind of helps reduce like tension when you go through the clippings. As you can see, this braid is about as wide as this clip is right in front and also another thing I do when I'm bringing the braids is, so you don't have too much tension around your edges and on your perimeter. I comb all of this out before I put the braid in so as y'all can see, even though I'm wearing a side part, nobody can see this anyway, it's not included in my braid. So that way, when I'm wearing this long term, I'm not really applying long-term tension on hair that can't handle it and making your parts bigger will help that as well, because, as you can see, instead of it pulling just on like the edge, it has like more Hair back here to pull from as well so with that being said, without further Ado, let's go ahead and get into the install. So the easiest thing to do is once you have your leave I'll kind of separate. It is to go through you'll see when you receive your wig. They literally have these things on there, which I guess helps like facilitate like the making process. So you want to cut these up, and when you cut these off, you will see you'll be able to make your? U part as wide or as thin as you want it to be: okay, okay and so now that the little things are cut up, as you can see from here, it literally gets easy, and then it comes with the little adjustment straps in the back. So you can adjust them to make them as tiger as well as you want them to be. I like my wig to be nice and form fitting, so I adjust mine to where it's right under the back clip and so yeah. That'S how I like to do mine and literally the way I like to apply my wigs I like to do the back first, so I'm going to clip in this very back clip before I clip in any of the clips on the sides, and then this is Where I apply the first clip in the front, and so let me show y'all, because this is very important, how you apply the clip so how I like to apply the clip is when I braid, I don't start braiding right at the root, because if you start Braiding at the root - and you have to apply the clip right there at the root - it will cause a little tension, so I start braiding just a little further down so that way, when I go in with my clip, I can literally just slide the clip right On top of that braid and then go ahead and clip and clip it down, and you know it's clipped down, because you'll literally hear it clipped down, and so I do that one first just to make sure the wig is where I want it to be, and Then I can go through with the second one and do the same with that one. So, as you can see, it's laid on this side. Let'S do the other side. Now, once the wig is on my head. All the clips are in. This is how the wig is looking. Obviously, this part isn't completely down, so I literally have to grab the wig and because, oddly enough, you part wigs for some reason are made to kind of go in like a middle part. So one key thing to remember when you're buying a u-part wig is that you want to if you know that you plan on doing a middle. If you know that you plan on doing a side part, you want to buy a longer length because nine times out of ten, you will have to kind of cut one side down to match the length of the other side. And if you want to, you could also take this little comb right in the front and tuck it under this braid. But in reality, once we add in the little bobby, pins and stuff, you really won't need it. But just to kind of hold your place is why you're installing it definitely helps there's also another comb on this side as well, that you can tuck under that braid and it'll hold the wig down here. Is my favorite part that I really found literally makes the difference in maker breaks my u-part wigs? So get you a couple bobby pins, I'll, say four Max and literally. This is what I do, especially for my side Parts when I like my hair to kind of fall on my face. This one is like falling on my face like really really nice, but sometimes I want a little more like bang. So what I like to do is I'll get a bobby pin and as you're putting on your u-part wig, you will kind of see and notice and feel that you do part wig is literally sewn, it's track sewn onto a wig, and so with that being said, You can feel in between the tracks, so what I like to do is get a bobby pin and in this Blank Space right here in between a track I like to get the bobby pin and what you want to do. Is you want to push the bobby pin through the net of the wig and once you push it through the net of the wig, you want to push it kind of under your anchor braid and make sure when you're pushing it under your anchor braid that it's Not coming back up through the wig, you want to make sure that it stays right there under the wig, because what this is going to do is one kind of give that wig a little more enforcement on that one part, and it's really going to help your Wig, like prevent any sliding, but you do want to make sure it's not causing too much tension or anything right there. So then, I'm going to do the exact same thing on the other side, but this time when I do it on this side, I'm actually going to pull my wig forward slightly slightly to where I know it's covering. Like my edges, it's covering my braids everything and I'm going to do the exact same same thing that I did on that side right here. Okay, now that everything is installed, I'm gon na go ahead and give y'all a look at like lengthwise. So this is literally how it looks when I've turned it into a side part and as y'all can see the as you all can see. There is not too much a difference from like me slightly Shifting the wig, so I feel like it's completely up to you. If you do want to cut the wig versus, if you want to kind of keep it, so you can be a little more versatile with your party, so anyways now it's time to go ahead and blend the leave out. So because I have my hair is already somewhat like straight: I'm really just gon na go through like with a very very like low heat to blend my hair in, and I can also recommend using this one. Second, I can also recommend when you're going through. I understand using some of this Biosilk Silk Therapy, because this is essentially like a gloss. It is not a heat protectant, but it definitely gives your hair a more like silky and glossy look that way it really Blends in with the rest of the wig. So I absolutely recommend this stuff all right and lastly, we're almost done the last step I like to do when it comes to installing and customizing my u-part wigs is, I like to add a few layers y'all and once again, if you do kind of plan on Being a little versatile with your party, maybe don't do so much cutting or layering when it comes to this wig, so that way, you're still able to like flip it over into your middle part, but I kind of just like to layer just a tad bit. I like to layer going down from where my natural hair ends to basically wear the weave ends, and this not only helps My Curls look so much better, but I feel like it helps my natural hair blend in better. So I like to use my layering tool, which you probably can't find all the things I'm using in this video on my Amazon storefront. So here we go nobody, okay, y'all and now this is the final look with the layering get into it. I really love it, and so last but not least, I like to kind of Wear My Curls, I'm gon na go off. Camera and kind of you know do my little curls and whatnot and then I'll come back and show y'all how it looks with the curls. As well all right y'all, so here is the final look of my cute little. You know loose wave, curls or whatever I like to call them. I don't know, but anyways y'all. Hopefully this tutorial really helped y'all out inspired y'all to try. You part wigs like y'all y'all. I love me and you part wig. I feel like these are like alternatives to freaking two three hour: sew-ins clip-ins, all that good stuff. So I personally love me a good you part. Wig, don't forget if you are interested in purchasing this hair or learning more about you part wigs. I linked all the information about this specific unit, I'm wearing Down Below in the description box, so thank y'all, so so much for tuning in you already know, click smash Smack That subscribe button down below and I will see y'all on my next video. Thank you, foreign
Comments
OGTV KC: I really miss your storytelling!!! Your voice and humor ugh so entertaining!! ❤ lol seee let me come back 3-4 businesses days