How To Install Tape In Extensions At Home | Ywigs.Com
- Posted on 10 July, 2022
- Clip-in Hair Extensions
- By Anonymous
Hey Beauties
Welcome back to my channel Hope You Enjoy This Video !
Shop My Refurbished Wigs - https://stylesbydestiny.bigcartel.com
_________________________________________________________________________
Direct link to the Silky Straight Tape-in Extensions
Link to the Kinky Straight Tape-in Extensions:
https://www.ywigs.com/products/natural...
Link to the Light Yaki Tape-in Extensions:
https://www.ywigs.com/products/natural...
Ywigs Tape-in Extension Collection:
https://www.ywigs.com/collections/tape...
Ywigs Microlinks I Tips Extension Collection:
https://www.ywigs.com/collections/i-ti...
Ywigs official website: https://www.ywigs.com
Ywigs U-Part Wigs:
https://www.ywigs.com/collections/u-pa...
Ywigs HD Clear Lace 13x6 Lace Front Wigs:
https://www.ywigs.com/collections/13x6...
Ywigs 360 Lace Frontal Wigs
:https://www.ywigs.com/collections/360-...
Connect with Ywigs:
http://www.instagram.com/ywigs_officia...
https://www.facebook.com/Ywigstore/
Snapchat: Ywigs Hair
Thank you.
———————————————————————————
Business Inquiries & Collabs Please Email : [email protected]
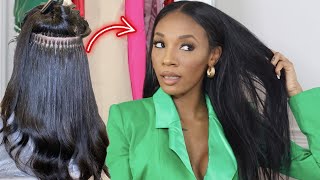
I bet you guys so today I will be working with why wigs.com, so they send me over some taping, so I was super duper happy about trying them out because, as you know, these are becoming very trendy. So this is everything that they gave me inside my box um and then, of course, this is the hair. Everything is in the length 20 inches. I will list all the details down in the description box below and that's what the hair looks like fresh out of the box. I did go in actually dye the hair jet black off camera just to match my natural hair color, because, as you can see, my natural hair is jet black and I wanted it to match effortlessly okay. So all I did to prep. My hair was parted in two sections in the front and then I have that back middle section. As you can see, I have my perimeter left out. So this is what the tapings look like all you're going to do is just peel off that sticky. You know that white piece of paper and then you're gon na pretty much just take small sections of your natural hair within each section and you're gon na pretty much just sandwich your natural hair in between the two tapings. Now what I will say is you want to make sure you don't section out too much hair, because then your tapings will not stick properly. You want to make sure you have just enough where it will stick um to both tape in so this was super easy to do. I would definitely say it is tedious on the back section was a little bit more complicated. Obviously, because you couldn't release, I couldn't really see that well, but it was super easy and also I want to mention. You don't want to place the tape in too close to the root of your hair, because that will cause breakage and when you try to put your hair up in a ponytail or anything like that, it's going to be really hard to have that flexibility. So once I have my two tape ends: I'm sandwiched together. I just followed it up with my mini flat iron, just to have some heat to really kind of like compress the two together now there is a tool that I believe you can use to kind of like help sandwich them. You know and really you know, clamp them together, but I just you know, use my flat iron, so that is what it looks like now. I'M gon na move on to obviously finishing and, as you can see, I'm going in a diagonal kind of like a slanted way, because I wanted the hair to fall towards my face and really just give me that nice, like body, look so make sure. When you're doing your front sections you're doing them in kind of like an angled way, so that it falls towards your hair and gives you like a really full look. So that's pretty much um, All I'm gon na be doing, and I will come back when things get more interesting. Foreign foreign passion, yay foreign. Thank you for you that thing there we go up here for me. I bet you guys so once I finish my front. Two sections: I just combed down my little leave out area and I'm just going to comb that into the hair and y'all I'm not gon na lie to you. I started to fall in love. I just knew this was going to be just amazing. Once I finished my front two sections so moving on to the back, that was how much hair I had left over and y'all I'm not gon na have to. I had a lot of hair left over. I was surprised. I ended up using all of the hair that they gave me because I was like to be honest with you like after I do this style, I'm pretty sure I'm not going to do tapings anytime soon, again, um, because it is a little bit of a high Maintenance style, because you have to keep in mind your natural hair is still left out, so I ended up using all of the hair, even though to be honest with you, I really didn't need to. I probably could have just used half of the hair and would have been good, but I did decide to use all of it just to make sure like I'm not you know wasting any hair or I don't have the hair just sitting around. So, moving on to the back, like I said, I'm not gon na lie to you. This was the probably the most well. This was the hardest part of this, because I couldn't really see clearly. I had two mirrors set up where I could like look through one mirror and then I would look through that mirror to see the back of my head, but it was still a little bit of a process. So if you're wanting to kind of like not have that much patience, I would definitely say you could get this done. Um professionally, but I'm gon na be honest with you when I was looking at the price of tapings, because that's what I was actually going to do. First, um just go, get it done professionally, but when I was looking at the price for tapings um, the insole of tapings and I live in New York City, so you know the girls is really charging. I was like absolutely not so you can do this at home, but just keep in mind. It is a little bit tedious and it is going to be a process because I think this this doing my hair took no less than three hours like. I know for a fact: it took no less than three hours and, to be honest with you, I don't want to say five, but I really feel like it was five because I did take a few breaks because you got to keep in mind. You got your hands up so your hand. You know my arms was getting a little bit tired, so you kind of got to take a break from that and then styling. My hair afterward was a little bit it, but needless I'm not to ramble like I said you can do this at home, but just keep in mind. It is going to be a bit of a process um so yeah. So I'm just going to finish my back section and I'll come talk to you guys later to me. I believe you know just what you're doing now baby. Thank you foreign guys. So this is how my hair looked after I finished installing the tape is, and this is in its natural state. I got the texture straight, so I actually love this look and I was going to keep the hair like this, but I decided to go on and actually style it, but yeah. This hair was super duper full and I meant love. It really gives you like that. True sew-in, look you guys so again. Thank you to why wigs.com for sending me over this hair. I will link all the details down in the description box below, so you guys could go ahead and check them out and don't forget to like comment and subscribe, and I will see videos in my next one: bye, foreign

Comments
Nickole Clark: Final results was thanks for the different clear angles. Your regular hair is lit as well!!