It'S Givingggg This Is All My Hair | Micro Links (I-Tips) Extensions Ft Wingsbyhergivenhair
- Posted on 08 June, 2022
- Microlink Hair Extensions
- By Anonymous
Have you ever tried micro links?
WINGSBYHERGIVENHAIR INFO:
Video hair: https://www.wingsbyhergivenhair.com/na...
Natural Color Coily Itips Hair Extensions
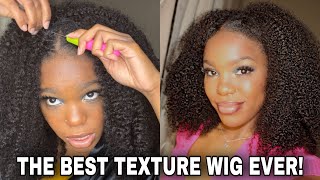
Hair Texture: Coily (3C-4A)
Hair Length: 18 inches
HAIR COLOR: Natural Color
$25 OFF Coupon Code: Diamond
Check more hot ITIPS below: https://www.wingsbyhergivenhair.com/mi...
wingsbyhergivenhair Contact Info.:
Website: https://www.wingsbyhergivenhair.com/?y...
Facebook: https://www.facebook.com/WingsbyHGH
YouTube: https://www.youtube.com/channel/UCLTCb...
Instagram: http://instagram.com/hergivenhair
Don’t forget to L I K E , C O M M E N T , S H A R E and S U B S C R I B E ! This let's me know that you guys are interested in my content so that I can keep putting out new videos. Turn on your bell notification so you don’t miss any videos!
___________________________________________________________
C O N N E C T :
Personal Instagram | @braids_by_diamond
Business Instagram | @princessdiamondco
TikTok | @_princessdiamond
Facebook: https://www.facebook.com/profile.php?i...
Business or Collabs: [email protected]
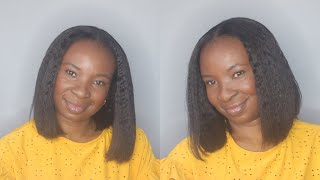
Hi youtube: it's princess, diamond, welcome and welcome back to my channel, so in this video i'll, be installing some micro link, eye tip extensions and the hair that i'll be using is from her given hair. Now they did send me everything that i needed, so i have their hair pliers, the threading hook and the silicone beads and their hair extension came in this really nice satin bag. The texture that i'll be using today is their coily 3c to 4a extensions or eye tips, and it is 100 virgin human hair and it's 18 inches long now i did co-wash the hair and added some leave-in conditioner and, as you can see, i'm brushing it through And these curls are just popping, they have the most realistic curl patterns and this is just natural color. So it's easy to blend in with most hair. Now, i'm going to show you guys what it looks like compared to my clients, hair and, like i said again, it just blends really easily. So here is my client, as you can tell, the texture is very close to my client's hair. Now we're going to go ahead and just start the installation. This is what the eye tips looks like to start out with the installation, i'm going to first section out the entire perimeter of my client's hair and then i'm going to braid that down just to get that out of the way and the reason i'm doing this Is to allow her to be able to wear this style in a ponytail if she wanted, she could wear it in a low ponytail or she can even wear it in a high ponytail, and it's going to give her that full coverage um and it's not going To show the eye tip so, however, you choose to wear your style is how you would want to section out your leave outs. So next i'm going to create the parts that i'm going to attach the eye tips to and for these parts, i'm doing it in a smile or c shape, and this is to allow the hair to the eye tips to be covered when the hair is pulled Up once i have the section of hair that i'm going to be working with i'm going to take one of the silicone beads and pass it through the threading hook. And then i'm going to take that section of hair and put it through the hook. And then just slide that silicone bead through towards the root of the client's head, and it should slide through effortlessly and easily just like. So if it is not, then the section of hair that you are using is too big and you need to make it smaller. Then i just take one of the eye tips to pass it through the bead and then i will use the hair pliers to then just clamp it down, and then you want to make sure that the bead or where you're clamping it down is not too close To the root or too close to the client's scalp, because that's just going to cause too much tension and you won't be able to move this the hair around when it's freshly done you'll have to wait until the hair grows out. Now you can see the length difference. I know my client's hair looks pretty long, but we're still adding some length to it with you with doing these micro links, and that is really the purpose of getting microlings is to add length, as well as add some fullness to your hair, while still being able To wear your natural hair out being able to switch it up, she can wear this completely down in its natural state. She doesn't necessarily have to put any heat on it, although we are going to straighten it towards the end, but if she just wanted to wear it out, naturally she definitely could do that. She could wear it in a bun if she felt lazy one day and didn't want to do anything with it. She could just put in a ponytail, so doing. Micro links gives you a lot of flexibility with um styling your hair and doing different things with your hair, but again, while still being able to wear your natural hair given additional length and fullness. If that's something that you are needing, you can see how well her natural hair is blending in with these extensions already like all, she would need to do really is just put some leave-in conditioners. You know and she'd be good to go. If that's all she wanted to do, she doesn't have to do much at all, so it doesn't take a lot of maintenance to upkeep with this style and again, if that's something that you want to do as far as styling and straightening, you can still do it To make it easier and speed up the time for me, it helped what i did was just apply all of the beads to the hook that i needed for that row, so they were already ready and on that hook that way um i just went through the Entire row with adding the beads to the hair, so it helped me to not have to continuously stop and go back back and forth with the process. So i'm going ahead and adding all of the beads to this row first and then i will go back and i will add in the eye tips and then clamp it down. This was just easier for me honestly, and it seemed like it was going a lot faster for this installation, because my client's hair is already full. I didn't really need to apply the eye tips to every single row of her hair. So what i did was i added the eye tips to two rows and then i left the row out without adding the eye tips and then i added the eye tips to the two rows above the one that was left out. Hopefully that makes sense honestly, i thought it was going to be a little difficult with getting the beads to go through the hair and then also adding the eye tips in. But when i tell you guys this is so easy. You see how how easily i'm able to slide that bead in and then here's a close-up view of me just adding the eye tips into the bead and then again i'm just clamping it down. It'S it's so simple. This style can last you several weeks to two months, just depending on the person and again just showing you how effortlessly the extension is blending in with her hair. So this is now i've done two rows of the eye tips. So with this third row, this is the one i said i'm going to leave it out. So i'm not going to apply any eye tips to this row. This section of the hair will just be left out, so i'm just going to use a clip to just clip that down and get it keep it out of the way and then i'm just going to go above that and do another row and with that row I'M going to then add the eye tips so um. So here i am working on my final row. The installation took about five hours to complete um. This is the last row that i'm doing and that section of hair on the top is what i'm going to leave out to allow her to be able to have a middle part. Once i'm done installing the eye tips, i'm going to go back to the sections over here that i had braided and i'm going to just take those braids out all the way around her perimeters and, ladies, is it not giving? Yes, this is all mine. Yes, this is my natural hair. Yes, it is so, as you can see, i'm putting it up, i'm combing it to the side, and it just looks like it's all of her natural hair. The eye tips are well hidden. The good thing about this is, if you and come to the end, and you realize that you didn't leave out enough hair, you can just go back to um wherever it is and just remove those eye tips. The eye tips do come out the same way. They'Re put in so yeah, you don't have to worry about if you left out enough hair around the perimeter or not, because you can always go back and take more out, that's needed and i'm just blowing out her hair and i went ahead and i pressed it. Um, so we can see that length, you know and girls are we loving it? Who are we loving it? I'M loving it. It'S definitely giving natural, like, i said, definitely giving yes. This is my hair like okay, so she can add some curls to these um. She could wet it back up and she can wear it back in its natural state if she wanted to, she could put it up in a bun. You'Ll, see me put it up in a ponytail, but look at this. This is gorgeous and it blends so nice when it was pressed out like this. It'S just beautiful. The link to this hair will be down in the description below, so you guys can go check it out. If you're wanting to purchase this hair with her given here um, you guys will have a discount code for 25 off and the discount code is a diamond. So you guys make sure to use that if you're wanting to purchase this and yeah, i hope you guys enjoyed this video. I definitely enjoyed the installation. Installation was very easy and simple. The hair just came out looking very natural. It looks and feels just like a real hair. These eye tips are reusable. So if she wanted to take these out, maybe in say three four weeks whatever she can definitely do that and get them re-installed. Just look at this. It'S so lightweight yeah. I love it. Anyways, i hope you guys enjoyed this video if you did don't forget, make sure to give it a thumbs up and i'll talk to you guys in my next video. I hope you guys be blessed. Stay protected and stay filled with love and peace. Bye, guys
Comments
Natasha Thomas: Wish we could see how you parted the top
Panagiota: how many bundles are needed like for this video herein?
Coreys Baby: ❤