Microlink Hair Extensions
- Posted on 26 September, 2016
- Microlink Hair Extensions
- By Anonymous
Mirco Link
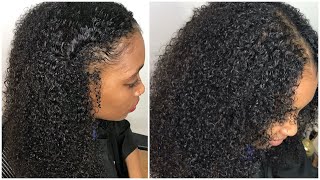
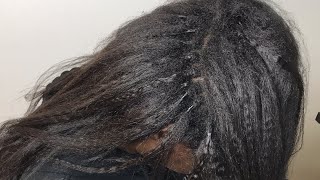
Them hello in Georgia and today I'll be teaching you how to do micro Lincoln Center. You you so the first step in micro link. Extensions is you're going to need your tools, so what we have here is we have our open claws here and what this does is, if you slide it in between the micro link, it allows the bead to pop open. You have your closer here. This is what actually closes the bead and seals the bead. You have your latch hook, needle your lap trip needle has a little needle hook at the end, and this is what grabs the hair and allows you to pull it through the micro link. Bead, you need a nice sharp pair of scissors. You need your needles, nice and pointy. You need your nylon thread durable. These colors come in black blonde and dark brown and then, of course, you need your micro link. Beads. These micro link beads are infused with the silicone on the inside to protect the hair and on the outside they're a bleached aluminum. So the first thing we're going to do is you're going to take your latch hook, needle and you're, going to load it you're going to load your beads on it. So I have about 4 B we're going to load it on here. So the first thing that we're going to do is we're going to take a section of hair, we're going to split the hair into we're, going to take the latch hook needle and we're going to close it. It'S going to slide the bead and then we're going to do a double loop, we're going to pull the other hair and on the other side, and what this does is it secures it? So the hair doesn't slide. I'M going to take your closer tool and you're going to close it we're going to do this one more time you, okay, now that all your beans are attached all the way around the head, you're gon na take your wet, that's already been pre, measured in pre-cuts. We'Ve doubled these tracks to just ensure fullness for the clients, so we're gon na go ahead and measure it all the way around to make sure that it fits and its purpose. So next we're gon na take our needle we're gon na attach our nylon thread. We'Re gon na put a knot at the end of it, so what I'm going to do is start at the end of the weft and I'm going to add a double stitch knot on this. Now it's ready to be sewn to the head, so you're gon na go underneath of the bead you're gon na pull it through now, you're gon na skip that one go to the next one and the looping technique. We'Re doing is a double stitch knot, and this is just to ensure that the thread stays attached to the west. So now we're at the end of the track so ensure that the hair doesn't slide or the track doesn't come. Undone, we're just gon na go over the ends about three or four times, and I'm using that same double loop, stitch technique, and then you can take your thread back towards the other direction until there's no more threat to tie. So once that's done, then take our scissors, I'm gon na cut off the road and we're just going to tie this any knots, I'm going to tie it about three times cut the excess all right. So we've completed the extensions, the micro links here, as you can see they blend evenly with the clients head. We just went in with a nice smooth flat iron amy has about six to eight extensions, which is a full head. The maintenance required on these are every three to four weeks, very versatile. She can put these up in a ponytail. She can wear him down, she can do half up, she can do half down. Okay. Take it down. Do that one more time you


Comments
Beatriz Carias: love it thanks