How To Box Braid With Extensions (For Beginners)
- Posted on 11 February, 2015
- Sew-In Hair Extensions
- By Anonymous
Tutorial showing simple steps on how to Box Braid with Extensions.
Hair Used : Kanekalon Braiding Hair 3.5 packs
Instagram : African_hands
Located in New York, NY
Email :[email protected]
Thanks for watching!
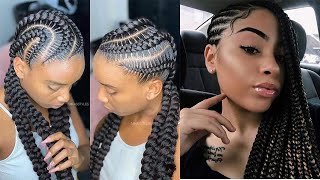
So now I'm going to show you some steps for box braiding um, cutting the hair separating the hair and stretching the hair, of course. So now I just took out a little piece of hair, and I'm stretching this on my knee I'm doing this so that the ends of my braids aren't so blunt and so that they don't want gravel. This gives them a nice end. Now, I'm going to show you how I separate what you do is basically take one third of the hair, which is a smaller piece. You see and wrap it around the bigger piece, it's very very simple: you can do it any way you want, as long as the hair is wrapped around so once again separate the hair into two pieces make one piece twice as big as the other piece take. The smaller piece or wrap it around the bigger piece, and now you have three strands of hair and then you're just going to keep doing that over and over again until you get it, it's really not hard, but it just takes a little bit of practice and Once you're done with that, you're ready to start interlocking your braid into the natural hair. So what I'm doing right now is ahead of box braids, I've already parted off the natural hair and I'm going to go ahead and show you once more how to separate the hair, basically, the smaller piece again intertwine them to the bigger piece and then all you're Going to do is kind of intertwine that into the natural hair, just as you would do a parade if you are not using an extension, so go ahead and intertwine that into the natural hair, you can put it in any way. You, like you, don't have to use my specific technique, but whatever way works for you, this is specifically the way I like to do my braids, because it ensures that the braids are very neat and also that the braids are very secure to itself now, when you're Doing this, you want to make sure that the braid is firm, but you don't want to pull on the natural hair too much because you don't want to cause any breakage. So once you get the hair locked in, then you can go ahead and flip over the braid and begin planning. Your actual braid, and now I'm just gon na go down and to the thing to ensure that your braid is neat is to make sure that each section is even that's number one and number two that you apply. The same amount of pressure when you're intertwining the braid to each strand, that's, what's going to make your braid look really neat. As you can see, the braid almost looks like corn, like corn, on a cob, very neat each each other. I guess we call corn is very intertwined very tight and also make sure that when you get to the part of the braid, where the natural hair begins to end, you want to apply a little more pressure. Just to minimize the amount of hair. That'S going to come out in your rate and so that your braid looks much more neater and you have a lot less work to do when you're done and I'm a professional grader. So I'm really faceted. So take your time in your breathing and I'm just showing you the finished product um, as you can see, that's the top of the head. Um, that's the side. Now these are the poetic justice braids, but we didn't do them very, very large. You did the more so of a medium large sized just so that they last a little longer and they're, not as heavy they're, not as not heavy at all, actually only used about four packs and we dip the ends in the hot water. That'S how we got there. Thank you so much for watching. Please stay tuned for my next video and don't forget to subscribe. Thank you.


Comments
LetsgoAmi: Definitely key information to braiding .... thank you. This is so helpful.
BrownHippie: Thank you, this helped me so much !
Panchita Bell: love the braids nice job
Mary Rey: This help me a lot, thank you!
Lit Lyrics: Omg thank you (100 times)this really help me thanks so much I love you and keep doing the good work
Jamilah Maiga: I'll be doing an updated braiding tutorial ladies , glad I could help !
Heather Barron: Looks amazing
Jaelyn Moragne El: Thx so much this was the best style I ever did
Naturalishous Diva: Very informative!!
K. Ferguson: can you show the braiding technique step by step...Your work is very neat!
Daynna Wilson: can you please show your parting technique as well as show how to make sure the braids are close at the front to show no gaps
Nvppy Gawdess: I finally get it now!
Aven Ray: Thank you so much for this video! But I'm going to be doing this to a friends hair soon but her hair is very silk will that change the way the braids stay in?
Noel Diaz: hey i have a question, can i do this braid extensions and let them lock and archive a permanent lock extension?
Theresa Anderson: this is the best video I seen thank you
Jazzy Shazz: What kind of hair do you suggest using for braiding box braids???? Affordable but with good quality?
chantelle zarb: From where can I buy the extensions pls online?
WitchBitch: How much of hair extensions do you need?
Marissa Hosein: hi...am indian my hair is medium length....an i really want to do braids with extensions can i do that or will i have to cut my natural hair????
ThePugGamer: could you just do the braids with your regular hair and not take separate hair and tie it on
Ayomide J: Did you cut the kanekalon hair into half?
Janiah Riles: Well it sounds cool and i liked the vidoe but i don't do these types if braids so yeah but i liked the vidoe though
Kay Mulaa: i love it u did it so neatmy mom said how much u charge to do my hair im 13
Xionarxist Jones: such a skill.. boy will I be savin hundreds of dollars a year soon
Danielle Melissa: I don't understand how this is only 4 packs of hair.....like....how?
Molly Marine: video is really far away. Do you have a closer video
Charity Ewing: where her edges
Fran Mera: Where her edges tho