Natural Looking Sew In At Home| Minimal Leave Out| No Glue | Sacha Bloom
- Posted on 19 July, 2020
- Sew-In Hair Extensions
- By Anonymous
Hello Friends,
Have you ever thought about doing your own natural looking sew in at home? Do you like it with some leave out or with minimal leave out? Would you use glue or no glue?
I did my own sew in at home. It was a challenge since I have been out of practice, but once you get the hang of it, it’s like riding a bike- you never forget how.
▶️ What I used:
• Water Wave in 16 inches 18 inches and 20 inches
• Rat tail comb
• Crab clips
• Elasta QP Olive Oil & Mango Butter moisturizer
• Flaxseed and Monoi oil
• Tresemme Curl Hydrate conditioner
• Curl Activator
• Argan oil
• Edge Control
• Elasta QP Foam Wrap
• Weaving net
If you like the video, please SUBSCRIBE and press the bell , like, comment and share. Stay safe and Love all.
------------------------------------------------------------------
▶️ Note: NOT A SPONSORED VIDEO. ALL ITEMS WERE PURCHASED WITH MY OWN MONEY.
-------------------------------------------------------------
▶️ Follow me:
• Facebook: https://www.facebook.com/sacha.bloom/
• Instagram: https://www.instagram.com/letsallbloom...
• Twitter: https://twitter.com/letsallbloom
-------------------------------------------------------------
▶️ My Other Videos:
• BEAT or BOTCHED: https://youtu.be/aVCwZcWzgSc
• Foundation Review & Wear Test: https://youtu.be/_5_JhHqnlzY
• JUVIA'S PLACE SHADE STICK IN GUINEA: https://youtu.be/q35rWqsImSQ
• HAIR JOURNEY UPDATE: https://youtu.be/EvLvUqrW6Es
------------------------------------------------------------------
▶️ About Sacha Bloom:
Hello! Thanks for stopping by! I am Sacha and I am thrilled to have the opportunity to share.
My purpose is to share experiences that matter in order to make a difference and to encourage blooming in all areas of our lives.
I appreciate your feedback; in fact, I welcome it! Thanks for your support. Please join me on this journey as we all bloom.
--------------------------------------------------------------
▶️ For business enquiries: [email protected]
------------------------------------------------------------------
▶️ Upload Schedule:
▶ New videos every Tuesday & Sunday
▶ Bonus video occasionally on a Thursday
------------------------------------------------------------------
#sewin #naturallookingsewin #diysewin #fullsewin #fullsewinwithleaveout
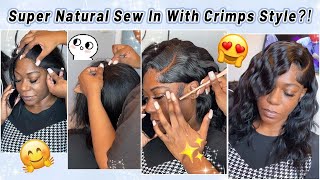
Hey guys welcome back to my channel if you are new, welcome as well. This hair looks like it's growing from my scalp right. It'S not! This is not a wig, it's actually a full install. If you would like to see my process, please keep watching hey guys. So before getting my hair braided, i did give it a very deep um protein treatment and, in addition, i'm going to moisturize my hair with this elastic mango butter, moisturizer and then i'm going to seal my hair with an oil. I am going to quickly show you my braiding pattern for this installation. I do leave a little bit of leave out in the front in the back um, in the event that i wear my hair up or in a low ponytail. The leave-out on top is just a sliver of hair just enough to cover the top tracks. It really has been a while, since i've done my own installation since i've done my own weave boy, this stay-at-home situation is really causing all kinds of creative juices to flow. I have found myself engaged in activities that i haven't even thought of doing in quite a while, so it is quite rewarding and quite um. Exhilarating to be able to. You know get back into the group of things and to have this much time to be able to invest in myself to be able to do things for myself that bring me so much joy doing this on my own was very, very difficult guys, just so that You know and having to try to film it at the same time was an additional hassle. So please bear with me um when i filmed the sewing on of the first track in the back. It was completely out of frame, so i couldn't show you guys what i did so everything i show you is what was able to properly be filmed. I did not have a very effective way of managing the recording of the back of my head, so yeah this hair that i'm using is about two years old. I have used it several times. I'Ve had it in and out of my hair four, maybe five times already, so it is quite old and, as you will see in a minute when i washed the hair, i let it hang dry. I did not lay it down flat to dry, because i wanted to install it right away and i i didn't want to wait a couple days for that to happen. So i let it hang dry and i think that was a mistake because it got really tangled and it was just a mess, but i decided to use it anyway and hopefully trim it so that whatever stray ends or loose ends, it has will be tamed. Also. Um this hair has been colored. I did dye it myself some time back and it is a different color than the color that is in my own hair. But since it's only a little bit of my old hair that is going to be left out, i do find a way to blend it. In as i will show you, the health i'm using is water waiver, and today i am using two different curl patterns. One is more loose than the other um. The colored hair has a more tight curl pattern than the uncolored hair and the uncolored hair is um. When i say uncolored i mean i did not color treat it myself, it came colored um, it is in black. I think that might be like a 1b. I am using both um, both both sets of hair, because i want to put the black hair in between to give it more body but um. As you will see, you will not be able to tell that these are two separate curl patterns by the end of the video everything just blends together very seamlessly in the end water wave is what we call wet and wavy hair um. I don't know why. The name has been changed to water wave, but it used to be wet and wavy. What happens is that once the hair gets wet, the curl pattern is accentuated, so it looks a lot more curly right here. I'M showing you how i knot the end of the track so as to avoid it shedding, because some of the tracks um have been cut and will be cut so prior to installing it. I do put a knot at the end so as to prevent any um shedding. Also, i am sewing my wefts singly and doubly i am doubling the plain black hair and i am applying the colored hair in single wefts. I am using the fold over method as far as the track allows me to i'm sewing along the length of the left until i get to the end of it, and then i am applying the new track where at the point where the last track ended and Continuing that way, i only begin to cut the weft when i get to the top of my head, because i want the hair to lie as flat as possible up there. I use the bobby pin to hold down the braids at the top of my head. The hair that i will be leaving out, but every time i pass the thread through the weft, it keeps getting stuck, it gets caught in the bobby pin. That is what just happened here. So i just went ahead and removed the bobby pin from the two braids on top. I am using three bundles of the color treated hair in 16, 18 and 20 inch lengths and two bundles of the black hair in 18 and 20 inches. The black hair did come in 16, 18 and 20 inches as well, but i only need the 18 and 20 inches to add to the hair. To give it a muffled look. The bundles were not very thick, but together they provide for a fuller look. It took me less than 24 hours to complete this look um. I braided my hair just before bed from the night before and sewed the tracks on the next day and was done a little after midday, so less than 24 hours. You would notice that i used a weaving net to um protect my hair before applying my sew in the weaver net has very many advantages. This is my first time using it and i'm glad i used it because i could have felt the difference. Usually, i'm not able to tolerate having a sew in because of the amount of tension against my scalp. So once it goes in it comes right out because it feels like it feels heavy against my head um and i'm prone to getting headaches. So that usually is a nuisance, however, because i did it myself and because i used the weaving net, i was able to manage the amount of tension against my scalp. That is one of the advantages of using the net. It protects the hair by creating a barrier between your own hair and the thread or your own hair and the tracks. So um you put actually less tension on your hair, less stress on your scalp, so that is clearly an advantage if you have thin hair. I definitely advise you to use a the weaving net when you get your sewing installed. Also, if your hair is very thin, i would advise you to not leave any leave out when you do your installation do a full sewin or get some up together closure. Instead, that way, you minimize the amount of damage to your own hair if your hairline is thinning or your hair is breaking that same advice applies, a sewing once it is done properly is supposed to last between 6 and 12 weeks. However, i never keep my sew-ins in that long. I am too paranoid about making sure that my hair is healthy, underneath my protective style that is important to me. So usually i keep my sew-ins in for no more than two weeks at a time because, like i said, i need to be able to take care of my own hair underneath this time was no different. I kept my sewing in for two weeks. I am on a relaxed hair journey and so um, if you have relaxed hair, your hair is a lot more delicate um. It'S more fragile, it's easier to break so um you'll need to also keep that in mind. When you're getting your protective styles done, you would notice that when i knot my thread that i do not pull um too tightly against my own hair against my scalp, because i want to make sure that i am not breaking the strands of my own hair and When i knot the um the thread, i only double knot. I do not go in three four or five times that minimizes damage to my hair and it makes it easier to remove the weave when you're ready to get it out, because this is not supposed to be permanent and oftentimes. You get a very neat. Very secure sewing and then lose half of your hair. When you come to remove it, i am not about that life. When i get my sewing removed, i want to make sure that the hair comes off and my own hair stays in place. So while i am installing this sewing, i'm keeping that in mind, so i'm making sure that i do not pull too tightly on the knot and that i only double knot. That is another advantage of the nets. It'S um. It gives your weave a good foundation so that, once you sew the hair onto the net, it stays in place. It really does not move. That is something that i experienced this time around, and it was quite nice when you get to the top of the head. You want to make sure that your last track lays very, very flat against your head, and you also want to sew it as close as you can to the um to where your last cornrow or last braid stopped that way. Um, your leave out properly covers the tracks so that the track does not show one option that you have when you're sewing your tracks is to sew it forward facing so that it falls toward your face. I did not do that because i do have a full side leave out um so that wasn't really wasn't necessary. I will be combing my hair down or back so um. That'S the leave out. There'S a side leave out, so i'm sewing my hair forward against my face really wasn't necessary. I did tell you in the beginning that the color of my hair and the color of the weave are different, but in the end that does not make a huge difference. As you will see in a minute um, so i went ahead and wet the hair off camera. That'S the only thing i did to it. I just wet it, so you could see how the curl pattern actually looks when the hair has been wet. So i'm going to go in with some conditioner and for that i'm using the tresemme curl hydrate. So i put a little bit of that in and then i am using the curl marks cool. What is it curl activator to help accentuate the curl pattern on this hair? Next, i'm going in with some cream of nature, argan oil and i'm putting this all throughout the hair just to give it a bit of shine. Next, i'm using the um cream of nature. Argan oil edge control and the elastic foam wrap and i'm working that all the way all the way around my hairline. I know a lot of people are not big on baby hair nowadays, but i like it so i'm going to go ahead and do mine. Alternatively, you could have used the got to be glued styling, gel and edge contour, or the what to be glued styling, gel and foam wrap. That combination gives you the sort of hold that really stays in place and does not move. So if you want your edges to stay put for 24 hours or more, that would be a combination that you could try that got to be good, styling, gel and edge control, or there got to be glued styling, gel and foam wrap together. I do go ahead and finish trimming this hair off camera. I found that i couldn't do a very good job of it sitting here. I needed to use the mirror, so i could see, especially in the back, so that is what i did and i'm a few weeks post relaxer. I was concerned that the texture in my hair would have made my hair difficult to blend with this hair, but i think it actually helped it it's yeah. It worked out even better. So that's great. It feels really great to be able to accomplish this. On my own, i did save more than a hundred dollars by doing it myself, but more than that, it feels good just to be able to start a task and finish it and do it well. Thank you guys for watching give this video a thumbs up. If you enjoyed it and if you have not yet subscribed, please go ahead and do so. Thank you for your usual support. I will see you in the next one. You


Comments
Caribbean Wonders : Wow. You make this look so easy.