How To Sew Down A Lace Closure Wig Tutorial| Natural Results| Ft. Mercy'S Hair Extensions
- Posted on 14 January, 2018
- Sew-In Hair Extensions
- By Anonymous
HEY REVAMPED DOLLS: TOLA REVAMPS|| HOW TO SEW DOWN A LACE CLOSURE WIG TUTORIAL. NO SPANDEX DOME CAP AND NO WIG NET. THIS UNIT CAN BE SEWN ON REPLICATING AN ENTIRE INSTALL AS FAST AS 30 MIN. Don't forget to Subscribe ⊹LIKE + SHARE + FAVORITE THIS VIDEO!⊹ WATCH IN HD
Hey Guys In this video I show you how to sew on your custom made unit. I also show you how to make your lace closure look a little more natural. To see more videos like this make sure you thumbs up, like, share & comment.
Part 1 (Red Hair)- http://bit.ly/2Fznt50
Part 2 (Unit Construction)- http://bit.ly/2FBhpZS
__________________________________________________________________
PRODUCTS USED:
Needle
Brown Thread
Got2be Glued Blasting Freeze Spray
Got2be Glued Gel
Tweezer
Foundation to tint closure
Nairobi Mouse
Water Bottle
Aunt Jackies Curl Pudding
Custom Wig Cap
https://tolarevamps.bigcartel.com/cart...
BLOCK HEAD
MANNEQUIN STAND
____________________________________________________________________
Hair Details:
Vendor- Mercy's Hair Extensions
Type- Raw Indian
Curl Pattern- Wavy/Curly
4x4 lace closure- 16"
(3) bundles 18", 20", 22"
Link- http://bit.ly/2DajePK
____________________________________________________________________
OTHER VIDEOS
HOW TO MAKE A LACE CLOSURE WIG (SPANDEX DOME CAP)
BRAID- DOWN FOR LACE CLOSURE WIG OR INSTALL
____________________________________________________________________
FOLLOW ME:
INSTAGRAM: RevampedStudioSalon
FACEBOOK: RevampedStudioSalon
SNAPCHAT: TolaIsShe
____________________________________________________________________
BUSINESS - for all business Inquiries and Hair/Products Reviews Email - [email protected]
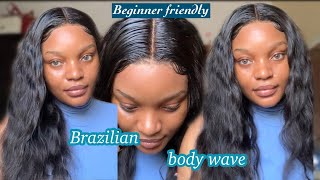
Hey guys welcome to part three of this video. If you haven't seen part one, please go check it out. This is a unit slash so in or wig slash, so in so, if you haven't seen how to make your unit slash so in wig, please check that out, but right here the unit is already constructed and we're going in to customize this lace closure portion. Whenever you have a lace, closure is always nice to go ahead and pluck the hairline area to make it look more natural when you create your baby hair, so I'm going in two rows. This is my first row and I'm going to go ahead and see that hair that cut up quite a few hairs and I'm going in to do my second row and not be done with plucking the hairline area. My revamped dolls know that I already have videos on how to pluck your hairline. If you haven't seen it yet, don't worry all the information will be in the description box below, as you see here, it has that nice low to high gradient. Now you can go in and go a bit further if you want to it's totally up to you, but I'm not worried and it's the baby hair portion. I want to look nice and subtle, nothing, nothing thick, and to do that, I got to pluck it out because on the left side here you see it's thick, so you got to go ahead and pluck a little to make it look natural once the plucking is Done you want to get your Nairobi foam and just saturate that closure portion down so nice that way, you mode it into a nice flat. Looking closure, no one wants no humpy lumpy closure. This has to be settled, so you can spray a little bit of water. Also, the more water you spray, the less product you have to use and mold that closer into place. Now you can either get a scarf and come back to wear a couple of hours later or do like me and get a blow dryer and tame that root. Okay, we want to blow dry that root straight. So, with a little bit of heat, you just blow dry that portion down nice and flat. So here goes our lace closure unit, slash so in wig child. You see your braids will sleep through there. There is no neck, there is no sweat next film cap, it's just you and your braids and it's gon na be sewn on so that baby ain't going nowhere honey. The only downfall with this cap I've noticed is, you can only wear it as a center part. So if you're noticing a part kind of girl, then we're gon na have to redo another kind of unit for you which I'll come up with soon. Don'T you worry so this is the co-main curling defying cream that I'm using I'll put it in the description box? Don'T worry - and this just helps enhance the curl, because if you notice, when it comes to curly hair, the less product you use, the bigger the curl gets the more cone defining cream. You use the more subtle and more wet look. It gives you and I'm into the wet look, not the big bushy curly, look well, actually, I'm in so both depending on what day I'm going for, but today I wanted to give it that nice wet subtle. Look not that big bushy curly look but she's, not the right word! Voluptuous, curly! Look! So I'm just going in and wetting it and brushing it in with the curl defining cream, and this cream was amazing by the way it's like the Miss Jessie's. Maybe the knockoff version of Miss Jessie's because called a aunt Jackie's. I don't know it's called something, but it works really good and you see how those curls are coming in they're, just scrunch it up and it just makes the curls pop. So now I'm just spreading a little bit of shine spray just to give her the extra moisture and I'm gon na, let it air dry. Now, if you brush your hair, I mean brush this hair finger comb. This hair, the bigger the curls, are gon na get. So if you want this nice subtle, wet, look, just don't touch it and just leave it, as is so. The cat does have these straps, but for some reason within a week or so they break. So you can use them, but trust me they're, not gon na last long, because there's nothing in the background. Cuz they're not gon na last. So I cut this off at the end anyway, because we're still in this unit on so go ahead and pull up your closure area be sure not to rip the neck. It'S hard for me to pluck on the side of a closure, because I'm posed to be standing in front of the closure. So, just for y'all, I struggle making these videos Janice, don't understand the struggle of making a dog video, but once you're done plucking you go ahead and you take a portion of the front part and just cut out that baby hair area. Now this is a bit much, I'm probably gon na use less than this to gel down, but there's a little portion of baby hair get your gut to be root; less increase Fraser's to tact that closure area down, because if y'all didn't know that spray acts just Like the damn gel, like with that spray, you can lay down the front. Oh yeah, it's that strong, but I'm just using a little bit of gel here to lay down the baby hairs and I'm using this cone. Now you can use whatever you want to lay down your baby hairs, a brush, a comb, there's this new edgy brush that I have been exposed to that. It'S absolutely amazing, and I'm going to tell you about that in my next video, but get ready for that, because that brush is absolutely amazing on natural hair, on frontals or closures like it is the truth. So i'ma show y'all how about that brush works, but once you're done with that, get your needle and thread now here is a trick. You do not want to cut your tracks on your unit, so you got to get a thread that it's not your color brown, a brown thread, maybe blonde. I would stick to brown that way when you cut off your unit, you're, not cutting off the tracks. On your unit, because you music, eight this unit intact when taking them on and off so I use brown thread and, as you see these holes are here, so you can all your scalp huh. Yes, you can all your scalp, you can scratch up in there. There'S nothing stopping you from getting into your braids and if you want to wash your hair every two weeks, you can take it off and put it on within 30 minutes. So there's nothing like this. It'S nothing! That'S compared to and easy on an off type. Look without having the fear of it falling off of so you get in a fight with somebody. Well nobody's no fights anymore right. We all love each other, but you know what I mean like you: don't want to worry about, going on a vacation and getting wild and your wig falling off. So I'm laying down the back portion now you just pull it down like so, and you can add a track there as well, which I'm gon na do later on because, as you know, I'm not using the adjustable strap because they break off anyway, and I just Sold that portion down with my brown thread and that way when you take this thing off, it's easy to cut off that thread, and you know where it is so just working way across the back portion of the head and go ahead and add a track there. If you are also gon na, do it with the bands, because the bands don't work like some straps to break off. So that's why I got to work on the cap construction because I don't know about that like why the straps always breaking but either way we don't need it for this type of install anywhere because we're sewing it on. So there is no need for artistical straps. This is a custom unit baby, it fits perfectly, as you see I kind of work backwards. I get my client to hold her close you down in the front and so the back portion down first and then I'm going into the front and I'm gon na show every other track from top to bottom. This is good. My first track up here and then sold it, I'm not gon na so they're. Actually I saw under the first track. So I start my my sewing right here and I sew straight across as he proceeded to see her scalp. She just has a slight case of alopecia. So with her is not gon na be as easy to sew onto her bracelet. She doesn't have a lot of hair, but ideally for y'all who have a lot of hair and they're doing this install. You will have a whole bunch of braids to sew on to secure that unit and you just do every other track. Working your way down to get to the bottom, make sure it's a brown thread. So you do not cut up your tracks and you are good to go now. People using sewing machines to make their units - and this is a good cap to use for a sewing machine. So if I ever get to making a cap with a sewing machine which I will and in their future, I will be putting on hair. So you guys can see Oscar because that will cover time down in half and we're all about getting things done. Quick and fast, so yes, wait on it honey, wait on it. The stitching method I choose to use to sew on my units are called blanket stitches, so you can actually see the actual stitch going away right across the track. So it's easy to cut off. It'S not hidden at all, so keep on going. So you get to the bottom and look: can you believe this when it gets hot? You ain't got, ta worry about that cap being too hot under there. You know I mean like yo and I don't like Center parts, so I'm definitely gon na come with a different cat. We can use for our side parts because I'm a side part girl. So you know I'm the ha feel about this center part wig. But you know it's still a great idea, so I'm cutting off these straps. Like I said, we don't need the straps, because it's a custom unit and if it's perfectly already - and we are done so I'm just wetting it a little bit because it has dried and I have manipulated a whole bunch by separating the tracks. So I'm just getting it back together and getting them curls, nice and juicy, and the color is pretty and, like I said that closure kind of tamed down the bright color of the bundles. I did not know this one get that bright. I was going for the top color, but hey it's Valentine's Day, so the brighter the color is the hotter. You are my mom. This lady right here is so hard to shoot her on camera. She gives me the hardest time, but I'm glad the results are beautiful. The lace closure is really nice and you see that baby hair made that lace closure look more natural. So whenever you have a lace, closure try to create some baby hairs to give you that more natural look okay. So this was before I wet the hair. So this is when I was moving the tracks out the way too so on the unit, see as you manipulate the hairs or fuller and bigger it gets. So if we do not like this big full look, just wet it again or don't manipulate the hair. Now I want to see how y'all feel about units so you'd like it to be sewn on, or do you want it to be removable? How do y'all feel about this? Like um, I get mixed comments. Some of my clients are like. I want my units to be sewn on or something like. I want to get off and now my hair to breathe. So I'm gon na throw a quick rant. Real quick, I know I'm sorry eyes are long video. This is a juicy topic. I personally prefer to have my units sewn on, and I pick up every two weeks to take out my braids, wash it deep condition it and then break it back down and sew on my unit again, it's less than doing a whole entire install and it's reaching Care of your hair, what do y'all think do you prefer for your hair to be sewn on? I mean your units to be sewn on, or you prefer, for your units to be removable or taken off like? Is your man gon na see you with your braids down at night or is he gon na see you with your wig on at night? I want to know cuz it's a juicy topic and I get so many mixed reviews. I want to know how y'all feel thank you for watching. So if there's a rate comment and subscribe and I'll see you on my next video peace,


Comments
B J: Sew it down for sure. I hate taking off a wig everyday
Holly Latrice: Mama is fine as wine . Girl I'm about to sew it down cause I have tried time and time again to glue but it's just not the way my mind can't compute the gluing concept low key even though I've seen countless tutorials on it. Plus it is annoying just to do all that finessing just for it to be looking like rabid coon fur the next day when you have to redo it . Maybe it's God trying to save my edges from me and I'm just gonna have to adapt improvise and overcome with the sew in method . Thank you for this tutorial. Mama looks like your big sister too the glow is real .
Vanessa Thompson: Now sewing every other track onto the braid is something I never thought of, and I've been seeing down my wigs for 15 yrs! I like it sewn down, and I will use your method from now on! Thank you for sharing and teaching me a better way to slay
Lalaaaj.: I loved this method. I think I'm going to try this out. I don't like sew-ins but I think this method would be best for a sew-in/unit! It seems breathable and I could scratch my scalp if I need to!
Terry: Yes I would definitely want it sold on my only apprehension is being able to take care of my hair underneath
Chantel Doan: Great Job! Perfect video! Beautiful mom!
Quiera Collins: Wow there's no other video like this amazing
J Stimulates: I agree with you on having it sewn on and leaving it for 2 weeks or so...but I like the beach so am wondering how my hair is going to dry wirh braids under there with the wig sewn on
Terry: It's not too bright for her it is absolutely gorgeous on her skin tone
Kechanda Harris: I love it :)
Renee's Channel: I find it very convenient and easy to wash a sewn in wig without a wig cap. It's actually easier to wash your scalp and style your hair than with free natural hair or a regular sew in.
Just Trice: Your Ma is so pretty and that style and color are both perfect for her...uuummm I don’t have man lol so I’m not caring right now. Great job thanks
Monsie Babe: Woweeeeee I love it. I like to be able to sew it on but get to my hair underneath. I'd love to see you do this on straight hair please. I'm wondering how it would lay. Your mum is stunning btw
Reign Royale: My man will see me with my wig on for sure
Felicia Mack: How long can you leave this sewn in?
Kendra Carradine: I love my units sewed on. What a great idea to cut the cap for the scalp to breath. When I make my wig I like to versatile so I can't cut my cap and I grease my scalp real good so no problem. What a cute wig you made for your mother..... #She's ready in my Tiffany Haddish voice. Thanks for sharing
Deborah M: Niceeeeeeeee! Your mom is beautiful too!
Catherine Johnson: Yasss Slayyy Div❤
Irene Sizemore: Love the wig but not the color.
Baaba Christian: Where else can I get that wig cap
Mrs Driscall: What kinda cap is it
Vanessa C: I wish you show us using foundation on top clodure. It does not Look cakey....