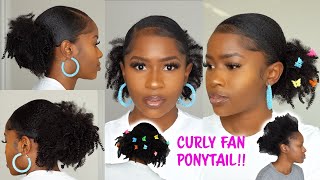
Curly/Bouncy Blow Dry Routine | With Micro Ring Hair Extensions | How To
- Posted on 09 September, 2017
- Sew-In Hair Extensions
- By Anonymous
Hellooo Everyone,
Today I decided to film my bouncy/curly blow dry routine for you. Having hair extensions in sometimes it can limit the styles you can achieve with your hair, but you can never go wrong with a bit volume and body to your hair.
This is one of my favourite looks to do for a night out and can be done with or without hair extensions. I just find with the extensions in your curls hold much longer and give a more volumtious effect.
For this look you will need:
Wide Bristled Brush
Hairspray
Volume Spray
Hairdryer (medium settings)
'good arm endurance ' it can burn!!
Enjoy :)
Please don't forget to Like & Subscribe
Love Zoe
xXx
Instagram - zoeamckenna
twitter - zoeamckenna
blog - www.scottishbossmum.com
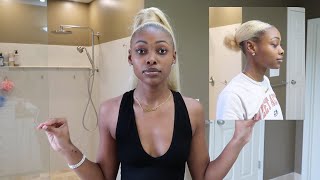
Hey everyone and welcome back to my youtube channel. So today I am going to be showing you how to get a nice fancy. Curly it'll dry. A lot of people ask when they're getting make sure all here extensions. How do I achieve the nice fancy? Curly look and a lot of people, don't know how to use straight nerves or curling wands, or anything like that. So doing this very simple, dry, routine as a much easier, simpler way of getting the nice bouncy curls without having to use a curling iron. So some people call this like the Essex blow dry or the big burn, simple dry, whatever you want to call that it looks amazing and I just love it and you can't go wrong or forgive curly blow dry. So if you do want to see how I have created this look for you today, then please keep watching okay, so, first of all, you're going to want to make sure that your hair is get to your native percent dry first and then I'm just going to Be going in with my away last sugar life spray and I'm just going to be spraying this up at the roots of my hair. Let'S just add a lot of extra volume and it just kind of like the feeling of this particular spray and then a very brushing it out with my Denman brush. This is my ultimate favorite brush for heel extensions. I just love how it's got big brush. Those and it doesn't tug it your hair, then you're gon na section off your hair and split it into two and clip it up and then split the bottom section into two. Also, the small sections that you take the easier it's going to be and more curl you're going to create. So you want your settings on a medium, medium, speed and medium temperature, and this is going to create the base curl. So you want to start at the root and you want to make sure that you're going from the top to the mid and making sure that that section is dry and you're going to go to the bottom and you're going to just curl. The hair run. The brush and twist the brush around with your hand. So, as you can see, I'm just turning it round and round and for the bottom section as currently and then slowly you're going to bring the brush up higher and hold it for a couple of seconds and bring it up again. Don'T worry if the other bits fall out, because you can just wrap it around the brush again and then start again so you're just going to keep bringing it up, keeping the hair dryer paste into the brush and not enter your face or on directly to here. Sorry, that's my daughter, Hayden under the table she's wanting to watch this tutorial today. You can see a popping through there. You go so she's happy now. She'S got a little cameo on so you're gon na keep repeating this step all the way up to the top and you're just going to hold it at the top for a few seconds pop the ball of the pin in it and then you're just gon na Unwind it and you're just gon na bring it back down to the bottom. The next step, you're, going to twist it right, your two fingers and you're just going to clip her end with a bobby pin. It'S just ensures that they, when it's hot it cools down into the curl and creates a more tighter, curl and you're just going to get the next section and you're going to repeat the same step again so starting at the top making sure that that's dry bring Them all of it into the bottom twist in your brush and then rule an up step by step. If you still feel that the route is quite wet, you can move your hairdryer back and forth just to dry this off. As you can see, the hair still looks a bit wet here, so I'm going to be repeating this process a few times at time. I feel that the hair is completely dry and she's off, so this section took a little bit longer, so I did have to do it a few more times and again, I'm just wrapping around the two fingers and I'm gon na pop it in place with a Bobby pin so I'm just going to be fast forward in these sections, because you don't want to watch me, will dry and every single section, but it's good to watch, because you can see the technique and how you're going to be able to do it. It definitely does take a lot of practice like I couldn't do it the first time that I tried and all over the place, and I I'm a store I was just getting fed up. I was having some bits that are Kylie and some bits is not currently so it definitely does take a lot of patience and perseverance, but the more you do it the easier it gets. I promise so obviously the back sections are a little bit harder. You have to kind of reach up higher, but you can always just tell you brush forward and bring it towards its front of your face makes a lot easier rather than looking at a weird pie and heart in your arm so disembark and his sections are completely Neat, you can kinda take any sections that you want depending on the region here it goes or you want, you have to fall, can do it backwards. You can do save words, whatever you feel comfortable with as long as you're doing the same technique. So again, until you know that you want to make sure that you're ruling it quite a few times at the bottom, but you have to get that curl at the bottom before you lift it up. Otherwise, it's just not going to hold, and you also want to make sure when you are doing the bottom section. You want to get right at the ends of your here, because if you start rolling up and you've not got the bottom of your here and it's going to get tangled this bullet here from the rib eye and then anyway, it's never gon na go on to The top section here and I'm just going to be repeating the same steps, but I am gon na be bringing it up a little bit higher here and bringing it forward towards the front of your face. This is probably the hardest section to do it just because it is really hot and you do need to try and get underneath to get that volume sometimes up to an velcro ruler. Just add one extra volume, but today I am. This will be under antennas again. Just rule a little bit for the street, here's that falling out tucking it under the brush for the front section. I always do it forward just because I've got the bangs at the front and just feel like it leaves a lot nicer and it's just a lot easier for me, because it is short to the front so once you've finished it all and you're. Just gon na go ahead and spray over it with any hairspray. I'M using the vo 5 ultimate hold his breath today and then I'm just going to be taking all the bobby pins out and releasing the curls. So at this stage you can leave an end for 10-15 minutes. If you like, just for the purpose of this video, I have just kind of taken them out straight away. So if I did to keep them in a bit longer, then my hair would have been a little bit more curlier and fancy. So, as you can see straight away, you get lots of volume, lots of life and I'm just gon na be back combing and teasing under any sections that I feel I want a lot of. It kind of helps me here: stick together again, sometimes it separates of the potential, so this cannon brings it all back together. So that is the finish, will dry and look for you today. I hope you enjoyed the tutorial and I hope you learned something new today and if you have any questions, please write in the comments below this is just a little Shane spray. I am spring over to finish off the look and that's me all done. I hope you enjoyed this tutorial and I will see you again next time.

Comments
Andreya Simpson: loveee this video! came out wonderful ❤️
Cait B: This is so beautiful! You are #hairgoals
kamarinda7: lovely hair style thanks
mica welch: What brush is it you’re using? The brand etc xx
Leigh Jones: Where do you buy your hair?