Ombre Flixy Hair Extensions - Diy Tutorial | Ariba Pervaiz
- Posted on 14 March, 2017
- Sew-In Hair Extensions
- By Anonymous
Hi Guys!
100% Remy hair extensions can be dyed, washed, curled, straightened and cut!
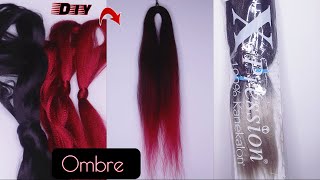
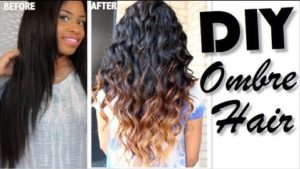
The reverse balayage technique is perfect for creating a gradient ombre effect.
To begin, make sure the weft is flat and combed through smoothly. I'm applying a generous amount of hair dye to the top of the weft and painting it downwards using the side of the brush. I'm putting more pressure on the brush towards the top of the roots and less pressure towards the mid shaft.
For those of you that have high contrast in your roots and ends, use a second color in the mid shaft. This will result in a more seamless and elegant blend.
Full color application and halo extension tutorial will be on my channel shortly!
Color Formula: Redken Chromatics 4N + 10vol
Halo Extensions: Flixy Hair (20" in Caramel) - https://www.flixyhair.com
USE CODE: ARIBA for $$$ off
Subscribe https://www.youtube.com/c/aribapervaiz...
******************************************************************
Let's connect :
Website: https://www.aribapervaiz.com
Instagram: https://www.instagram.com/ariba_pervai...
TikTok: https://vm.tiktok.com/G1UPas/
Facebook: https://www.facebook.com/aribapervaiz....
Pinterest: https://www.pinterest.com/Aribapervaiz...
Make sure you LIKE, COMMENT, SHARE & SUBSCRIBE to my youtube channel and follow us on our family adventures!
Thanks for dropping by!
Hey guys today, I'm back with my new flexi hair extension. As you can see, the color match is really really well on my ends, but on my roots is really off, so I'm going to be using a reverse balayage technique to create an ombre effect on these hair extensions. So I'm going in with retconned chromatics. It'S an ammonia, free, hair color, it's also coconut oil-based I'm mixing together equal parts of four and and ten volume peroxide and then just laying out a regular baking coil on top of a piece of plastic and then I'm using the clips on the hair extension to Attach them to the foil to keep it in place and then I'm just taping the coil onto the plastic. So nothing is going to be moving when I'm dyeing my hair extensions - and you want to make sure throughout this coloring process, that your hair extensions are deep. Tangled and combed out really well, you want no tangles in this or else you're going to get really blocky. So I'm starting by applying a really really generous amount to the West right on top and I'm using a criss cross brush stroke to make sure that the color saturates all the way through and once I'm happy with the amount of hair color on this side. I'M just going to quickly flip it over and do the same exact thing on the other side. So I'm doing this about 1/3 of the way down from the entire length of the extension, so about 1/3 of the extensions could be pretty solid and then I'm just flipping it back around and of course, I'm going to make sure that it's detangle. So I don't get any blotches and then I'm going in vertically with my coloring brush and just painting it downward. So I'm starting solid and heavy at the top and then just flicking my brush upwards and once I'm happy with the amount of fade that I have with my hair guide, I'm going to set my timer for 45 minutes after the 45 minutes. Once the color is processed you'll notice that your hair dye looks a lot darker, so I'm just going to go in and use a regular color, safe, shampoo and conditioner and style it as if it was my own hair, and this is the end result. Perfect gradient fade, and I say I got a pretty solid match in there. No one would know I'm wearing hair extensions, so these are actually really really easy to dissolve there halo extensions they're, not like your regular website. You can clip in they come with this clear string and it looks like it's a flimsy little string, but it's actually quite strong and it's attached to these little hooks on both sides. So one side comes already attached and the other side comes with this ribbon. The size of the ribbon is the adjustable side. Based all these extensions. You want to start by creating a halo on the top of your head, I'm starting about an inch inch and a half away from my hairline and creating a halo parting. Then I'm taking the string and placing it right up against the halo parting in the front and then we're pulling the string on the side of the ribbon the adjustable side and when I feel like the extensions, are nice and snug but they're comfortable. I'M going to just grab hold of where the string ends and I'm going to keep a solid grip on it and just take the extensions right off and right, where I'm holding it, I'm going to tie a triple knot. So once I've secured into place, you can just cut off the excess string and just slide it right on top and then I'm just going to unclip my section drop it on top of the West and it's completely blended. Nobody knows it's there, okay, so this is the final result after I colored the extension they're perfectly blended. So this is the track right here, my natural, I dyed it with an ammonia, free, coconut oil, bait paradise called cymatics from wreckin, and i use just a straight for ends. If your extensions are a bleach bleach, bleach blonde in your roots are like pitch-black, then you probably want to go in with two colors. You probably want a root color on a mid-tone, and that will help it blend a little bit better, but because this is only about a three or four shade difference. This is before this is an eight I just went in with just one color on the route. A for N - and I applied it really heavy in through here and then I just kind of flicked it out, but you'll have a lot more seamless blend if you go in with a second color, if you have a ton of contract from your root color and Your color on your end, I applied the color, I let it talk us for 45 minutes and then I just shampooed and conditioned it as if I was to do my own hair and then I just run the blow-dryer through it and I round brushed it, and I ran a one and a half inch wand. Through the extensions and my hair. I was going to curl my hair on camera, but I needed somebody to hold of the West for me, while I curled it and my husband was helping me curl it and he didn't want to come on camera holding hair extensions. I really hope you guys found this tutorial helpful. I hope you guys enjoyed watching it if you did be sure to give this video a thumbs up, leaving a comment below letting me know what you think and I'll see you guys on the next one. This video was in collaboration with slick, see, hair, the opinions and content are all mine and if you want already be sure to follow me on Facebook, Instagram and my blog millennial, mama da ba for more hair inspiration, don't forget to subscribe.

Comments
Dante Velasquez: oh my! your hair is already perfect and then you add that and it's even more perfect lol. Nice job matching the halo with the dye job :-)
Anna O'Briant: It matches so perfectly!
Catherine Ziegler: Hey Ariba! I love your hair makeover videos! Any tips for getting my curly hair cut to a medium ish length? Like what to tell my stylist etc.
Wow: if i have your hair i would never think to wear extensions ❤
Alisa: Hello, your videos are great! Could you let me know what is your current hair colour/colour style (balayage, ombre etc)?
AXOXOJ: Love it! I need to do the same I need the color that you use but I will buy it in Sally please let me know wish one is the color and the one you have on you roots I have the hidden crown hair extensions and I love it!
Ms. Mommie: TFS your hair coloring tips.
Danreael:
Sheila Boyd, RN: Woooow