Blonding Pattern + Toning Extensions | Jz Styles
- Posted on 12 September, 2022
- Tape-In Hair Extensions
- By Anonymous
Hope you guys enjoyed this tutorial!! Let me know what you’d like to see more of!
♡ ♡ ♡ FOLLOW ♡ ♡ ♡
Instagram:
www.instagram.com/justjessiiii
TikTok:
https://www.tiktok.com/t/ZTd3XB8Pp/
SHOP MY LIKE TO KNOW IT:
https://www.shopltk.com/explore/justje...
LISTEN TO THE JUST JZ PODCAST:
SHOP HAIR EXTENSIONS:
SHOP MERCHANDISE:
https://www.jzstyles.com/merchandise
SHOP HAIR CARE ESSENTIALS:
https://www.jzstyles.com/hair-products...
SHOP EXTENSION TOOLS:
https://www.jzstyles.com/extension-pr...
UPCOMING CLASSES:
https://www.jzstyles.com/certification...
SHOP HOT TOOLS:
https://www.jzstyles.com/irons
Business Inquires:
Call the salon/hair extension company:
801-404-6747
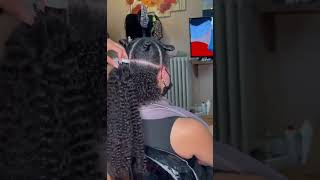
Hi you guys welcome back to my channel so for today's video, i'm gon na be doing one of my stylist kaylee's hair, we're gon na be doing a half blonde, i'm pretty sure it may change when she gets here. It'S either gon na be a partial or a half and then some extensions. So i just wanted to show you one of my favorite go-to, foiling patterns, give you some tips and tricks and then show you the before and after so, if you're interested in watching this stay tuned. Okay! So for this client i actually put the extensions in first and i wanted to show you guys an appointment where i did that and why i do it. So i do this if i want to custom tone the extensions with her own hair and since she's had the hair for a while it needed to be refreshed. So i'll show you that process, so she decided to do a partial highlight. This is the sectioning i like to use. It is a mohawk section, but, as you can see, it ends in a triangular point towards the bottom, and i really like to do that, especially if the client has a cowlick which most people do, because that point meets below the cowlick and that way, if the Wind blows or their hair moves you're not going to have like a dark hole where their calyx separates. So this is really good for all hair types, because it just ensures that you don't do a mohawk that just ends in like a box, because when you do that, it can be really obvious that you just did the mohawk area. So i feel like this helps everything lay a little more naturally, so i'm just doing a highlighting pattern. That'S a little bit of a thicker stitch. It'S not necessarily a baby light, because i am doing a rooted blonde and i want these blonde pieces to stand out. So it is a thicker stitch because of that, but a really fine section if that makes sense - and i am just leaving a little bit of a subsection in between, so that we still have that depth. You don't want to do your mohawk like packed back to back with baby lights, because then that section will look really blonde and it won't blend in naturally with the rest of the hair, especially if they have regrowth. So we're doing this to keep her. You know lived in and natural looking and how i like to tackle this mohawk parting. Is i start in the back like you saw me doing and then i stop about midway and i flip to the front and then i just meet in the middle, where i ended the foils in the back and i just meet together in that section. So i'm now starting in the front - and i am going to be doing two slices back to back here, just to give her a brighter pop around the face. So i start with those slices. You can see that i'm using my money piece foils. These are really small, so i use these wherever i'm doing her tighter money pieces, which are either going to be slices or baby lights. So these two are slices. Now i'm going to transition into baby lights, which will just be a finer weave closer together, so that it still gives that bold pop in the front and then, as soon as i start doing my regular highlighting pattern again with a thicker stitch. I'Ll transition back to the black foils and then, while everything's processing i'll, be able to tell the difference between what's the money piece area. Since those hairs are usually more fragile, you want to keep an eye on them and then i'm able to differentiate those between the regular highlights in the interior. So now you can see i've started using those regular foils again because i've switched over to the regular highlighting pattern. So i'm now just continuing that same pattern that i had done in the back until i meet the foils that i finished with in the back. Okay, so she's finished processing. We let her sit about 48 minutes, and this is the result. So we are now pulling her foils and we are going to do that root shadow. So i previously inserted the formulas that i'm using and i'm going to be using those formulas on her own hair, as well as her extensions. We did install those two rows to begin with, so those are installed and i'm going to refresh those along with her own hair and if you have a blonde client, this is a with extensions. This is the best way to do it, so i am taking that root formula and i am rooting the extensions. This is an important step because the extension hair is natural human hair. If it's good quality - and it will fade over time - just like your clients, own hair - so just keep in mind that your client will come back with faded, warm roots, sometimes a faded warmer blonde, and because of that, you have to upkeep their toner on the extensions. Just like with their own hair, i get a lot of questions from stylists and clients about this. Just wondering why the extensions fade, and it really is a good thing if they fade, because it does mean that it's human hair and it's going to mimic what the natural hair does. So i am putting that root shadow on wherever the extensions were rooted previously and then taking my blending comb to just comb it down, and i'm very careful that i don't drag it into the blonde part of the extensions i'm just doing that base. Wherever i used the root shadow and now i am using that root shadow on her own hair. Now that i've done the extensions - and i actually follow a similar pattern to what i did with highlighting, but i split it into two sections parting: it down the center and then i work left to right. But as you can see here, i'm not just going up in a straight parting, i'm going on a diagonal so that i'm mimicking that triangular section that we touched down with in the back. So because of that, it's going to follow the natural pattern that i highlighted with, and it's going to lay really naturally with her own hair pattern as well, and then after that's applied, i'm going to do the same thing. I did with the extensions where i take. My blending comb and i just gently blend down from where i applied. I do have conditioner on her mids to ends as a barrier, so that does help if you accidentally get your root color too low. But i still do this with the comb anyway, just to prevent that. So i did everything in the back on either side and now i'm just switching over to the front going on a diagonal parting, but in the opposite direction, but i am leaving her very front money pieces out. So i'm just touching the highlights that come right before the money piece. I will comb those away and then we're going to do a technique. I like to call back shadowing on the money pieces so with the money piece area, there's so many different ways. You can do it, but this is one of my go-to's if you want to keep it bright, but also have it be blended. So i just take that money piece section and, as you can see, i tapped the root smudge just on the back side of it and then i'm gon na comb. But it kind of transfers to the front so that it's all blended but you're not actually physically. Putting product on the front of the hairline, so it keeps it a little bit brighter. Now i am taking that toner and i am just going through and going to tone the extensions and work my way up and then get her natural hair. But i always like to do the extensions first just because it gives them a longer processing time, especially if they are faded. You can see that her extensions are pretty warm right here and that's very common in summertime when people have been in the sun and swimming and all sorts of things like that. So the toner is the same formula that i'm using for her natural hair that i had inserted before and i'm just going section by section when doing this, you want to make sure that you go section by section, because you want to saturate each of those sections. Very well, especially when working with hair extensions, i left the front out, and now i leaned her back, and i do these front sections and the money piece is very last since they're usually more porous, i'm just gon na work it all together, and i would say I let that root shadow sit for about 15 minutes and then the toner was about five and then i reinforce everything with purple shampoo and then we are good to style. So we are just doing a quick little blowout on her and then, since we had those wefts installed first, i don't have to worry about doing the majority of her extensions, but she does have four tape: ins on either side for extra fullness in the front. So i added those in after we dried her and after we colored her, because you can't get tapens wet for 24 hours. All right, you guys. This is the final result. It was the perfect little refresh and tightening up that she needed she just had a baby. Four weeks ago, we're so happy for her and she needed a little mommy makeover. She wanted it to still be a buttery beigey blonde, like we had done before, but just refreshed. So i hope you enjoyed this tutorial. Let me know what you would like to see. More of - and i will see you guys on the next video


Comments
Hair by Sandra: Love this! Super efficient. I’m always worried about the extensions soaking in the Shades too much. Do you ever feel like that happens?
Cheyenne Bechtolt: She looked so goood!!!!! You did an amazing job! Love love love how detailed this video is!
Yelena Hallum: So excited for this ❤️
Ashley Donohue: Next time it would be helpful to actually see you part the hair but as always amazing video and I learn so much!
Максим Богданов: ♥️ ❤️ Alles sehr schön. Aber zuerst zusammen die Nummern 10 und 1. Eine CountryGirll.Space Brünette und eine andere Blondine. Es wäre unfairv, wenn ich 4 wählen würde