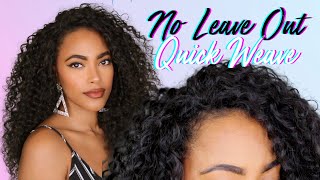
How To Natural Versatile Reusable Quickweave. No Glue On Hair! Better Length Hair
- Posted on 10 November, 2022
- Tape-In Hair Extensions
- By Anonymous
Easy DIY Quickweave Tutorial. Versatile Styles. No Glue Residue on Hair!
Check out BetterLength for your textured clip ins: https://www.betterlength.com/?utm_sour...
Save $5 OFF any Natural Textured Extensions.
Promo code: Ambre1102
Follow BetterLength Instagram: http://www.instagram.com/betterlength
My Wefted Hair Info:
Texture: Light Yaki
Hair Length: 18" & 20".
Quantity: 2 bundles
Color: Natural Color
Link to the same hair: https://www.betterlength.com/wefted-ha...
Chapters
00:00 Intro
00:20 Type of Hair Used
00:35 Braiding Pattern
00:47 Cap Construction
02:40 How to Lay Tracks
04:17 Reusable Cap
04:39 Updo Style
04:53 Flip Over Style
05:01 PonyTail Style
With the method there is pretty much no glue that will get on your hair. You will have a little glue around the perimeter of your lace out which is very easy to get out.
The weave wonder wrap is very easy to wash out once you take the weave out. It washes out like any other normal product you used on your hair.
Products used ( All Items can be found at your local BSS or amazon) Links Below :
Black Wig Cap : https://a.co/d/1sNzbpz
Salon Pro Weave Wonder Wrap : https://a.co/d/dYZsW6q
Sanek Strips : https://a.co/d/8WrqQUV
Salon Pro Hair Glue :https://a.co/d/1ekYNFj
Instagram : AmsRenee http://instagram.com/amsrenee
Twitter: AmsRenee https://twitter.com/AmsRenee
Snapchat: AmsRenee
Foreign, the hair that I'm going to be using in this tutorial is from better length hair. They sponsored this video and sent me two bundles of their light, Yaki texture and the lynx 18 and 20 inches, which I colored to match my hair color for my braiding pattern. I did straight backs sewn together in the back, so that I could have a flat Foundation as well as leaving out the entire perimeter of my hairline with a middle part. So the first thing that I'm gon na do after placing the stocking cap on is I'm going to take the weave Wonder, wrap by Salon Pro and I'm going to brush that all over the areas that I have the braids and while that is still wet, I'm Going to take some Scenic strips, I'm going to wrap that all over the stocking cap in the areas where I placed the weave Wonder wrap this part is very important because to me this is the part. The main part that makes your weave cap reusable, then I'm just going to cut off the excess pieces of the strips that I don't need. I'M going to press that firmly into place, then I'm going to use a blow dryer to kind of get it dry and it should start to stick to the cap once it starts to dry. So first you're just going to see me cutting away the excess strips on the cap and then I'm going to add a second stocking cap. This is what the tracks are going to be placed on. So I'm spraying some freeze spray onto the cap so that it sticks to the strips underneath and then I'm getting that nice and dry with the blow dryer. Now I'm just going to take a white liner and outline the areas of my leave out so that I have a guide when placing my tracks so that that I don't get any glue on my leave out so now on to gluing the tracks onto the cap. There is no special method that I use for gluing the tracks on the cap. In the back, I just measure the track cut, the track, add the glue and then firmly press the track to the cap. As you can see, I also wanted to point out that I did not invent this double stacking cap method. With the scenic strips, I saw a tutorial for this on Instagram and thought it was a brilliant way to protect your hair from glue for quick weaves, and so I decided to give it a try myself. So when I am placing my tracks at the top, the only thing that I do differently is, I start to curve the tracks a little bit, and that is just so that the hair Falls towards the face and that it will frame the face and kind of Make that area of the quick weave look more full. I also feel like with curving the tracks. This way you can fit more tracks on your part, which makes your leave out area look a little bit more full look, and that is basically it then. The last step before you get to any styling is just to cut off the excess cap, and you want to be extra careful and not rush this part, because it can be very easy to either cut your hair like some of your leave out, and you can Also cut some of your weave, so just be patient. Go slow on that part, so this is how everything looked once I got all the cap cut off now, I'm just flat ironing my leave out and I'm going to very quickly run the flat iron through the weave just to show y'all that blend game. So I'm gon na be real with y'all. This is like one of my favorite hair textures that I have ever worn like the blend was just damn near perfect, like it looks exactly like my natural hair flat iron like the luster was perfect. It wasn't too shiny, like it just looked very natural to me: I loved it, so that is pretty much it first. I just want to show you guys that this cap is reusable. I added these little Clips in here so that you can see that the cap is intact. When you remove the perimeter of the cap, then I just want to flex some of the versatility of this install method. You can wear it down. You can wear a flip over style, you can wear it in a ponytail, high or low still looks natural and you can even do like an updo. I'Ve been seeing this cute updo all over Instagram. So here's my little Recreation of it, like you, have a lot of possibilities with this quick weave tutorial, so I hope y'all enjoyed this. I had to go through a lot of night and day outfit changes to get this recorded for y'all. If you could not tell from the change in the videos um, but I was just very dedicated to getting this out to y'all, so thank you so much for watching and until next time, foreign foreign
Comments
Ruthie's vlog World: To whoever is reading this keep going, you're doing fine! No matter how slow your progress, each new week is filled with tiny steps forward. Be proud of yourself you got this. ❤
Naima: *You did a great job* with this quick weave! That’s been my jam lately, I promise ✨
Just Nathalie: This install was flawless and I really love this texture/color on you.
CellyLiv: That is gorgeous!! I love this so much!
Ms. Mommie: Ok sis you better do that! Love this and I’ll be giving it a try for myself.
Sade Monette: Danggg I needed this a week ago. You did that..
Che' 777: Gorgeous!!!!!
Davia Fenty: Two bundles ?! WOW
Moniquelp83: My hair is the exact same color and I just ordered a vpart Yaki wig. Did you do a coloring video for the bundles?
Mrs. T: Baby you did that!
Briana Brown: What dye did you use?
Jazmine Gardner: SOOOOOOOO Gorgeous you so beautiful ❤❤