Microlinks Hair Extensions Install- Like A Pro (Version Nanoring).
- Posted on 17 July, 2022
- Tape-In Hair Extensions
- By Anonymous
HELLO !!! everyone I will be sharing with you all the products and tools I'm using on this video, if you can purchase your products using my links it will help me keep posting videos for you.
I really love my work it saved me from bad situations in the past, and I'm really proud of what I do for a living.
For my practice:
Mannequin Tripod: https://amzn.to/3uTiBDl
Mannequin head: https://amzn.to/3ILgmrf
Hair straightener: https://amzn.to/3vhwQSH
Pliers Hair Extension Tools: https://amzn.to/3z9E1yy
Hair Gripper: https://amzn.to/3OdauIu
Carbon Fiber Stainless Steel Pintail: https://amzn.to/3yLGLk9
Clips: https://amzn.to/3B42vdE
Hair Beads Silicone Lined Nano Rings: https://amzn.to/3zejTeJ
Hair Spray: https://amzn.to/3zdMgtw
Dyson: https://amzn.to/3z8Hr4z
For my videos:
Lights: https://amzn.to/3AZZOKf
Mic to record voice-over: https://amzn.to/3oaakXO
camera tripod: https://amzn.to/3zejf0N
Teleprompter (very important for me - I'm learning English): https://amzn.to/3aHNdRo
Music: Music by Jonah Zed - happy now - https://thmatc.co/?l=1E6838DA
Enjoy this amazing son guys while we work together.
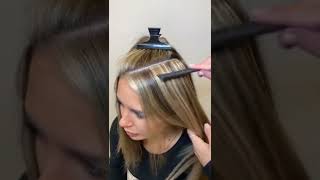
Hello, everyone - this is camilla villasbos from expresshair.ca and today, i'm here to show you how to install nana rings, hair extensions. So, first of all, i'm using my dyson to straighten the hair. I love dyson that make my work so much easier and i really i'm really happy happy for the money that i spent, because it's really amazing. So, first of all, we're gon na take sections of the hair and i will break the front part of my client from the ears to the front because we only gon na work on that part. At the end, once you mastering and you're like a professional and you speed up your work, so yes, you do not do not need to to leave the front part for the last one, but this will take some time. So, first of all, i take this small section on the bottom, because that section will protecting will protect the hair extensions. When my client pull the hair up, make a ponytail or whatever she want to make the hair up. It will protect the foam, let extensions exposure or you will not be able to see the extensions, because that hair will be there protecting. So also we take on the sides uh in a i don't know, diagonal. Listen. I accept coffee drinks, a parks, walking museum zoo. Whatever, as long you take me out for teach me how to improve my english, i'm from brazil, i'm live in canada for the past five years, and i work with hair extensions for more than 17 years. Okay, so once i took all these sections, as you can see, i'm trying to be the most clear possible, so you can see exactly what i'm doing and i got the things on aliexpress. It'S really helpful because keep the hair down also, i use the spray spray, as you have seen, but do not put too much because you we don't want to do that and then you take the section you see, i put a little bit more spray, but i'm Not putting bright and where i'm gon na put the extensions, because i wanted that part to be clean and clear. So, as you can see, i take all the little hairs that could be painful or get stuck and here's. My first section - and i will feel this section - not gon na - leave no space. It'S gon na be all hair extensions on it and um. As you can see, uh i'm using the eye tips. The eye tips have the eye tips. I'M sorry don't listen to me. Nano rings i work with all the techniques, so sometimes it gets a little bit confused for me, but don't worry, we're gon na go through we're gon na make it and you're gon na be good at it. Uh. Once i take this section, i will put the ring. Ah, you see, as i put the tool on my in tw my finger between the two to help me to pull out the hair. Oh sorry got stuck why i got stuck because i grabbed too much hair. I want to show you that you needed to learn how to grab the exactly and perfect amount to be strong enough to hold the hair and also to be thick enough, but not too much. That will not allow to pass the hair into the ring. So once that we did that first one we clap the ring and then that's gon na be secure for the next two to three months. Okay, so we're gon na keep going and you put the hair in and then you lock again your ring make sure it's not too tight. If it's too tight, it will hurt your client. So if it's too tight, you just unlock a little bit and put down and make sure you try putting up, because if you stitch too tight, you should adjust to not hurt your client um. Here i will be showing you with another one. As you can see, i will be putting every single section. I will be putting one strength of hair. Okay. As you see, this is my favorite technique. I will tell you why, because i find this technique so clean and so hygienic uh and practical for my clients to take and put back it's just amazing, most of my clients, with switching for for this technique. I work with all the technique, tape and and everything but a lot of clients. They prefer not using tape anymore because there's other techniques which is more clean, more hygienic and actually have a better end and nicer look so as you can see over there. I have this small table on the side, so i take the hairs and put in the table because that helped me speed up my service because i have already it separated and then i just has to grab one and just go and put on my client so Or you also can have an assistant but yeah yeah hard to have an assistant. It'S not easy! So once you get your hair, you put your hair extensions. You see you clap again with your pliers. I don't know if the words clap, but you get it because you see what you see and what i'm saying. Maybe it doesn't make much sense, but you see in the video. So it's all good you're gon na make it so, as i told you before this section, we will put every single section: we're gon na put your hair extensions. Why? The reason why it's? Because that's it's! What gon na give me the fullness at the end of the hair that i need. I have seen so many extensions with the end. It'S so thin looks so bad because they're not focusing and make sure the bottom it's full enough to make. It look great natural nice so as we keep working here um, as you see her extensions, my ring it's, you know what i'm gon na stop to talking and i will let you watch the video okay and i will be back with you when it's more things To talk about it tears i see my past like it's still around. Am i happy now? Am i happy now, but my frame just cracked? Am i happy now different heights angels in my head tears? Am i happy now? Am i happy now? Are you happy now? Hello, everyone here i am back - this is camilla your hair extensions technician. So, as you can see, i already did a few applications we're still on the way, but i decided to come here and talk to you a little bit more about hair extensions. While we are doing the application, so this technique, it's a very nice technique for people as my client, as you can see, she have a very fine hair. When somebody when someone has when someone have a very fine hair, we wanted to make sure our application is. The most perfect possible to be able to give the perfect look without look overdue, like we don't want to see the hair extension be so thick and look and do not give out as that desire look. So when i have someone have very fine hair uh, i try to look to use between 100 to 120 grams, no more than that uh, because we don't have as much space a person who only a person that have a fine hair only can handle between 100 220 grams, if they want to add some length and volume the same time, but if it's a person just wanted to add some volume, it's fine. We can work between 70 200 grams as long the size is the same size of their own natural hair. So, yes, we can do that, but if you wanted to add length and volume at the same time, so no we're going to need to work between 100 to 120 grams. If the person has a very fine hair, because if the person has very fine hair, that means that they do have very little hair correct. But if my client wanted to use nano rings and she have, i would say, a normal hair. I wanted to work with between 150 grams 200, 180 grams, max 200 grams. I think 200 grams is more than enough for someone who have normal to more like normal to more full hair, because we don't want it to put too much weight on the hair on the scalp, because, yes, we can cause some breakage. We can cause some damage. So you have to be very careful with that. You should not overdo with the grams. So, as you can see, i'm taking another section this another section once i complete the three full rows rows rows on the bottom. I don't know guys you understood what i mean. Um so now i'm using two of that protectors, devices separator whatever you want to call that i find an alibaba. I will post here uh the link for you guys because it's very convenient i really like to use um, i'm just trying to adjust the light. So here i want you to see every single detail, because you need to understand and for you to understand you need to see it clearly, as you can see. I just add this ring right. This ring will be the first one placed beside my ears beside the client's ears, so you make sure you always respect the direction of the hair growing, never go against to the direction always respect the way the hair is growing. If the hair is on the left always place to the left, if it's the right always place to the right, but do not pull against the hair natural growth. Otherwise you can yes cause pain, damage, breakage on that hair extension, and i have some issues with lighting. I'M sorry um. This is my first time recording by myself or at all, and i'm trying my best to make sure we have a great video. So you can see exactly what i'm doing. Uh something happened. The video went back, but yes, it's fine here we can wait as you can see how many lines i already did one two three right, so i did have already few lines so this next section once i did that full three lines of the bottle can be Three to four uh, some clients i do for some clients. I do three some clients i can't do even to i can't just do two right so um once we place this protection, we wanna make sure we we we're gon na get the hair in the right place. So in this section right now we're gon na be different in this section. Is i'm not gon na be placing hair in each strength? In each section i will be jumping one put one jump, one put one jump one. I don't know how to explain english, but yes, you're gon na see in the video and that's why it's so important that you watch the entire video, because all my tricks, you will be seeing the video, oh, my god, all my tricks, so ears are tricks. I will be showing you so, as you can see, i'm jumping one and apply on another one. The reason why i do that - and i want to get the camera very close, so you can see that part. The reason why i do that it's because i want to start to blending, make sure the hair mix together, like the flavor. The party happens in the moment that the hair mix together and they're, not like my client's hair and the hair extensions anymore. We start to be just one body and start to be just one section: one hair one head and one everything. So that's the eight point. That'S idea. I think you got it, don't get mad at me. Sometimes i talk too much. Yes, i know um and then i'll be placing as you can see in the details far away. I think i'm close enough in the video for you to see it that there is one strength, it's a little farther from the other one and i'm leaving that space over there, because that's what gon na? How helping me is start to blending that hair extensions. You'Ll. Get it you got it so and you see always checking if there's not too tight. If it's too tight, just open, remove and install a grin, because you don't want your clients, have headache or have a bad time with her hair extension. So you just like you know, apply in a way that it's not painful. If it's too tight, don't be lazy, take it off and put back and practice make perfect. So just get your doll on amazon. I will post the link down here where i got mine and keep training. Training practice make perfect if you keep trying, if you keep doing you're gon na, be the best there's place for everybody, and you have to keep doing as you can see that division. The way i'm working right now will make a lot of difference a lot of difference at the end of the hair extension guys um, i'm i'm confident, i'm really confident about it. I have been working with the hair extension since i was a kid like very kid. Like very good and probably um, hair extensions is not just my job is my passion, so, as you can see now, you're gon na do the same thing, but on the gaps that i left behind, i will be put on the direction on that of that gaps. I would not be put in the same direction that i placed the other ones, so it's gon na be like i don't know how to say, but there's gon na be like one on top of another one and that's gon na help blending the hair extensions um. So now, where was where, in the direction that i placed the other tip, i will not place, and i will place in the place that there in the direction that there is not tipped. That is not extension on it. Putting again my divisors and let's go. Let'S go, let's go and then, as you can see over there, i'm not putting the same direction that i put just before i'm putting in between in between and the space that was empty. There was an extension yet so i wanted to make like one go. On top of another one and match perfect - and this table is just a great thing to help me - because i put all the hair in there and once the whole extensions it's there - it's get much easier for me to to do the application don't get mad at Me this is my first time recording this video. I hope it's very helpful because i took a long time to learn to do this in a perfect way and i'm just want to share with you some of my tricks, but remember if you would like to purchase my training, you can go to my website or To my instagram get in touch with me, i love to talk to you guys and talk about my hair extension service or just about my training, i'm based on ontario concord. As you can see there, can you see guys them doing one and left a little bit and go another one and that's the way, we're gon na finish the whole hair extension? The reason why is because, as i mentioned it before, that helps blend the hair extension and make sure you keep trying on your doll, so you're gon na understand the reason. Why cannot be too thin and cannot be too thick if it's too thin, there's a risk of your clients, put some tension on the hair, and actually the ring comes with the hair and everything. So we don't want to do that either and also, if you have hair extensions, please make sure you are not treating your hair extensions. Like your shoes, you just come and throw away and then that's done. Hair extensions require a lot of care a lot of time. It'S time consuming, you need to have a lot of patience to deal with and but once you're done, your hair looks so beautiful and amazing and and that's it i love her extension. So guys, as you can see, i will let you keep watching. That'S the that's! That'S the bias, i don't know if it's the right word, but that's the direction that we're gon na be following to all way to the end of this back, to make sure it will tears. I see my past like it's still around, but am i happy now? Am i happy now think i'm going down? Am i happy now? Am i happy now different heights, but it's the same hello, everyone i'm back, so i did this. I did the back. I completed the back on a way i was showing you before now. I'M working on the sides - and i just wanted to tell you the size - is basically the same thing. We did in the back, there's just a few more things that need to be done, but it will be accordly to your client. It will change clients to client. So you have to understand the client's needs to know and to be able to provide what you exactly need. There is notable for every client it's going to be the same thing for every client for clients. Sometimes i use different techniques. Sometimes i use different ends. Different finish, so it's important for you to understand that you need to get a proper training to be able to offer a full service, hair extensions. So normally, when i'm done a service like that, what i do i just spray. Some water in the hair put some moisturizer or just mousse, and just let my clients go with the hair uh with a little bit of mousse natural. So it's gon na it's gon na look good after an hour when the hair dry, but in this case today i'm just gon na use my hair straightening to do some curls. So you can see the result uh, but i would suggest for a curly crying. So always let them go with the hair, with some mousse and wet and let dry natural. But in this case here i'm just doing some curls, so the hair just gon na match when she leaves. But of course it's gon na look much natural and nicer with her natural waves um. While we're doing this work. I would like to talk to you a little bit about me, so my name is camila villas boss. I am from brazil. I live in spain. I live in uruguay, sorry, paraguay, bolivia, argentina, um, different places. I have traveled the world providing my service. I started doing hair extensions. Long time ago i went to university in my country i graduated as a cosmetology and aesthetician in my country, but i always choose because it's my passion, it's my therapy. I choose to work with hair extension, it's what i like to do, and i'm really happy that i'm here today explaining to you about me about my business, about my hair extensions uh, my passion that make make me money and also provide me free therapy, because it's When you do things with love, it's really good. It'S really enjoyable! I just gon na grab some oil. I'M gon na put some uh oil like a treatment on the end of her hair, but for sure uh be careful to not put any product oil or cream um close to the scalp, because otherwise the extensions can fall out and that's not what i want. But in general do not put cream more oils on your scalp because it's not good. I know people are gon na hate me for say that, but it's not good. So here's the result. I love my hair extension. My clients she's a regular client she's, always with me every two to three months and i hope you have enjoyed guys and i hope see you soon and i will be teaching you more about hair extensions and if you follow me, go to my instagram expresshair.ca, i Will be really happy to have you there with me stika condos

Comments
Karen Noir: I really liked the explanation❤️
Felicia Salim: I loved your simplicity
Jasmin Clever: thanks for posting videos explaining I learn a lot
ivony Sapa: I really liked the explanation
Jennifer Gutschmidt: Best explanation video EVER!
Sami kongo: Thanks for Sharing this Video
Sololyamon: Hello . I am looking for locks like yours for my clients.... could you give me the contact details of your supplier? I am in France . Thanks
ivony Sapa: I loved the video
sliced & iced: Can you please tell us what pulling tool and threader you're using? Thank you!!
Katherine Suzuki: I learn a lot from your video camila
Katherine Suzuki: Perfect
Tashema Stephens: How long does this take to do?
Juliete Pereira:
emma soza: I loved
ivony Sapa:
Guta Suna: I loved the video
Vida Nogal:
Vida Nogal:
Vida Nogal:
Chery Lup:
Grace Hendri:
Higor T: ❤️
emma soza: you really good
Vida Nogal:
Helem Dru: Girl need to book with you
Katherine Suzuki: ❤️
Loris Veer: I loved you rock too much❤️
Grace Hendri:
Lilac Mota: soy de españa y voy a viajar a canada solo para que me peines camila.