Lock'Nlong Hair Extension Installation Video Diy Long Real Hair Best Cheap Remi Not Clip In
- Posted on 18 September, 2013
- Tape-In Hair Extensions
- By Anonymous
http://www.locknlonghairextensions.com...
30% OFF Promo code: YOUTUBE
Installation Video for a new set of Lock'n Long Hair Extensions. These are Not Clip In Extensions
Permanent, Practical and a Perfect Price. Do It Yourself hair extensions that are permanent and a Patent Pending Process! http://www.locknlonghairextensions.com...
Do It Yourself Long Hair extensions
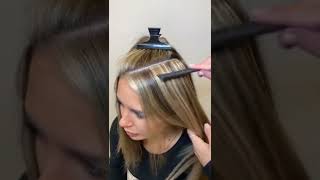
Hi I'm Madison and welcome to the Lakhan long hair extension installation video. Now you are just moments away from longer: more beautiful, luxurious hair with laka mom hair extensions. Please note that it will take about 15 to 20 minutes the first time you install your extensions, but it only gets easier after that. So some of the items that are included in your kit are your hair extension pieces, your hair extension pliers, your loopers and your links, some other items. You may need a mirror: a comb, a pair of scissors and two hair elastics. So after you've taken your extensions out of the bag, the first thing that you're going to want to do is simply take your scissors and you're going to want to snip the slack top now. This black tie is simply securing all of your extensions together, and you want to be sure that you don't snip anything else, as these will be wet and secure your hair extensions way. As you can see, there is a difference between the front side and the back side. We want to make sure that this is the closest part to your scalp and that these loopers and these feeds are facing forward. So the first extension we're going to work with is the smaller side piece now, like I mentioned before this is going to give you the best visual for you to install the rest of your extensions. So what we do is we take a small piece of hair. Just slightly above the temple and we're going to take a clip and clip off a nice clean line, take our extension remember this is the back sight, and this is what you want closest to your scalp you're, going to want to place the extension about one inch In from your hairline, take two fingers or comb and you're going to reach through with a clear plastic looper, so you'll grab a small section of hair just on the lying and you're going to pull it through the clear plastic looper. Now, as you pull the very bottom of the louver, you will watch the hair gently glide through and pull the hair directly into the leaf. Now the next step is you're going to want to take your hair extension, pliers and you're, going to going to put contact onto the bead and you'll gently clamp and crimp the bead, so that it falls your extension in place. The next step is to repeat on the opposite side: when you go to take the hair and bring it through the loop er make sure you have the right amount too much hair can cause the loop to jam, so you'll want to start over. If that does happen, so we've just finished putting in both sides of my hair. The next step is, we are going to take a nice clean section just about at the temple area, all the way back around to the back of the head clip up the hair. I'Ve gone ahead and secured the third piece of extensions with this headband, and now I have both hands ferny. You want to make sure that this piece is centered on your head and it just about the temple height I have completed putting in the third set of extensions. I have made sure that all of my links are secure and, as you can see, it's added at least four inches of length to my hair for our last and final piece. We are going to simply go just about one inch under the third row. We just put in create a nice clean straight line and clip it up and out of the way so I've gone ahead and I have installed all of the links. I started first with the very center and I made my way forward to the front of my face. If you feel the need to have your ends, trimmed up. If you want to put any layers in your hair, we recommend that you have that done by a stylist or if you would like to do it from home. Here are a few easy tips to do. Some easy blending simply take the front sections of your hair. Make sure that you're only cutting the X in here you'll take your scissors and you'll just gently glide them down the extension hair? No, we call this the waterfall effect and what this will do, if you just take simple easy little pieces, it'll, add a little bit of layering without taking up a whole lot of length, and this will help for your extensions to blend in nicely with your own Hair in just four easy sections of hair, you too can have this long, beautiful, luxurious hair that you have always wanted thanks for joining us today and for more tips. Please visit the website at LOC among hair extensions, calm,


Comments
Linda Mercado: Got these done at an expo and have loved how secure they are!
Miranda Dellucci: This hair is high high quality and it took me a few minutes to install but beats the hell out of 4 hours that I have waited before!
Vicki McKellar: finally someone has created something I can love!!!!
Karolin Holtzmann: I also saw these at the expo and so bummed i missed the deal, I will see if the code will work for me :)
Margaret Dart: I like that they are re-fillable what a neat idea
Sonia Hays: Was worried they wouldn't match my hair but with the free exchange policy really nothing to worry about.
Winnie Green: Going to try them for a dance-- wish me luck!
Rebecca Pokrovskaya: I'm going to try them for my wedding because I can not stand clip-in extensions and I'm a poor soon-to-be-bride;)
Ines Krüger: she is so cute and the hair matches so well