Easiest Self Haircut! 2K21 How To Cut Your Own Hair
- Posted on 04 January, 2021
- Hair Knowledge
- By Anonymous
In this tutorial I run down a step by step process on cutting your own hair out the comfort of your home in case you are still skeptical about being out and about due to this pandemic going on. hope you find it useful if so let me know down in the comments what you did and didn't like so maybe I can better help you in the next video. thank you for watching.
F A D E D C U L T U R E.
Filoso razor blades! https://filosobarberbrand.com/fadedcul...
Fading Steps:
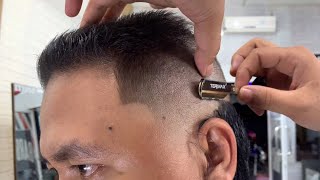
Run the 8 guard with lever open over the top
1st step, guideline with zero
2nd step, guideline with .5 (no guard lever open)
3rd step, guideline 1.5
4th step, 2.5 blend up
5th step, 3.5 blend up
6th step, 4.5 blend up
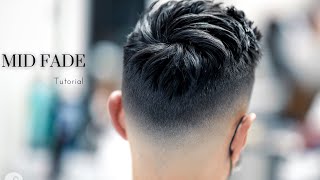
7th step, blend out top guideline w/ 1.5 guard open to 3 qtr
8th step, blend second guideline w/ .5 guard open to 3 qtr
9th step, continue blending second guideline w/ 1 guard open to 3 qtr
10th step, blend first guideline w zero, lever closed
11th step, open lever half way, continue blending
12th step, continue blending with lever open to 3 qtr
13th step, do any touch up work
14th step, use trimmers to take out bottom hair
15th step, use electric shaver
Need coaching?
Book us
https://stanwith.me/fadedculture
Follow us on Instagram!
https://www.instagram.com/sergiobarron...
https://www.instagram.com/adrianbarron...
https://www.instagram.com/fadedculture...
Shop our merchandise.
Equipment used in video.
(CLIPPERS)
Surker cordless clippers https://amzn.to/356KH0W
Babyliss Fx https://amzn.to/2LDnXLW
Babyliss Trimmer https://amzn.to/3cFg8kN
Wahl five star senior https://amzn.to/37WjhtV
Andis GTX https://amzn.to/2OqYneL
Andis shaver https://amzn.to/36Y7YjA
Babyliss blowdryer https://amzn.to/36Wxq9l
Wahl guards https://amzn.to/2WlRa2Q
Clipper disenefectant https://amzn.to/35xtz3x
Hair dye compressor https://amzn.to/3eT79gB
Straight razor https://amzn.to/387477N
Hair brush https://amzn.to/2LetrQb
Neck duster https://amzn.to/38Y4cKg
Handheld mirror https://amzn.to/3rOH2P1
Ring light https://amzn.to/3b3Bpq5
(STYLING PRODUCTS)
Johnny B Gel https://amzn.to/2Z5px0O
Johnny B Matte paste https://amzn.to/360xDtg
Johnny B Pomade w/ shine https://amzn.to/3cASy8P
Semi permanent hair dye https://amzn.to/2U7VDpq
(CAMERA EQUIPIMENT)
Canon 5d mark IV https://amzn.to/2Ul8960
85mm lenshttps://amzn.to/37Wvm2m
Ring light https://amzn.to/2S4XbQJ
What'S going on faded culture, it's sergio barron and i'm back again with another tutorial today, i'm going to be doing an updated version of my self-cut tutorials for those who are still kind of skeptical about going to the barber shops. Due to this whole kobe thing going on, so i hope y'all enjoy and with that being said, let's get started. Was that good, yeah, all right guys so to begin you're gon na need your number one through four guards and then on number eight, since we're doing eight and a half on top and then be sure to have your half clip and your one and a half Clips as those are gon na be really useful when it comes to blending these guidelines out and then i'll be using the circa cordless clipper and my babyliss skeleton trimmers as well i'll, be using this and this electric shaver and then you'll need a neck duster and A hair brush also be sure you get a cool care plus disinfectant spray, as this lubricates and disinfects. At the same time, for your clippers and also i have this ring light behind me, and since it has these knobs right here, i'm able to hang this handheld mirror right behind me so that i don't have to be holding it with my hand, i'll link. All of these things down in the description, as well as with some other options. If you can't find these things that i got okay, so to begin you're going to throw on the eight guard and then open the lever, all the way, which is eight and a half, then you're going to run the clipper multiple times over the top hair. Just until you get everything nicely cut and even be sure you go against the hair growth pattern. Okay, so to begin you're gon na grab your clipper with no guard and close the lever. Then you're gon na lay down your first guideline, starting from the temple peak and then slant back as far as you can see from the front mirror and you're gon na do that on the left and right side of the head make sure both of these guidelines Are even when you stare straight into the mirror before moving on to the back and as for the back you're, just going to want to turn around and stare at the little mirror so that you have a bigger reflection in back of you and you're. Just going to want to connect both your guidelines, so they meet evenly in the back. This guideline here is probably the most important guide guideline of them all, since the rest of your guidelines are going to run parallel according to how even and straight this one is set, so just take your time and make sure you get it down right. So once you're done with this guideline, make sure you take a good look at it and it's as even as possible and then you're gon na come in with the open lever. That'S a half and you're gon na set down your second guideline coming up about a finger and length up high and we're gon na just run that guideline all around the head running parallel to your first guideline. It'S always going to be a little tricky as you reach the back opposite side of your dominant side, since you got to kind of stretch towards it, but uh with practice, and maybe a little bit of stretches before you start it'll help you get better with time And once you're done here next we're going to move on to our third guideline by setting down the one guard and keeping the lever open and we're also going to come up about another finger in length all around the head. Try and not use so much pressure when you're laying down these guidelines that way, they're not that hard to take out when it comes time to blending them out and once that is set. We'Re gon na move on to our number two guard and the same thing. We'Re gon na keep the lever open, except this time, we're gon na start kind of sculpting the side length of the hair onto the top kind of using some c-scoop motions. So that you're not blending too much into the top length of the hair and next we're gon na throw on the number three guard still keeping the lever open, which is a three and a half and we're going to repeat the exact same steps that we did With the number two guard and we're only gon na come up about a half inch higher than we did from the two and a half and the same thing guys we're just kind of sculpting upwards. As you reach the curvature of your head, you don't want to kind of dig the clipper into the top head, because that will take off too much length. We'Re kind of just think of your head, as kind of like a square shape and you're kind of moving. The clipper straight up to the roof, and now finally, with the four and a half we're gon na, do the same thing except this one's gon na be the last guard. So you're gon na try to really connect the side length to the top length of the hair. So if you got to kind of lift the clipper up a little bit to really scope the side length to the top, then do so when you're using higher guards. It kind of starts to get harder for your clipper to cut everything nice and even when you're moving fast. So on this process, start slowing down your hand, motions so that you give time for your to your clipper to get everything nicely cut and even and once you're done, you're just going to come in with your hair brush to brush away any loose hair. And that's all your guidelines are really visible. As you see here, we got our three guidelines, make sure they're nicely even put all around your head and we're gon na start blending out the uppermost guideline for that. I'M gon na come in with the one and a half clip and i'm gon na open the lever here to about three quarters and i'm gon na start, using kind of the corners of the clippers to get that guideline nicely blended and be sure you get it Blended all the way out before you move on to the opposite side and to the back side, and if you feel you need to open or close the lever a little bit more here, and there then do so try to get comfortable using that lever. As like that lever play is going to be really essential to helping you blend out these guidelines completely. For me, the lever open to about three quarters seems to be a good starting point when it comes to blending out these guidelines, but every hair will differ here and there, depending on your hair type and hair texture, but uh yeah. So just i mean just start with that lever open to about three quarters and then just adjust as needed. Be sure you utilize that handheld mirror as much as possible so that you get really good comfortable positions when it comes to looking at the back of your head. Next, we're gon na throw on our half guard and i'm gon na leave the lever still there to that three quarters and now we're going to start working on that middle guideline be sure, you're using only small, consistent strokes when you're taking out these guidelines. As you don't want to take these lines any higher or create any darker ones right above it, but uh, it's important to note that when you're taking out this middle guideline, you will kind of create a softer guideline right above it, but don't try and take it Out with this initial guard right now, you'll come back in with the higher guard to finish blending out the middle guideline completely, and next we're going to leave the lever open to that same three quarters and now we're going to throw on that. One guard, like i said, to finish, taking out this middle guideline and next we'll come in with the clipper lever closed and then you'll open it halfway and then all the way to finish taking out this last guideline right here, i'll start by using small, consistent strokes. Here with the lever closed and then uh i'll open it halfway, move up a little bit higher and then i'll open the lever. All the way to finish taking out this guideline completely, i like to take out this last guideline in sections at a time so you'll see here that i start taking it out completely. With the i mean on the right side of my head and then i'll move forward to the left side and then i'll focus on taking out the back side and for the back side, i'll kind of split it into two sections: the back left side and the Back right, side be sure, you're continuously brushing away any loose hair. That way, you have a clean view throughout the whole process and, like i said before, we're gon na repeat the exact same process on the opposite side, starting with the lever closed then halfway and then all the way open, gradually moving up a little bit. At a time, be sure you're using the clipper with soft scooping motions so that you're not creating any hard lines or anything like that. Cutting your own hair does take time to learn but uh with time you will get better. So at first when you're starting out uh be sure you take your time with every initial step and try to get it down as perfect as possible and uh with time. You'Ll, just gradually get faster and faster, be sure, you're, always cutting against the hair growth pattern of your hair. So if you feel you need a twist and turn the clipper a little bit here and there to always go against the hair grain, then uh do so and now moving forward to the last section of the hair again guys, starting with the clipper lever closed right. Here and then i'll open it halfway, move up a little bit higher and then we're gon na open. It all the way to finish blending up this initial guideline and once you're done you're going to want to take a good look at the whole haircut and determine if you need any little touch-up work for mine. I did notice that i had some little dark areas that i needed that needed to be cleaned out. So i came back in with the half guard open to about three quarters and i kind of just pinpointed those dark areas and kind of just focused on splitting them up with the with this guard. So now that we're done fading out all the guidelines, we're going to focus on taking out the bottom of the hair and for this i'll come in with the clipper in this position, since it creates a baller guideline and you'll see why i do this a little. A little bit later, but as soon as you do that guideline you're going to turn the clipper back over and then take it right out with this same trimmer and we're going to repeat this process all around the entire head and remember that you're. Only setting in this bought guideline right at the uppermost part of where you still have hair and uh try not to set it in any higher than that, because then it will be harder to remove and now we're just going to focus on taking out the rest Of the hair, and since we started with the trimmer in that first position with the setting in that border guideline, now we'll be able to see this faint little guideline so that you know how high to take up your electric shaver and if you don't care to Shave your head with the electric shaver at the bottom, then by all means all you had to do - was just take out the bottom of the hair with your trimmers. But if you are using your electric shavers you're just going to use them as they are a pair of clippers and you're just going to shape up up until that faint line as you're doing this process. It'S a good idea to kind of feel your skin as well to see if you miss any uh any parts of your head. So when you're feeling it with your fingers, you'll be able to determine if there's any little rough areas and uh the same way. You'Re kind of just using the shaver against the hair growth pattern of your hair growth. That way you get down to the skin and that's pretty much it for the blending process, guys next we're going to move into setting up our box or our edge up in the front, and all i like to do is kind of start towards the end of My eyebrows or the you kind of you can kind of see where your hairline is naturally set at and you're just going to try to create a box with the corners being at about a 90 degree angle. This could get a little tricky, but just take your time and just try to get it as clean as possible. I usually set the side bars in first and then i'll try to connect them towards the middle, and next i'm gon na come in with my one and a half just to trim all of my facial hair and then we'll just focus on blending it down from The sideburn area, i'll open the lever and then i'll close it just to finish blending it out completely. The bottom lining is all kind of preference, but i like to set my line right about where the neck bends in the middle so i'll find the center point. In the middle and then i'll work, my way to the left and right sides of the neck and then i'll just come in with the trimmers and uh take out the excess bottom here lining up. The back of your siberians could be a little tricky since it's kind of hard to see in that area, but uh with your fingers just try to pull your cheek forward as much as possible, so you can basically line it up back there and uh. Then the bottom i just come in with my electric shavers to shave the bottom neck and also shave off my mustache. If you own a straight razor, you could come in and tighten up the edges of your lineup, but uh. If you don't know how to use these, then i suggest you kind of practice at first without a blade on there. That way, you get familiar with the hand movements before actually using a razor so that you don't risk the chance of cutting yourself. So that's pretty much it guys for this tutorial i'll come in with a little bit of some mac clay and work it into my hair before teasing it and looking for a desired. Look that i'm comfortable with so yeah guys. Here'S the before and here's the after! So i hope y'all guys enjoyed this video and were able to take something home from it, and let me know down in the comments what your thoughts are. Also, let me know if you are able to try it out and uh, which all the outcome was again guys. My name is sergio barron. This is faded, culture and i'll catch on the next video peace.


Comments
Cássio Mori: I’ve practicing with your technique for months now and I can finally say that my fade is almost as good as of my pre-pandemic barber! A game changer was to switch from the basic Wahl clipper to an Andis Pro Alloy. I appreciate your world class content, keep it up!
Abner Alberto: Best tutorial I've seen so far, it's very detailed . Keep the self cut content coming.
Justine Tadena: When his self cut is better than your $30 +tip barber cut.
Richard Pearson: Can’t believe that this is a self cut, it’s perfection
adam lee hadfield: The 2 best barbers on YouTube, Sergio and his brother. The content they put out is in a league of its own. Pure, pure quality. Blessed us with another self cut that is so good it’s ridiculous
Lewy’s Laces: Absolutely quality tutorial! I’ve never cut hair in my life I work in construction, but I’ve always been interested in cutting hair and I’m very particular about how mine looks. I bought the wahl 5 star senior cordless during lockdown as the barbers were shut, I only ever did one grade all over though. I watched this tutorial yesterday and followed it step by step, it actually turned out really good and even my girl thought I had been to the barbers! Thankyou for the tutorial your technique is flawless and your talent is out of this world, wish there was a barber on your level where I live but there is no one anywhere near this level. Keep grinding and I wish you all the success the world has to offer
marktheshark45 Rivera: Bro! You make that look easy! That cut is so clean! I have these exact same clippers so I’m excited to follow this video on my next self cut. My first self-cut with these clippers was pretty decent, but like you said, I’ll get better with time. I feel like this video has more better details and better final product than any other self-cut tutorial that I’ve seen. Thank you!
Ramiro Ospino: Awesome video bro. I’ve even cutting my own hair since Covid began and there have been plenty of ups and downs. I’ve been struggling with blending the lines but with your pro tips I feel more confident. Thanks man.
Jonathan Salazar: Thanks man! You just gave me great pointers! The results came out great with my magic clips with the ceramic blade. I get my double wide 2215 blade for my ac trimmers soon. I've been cutting my hair for 1 year and a half and with your tips I felt like I have just started giving myself better results than some of the 25$ Fades I've gotten! This is awesome!
S11LIFE: Instant subscribed! Everything was well explained! Been fading my hair since high school and I’m now 36 but I love your steps. Definitely trying this out tonight lol
Raffael Tzeggai: I've been cutting my hair myself for a long time. I tried the technique yesterday, it's very good ... thank you very much
Walkaa: I also cut my own hair but atm my hair on top is a 4 when it grows to an 8 I’m for sure doing this cut
Moses Valentino: Amazing video forreal!!! Really love these tutorials & I’m learning so much to perfect my craft. Keep up the work!!
Benjamin Worlund: I love the part when you're going around to the back of your head and you turn the clippers the wrong way first. I've been cutting my own hair for years now and I still do that every time. I haven't been brave enough to do a skin fade, but I'm going to try it now and I'll let you know how it turns out.
Marc Lopez: Dang bro this is the first video I've ever seen of you and I'm sure glad that I did. I love the steps you use to get it done and the 3/4 to get out the lines. I'm gonna use that. I have the self cut system. I'm definitely subscribing
Washington Espinosa: I am glad I found you guys! I have been cutting my own hair since a bit before Quarantine. Actually started when I kept taking my 6 year old at the time to a kids barber. She literally took less than 7 minutes to cut his hair and charged us $30 plus tip. I tip really good FYI. She started to get sloppy and I said I'm done. I'm going to do it myself. I started off bad but started to get better. Saw countless videos and they helped. But this one here tops them all. Especially since I also started to cut my own hair. My fade came out clean! Thx man
Coco r: Thank you! For the great Video! I was able to Cut ✂️My husband's hair way better than before because of Your easy yet perfect techniques ! Thank you ((:
Juan Rosales: I'm also a self haircut member10+ years doing my own haircut and this is the first time I see I'm not alone
walter N: primo... damn I been cutting my hair for a few years now trying to complete the guidelines one by one (open, halfway then closed) and always noticed my lines getting pushed up... your way made it so easy it was like a cheat code and cut the time of the cut in half. Thanks i'm subscribing rightt now respects!
Kolten Lima: This video was a great help. Obviously the first try wasn't perfect but it came out WAY better than I planned.
rockym56: Great video tutorial!! I am 39 years old, and I have been cutting my hair since I was 13. Mom and pops never had $$ when I was little to take me to the barbershop in a timely manner. I only got a haircut once every 2-3 months.. My hair was crazy wild back then. So I asked for some cheap clippers from walmart for xmas and the rest is history. I agree with ya, the back of my head is always a pain in the ass. I am no professional barber, I can fade real damn good, but I can always improve! I just cut hair for fun and the experience. Never charged for a hair cut in my life. Its totally different from cutting your own hair and cutting someone else’s. So I welcome the experience I get from cutting family member’s and friends hair. Now I have a 6 year old and I love that I get to experience that I need and I enjoy our priceless talks while I cut his hair. I have the andis master and andis fade masters, gtx t-outliner right now. I have my clippers and outliner zero gapped right now. I use “The Rich Barber’s” 1 min blade modifier to sharpen my outliner blade. But I am still not happy with that! Do you have any tips on what outliner is the best in ur opinion? Is the Gold FX really worth it? Do u modify ur outliner blade? Or is the Razor the way to go? Thanks and you have a new subscriber
willie007: Man thank you for your videos it was because of your videos that I was able to start cutting my own hair and now my father in laws hair and the fades come out really clean and crisp following your steps
DavidJiang2nd: This is so clean! One of the best fade tutorials there is!
Ralph Propeck: Clean as always my friend!! Thank you so much for the great tutorial!
NonNobisSolum: Been doing this myself for 20+ years, just stopped in to see if I could pick up any tips. Great vid, thanks for producing and posting. Cheers, bro.
Kurt Uentillie: Been learning to self cut my hair and I watch this EVERY TIME to help me out. I've only cut my hair 3 times but each time it gets better..
Markus Mustermann: Best tutorial there is on YouTube, thank you so much. We're currently in lockdown 4 because eof corona and there is no barber open for 20 days so you can imagine which favour you did for me with this video hahah
ThisBoyzOpinionz: This is too good to replicate. Bravo great job man - it was art! Thanks for the video!
Scribbles13 Gaming: Thanks for the video! This has helped me keep my hair short and not having to wear a surgical cap while working at the hospital. #newlockdownskills
Captain Taraw Gaming: Dope! Cut my own hair and it took me a little time to learn the process. Once you learn the process the tweaking brings the magic. Be gentle because you can always go back cut what you don’t need.
Karloz Trejo: Dude thanks for the tips i started to cut my hair and my son’s hair and i got really good with his but mine is been hard cuz I didn’t know how to do the back but your tips are very helpful ✌
Lorenzo Garcia: Mad respect bro!! I tried it rn and it came out okay. It’s hard as crap. I will say that. Thanks for the video tho. I can cut other people hair but trying to cut my own I didn’t think it was possible. Until I saw your video, then I was like Ight imma try it. Abs it came out alright tbh. For a college student it looks good to me tbh
Frank Zavala: Started cutting my own hair since I saw this video. Great video and explanation my bro. Thanks!
Jamie Cusack: Watched this so many times. Everything so fresh about the cut and the neck ink too
Peter Minicucci: One of best self cut tutorials I've seen! Gonna attempt this on myself next cut.
Jr Rosa: This was super clean and straight forward. Thanks for doing this video. Peace.
Tim Palmer: Wow, that is by far one of the best self-haircuts I've seen. Damn dude!
SdZ: Great tutorial! 1 Question: when you use the trimmer to remove the remaining hair, you just remove it up to the first line, right? So the line you removed last with the clippers closed?
alex rigby: I’ve done my own fades for 20 years. I use mirrors a little but mostly go by feel. I’ve. Had hundreds of cuts. Good bad and ev in between. I just know by how it feels when it’s right. Granted this guy is next level. My hair grows fast so any mistakes don’t last but never had any I couldn’t live with or worse from cuts I paid for.
Ed Hernandez: Crazy. I've been watching a few of these videos because I'm hoping to start soon but man, hands down best self cut I've ever seen.
Chux479: Clean fade man, thanks for putting this out! Quick question, do the gaurds you use come with the Surker clippers or do they come separate?
phil brandy: thanks a lot for your cut tutorials, sergio! i was looking for a haircut like yours for quite a long time. i bought a clipper as you suggested and tried out my first buzzcut-dropfade on myself. it went pretty well i gotta say :) looking forward to getting better at it. your tutorials are really helpful. big props!
abrizuela2691: dude you make this look so damn easy lol im on my 3rd time trying to self cut myself but blending is the trick. i need to get better lol. good video btw
Umer Hussain: Bro iv seen this tutorial about a 100 times but I still can't do it as good as you! Your one talented dude bro respect
Samuel Arroyo: Very nice,I've been cutting my own hear for over 20 yrs.youre right, you do get better in time,I remember my first few fades lol I got laughed at in school lol
Jordyn_ official: I'm gonna try to dip the back down. I always stuck with doing it even all the way around. I'm hoping your tutorials will help. I got faith in your tutorials so I'm rating them @ 100% #YouTheMAN , @sergiobarron
llg robert: Can't believe this is a self cut ! I'm an amateur barber but your videos motivated me to keep pushing untill i get there ! TO PERFECTION !! Much love !
Officixl Biggi: Always wanted to cut my own hair and my kids, now you know where i get my confidence from.
Furuya: I need to try this. It looks like the best way of fading your own hair for beginners crazy .
Bruce Kai: as always!! I have a question... If I want to follow the tutorial but have my sides little longer or more of a low compressed fade, should I use a #2 when you use a #1, and a number #1 when you use a #1/2 guard etc etc?? Just so I can follow the same steps but have my cut a little longer on the sides?
Louis Lopez: Really helpful. More complicated than what I thought, but I'll try it out. Good look with the typed steps in the description.
MikEyn3ss !: Your videos teach me a lot man keep em coming
Andrew Rosales: Thank you for this tutorial. There’s a lot of detail in this so it’s def gonna take a lot of time and practice lol
Klark Kent: Nice video with clean instructions like always. I think your previous self haircut came out perfectly, better than this one, here you made some unintended marks with 0.5 guard I think but the cut looks very very nice anyway... I say you can challange Adrian to try to make better self haircut
Texas Cowboy: This self haircut is way better than what I get at my local barbershop. Thanks for the tutorial.
O G: Yooo thanks for the tutorial bro. I tried this at home and no lie I have to wear a paper bag everywhere I go now, but ima keep practicing, bet !!!
Sin City Sith: This was amazing and thank you for another updated self cut! I wish you were in Vegas, i'd go to you and bypass all my self-cuts that are so-so... i love your steps listed in the description. Question: In the listed steps you say to use 2.5, 3.5, 4.5 etc,, is that the 2, 3, 4 halfway open? Again, THANK YOU for helping me and others so much!
luminaa official: Muy duro hermano llevo 6 años asiendo mi corte yo mismo muy buen video
Mtzblades: Barron faded achievement to its highest sick as always and I have been using your style for awhile and have gotten nothing but compliments from barbers asking who faded my cut stay keen bro
Red filme play: Mano seus vídeos e insanos de mais parabéns,já asistir várias vezes
Lester Ocon: A new year with more amazing content. The culture is on
are_eye_see: after 20 or 30 youtube videos on cutting my own hair over the past few months , THIS ONE is hands down the best video and it actually WORKED lol . ive tried a bunch of different methods from videos and all my fades had that "i gotta let it grow out a little bit and it will look better" look to them haha. this one worked perfectly. thanks so much. I even bought the surker and it is soooo much better then my highly recommended oster fastfeed. My next cut im going to attempt the angled/sweeping fade in the Spanish video you just posted. definitely subbing. thanks bro
Nick Murray: just used this and cut my hair, feels good to learn new skills and further independence, rate it highly.
Xander Burke: What product do you use to style this cut? Thanks! Keep up the great work! Getting this cut on Monday!
4everblue72: Love your vids mate you are well food at explaining the best way to do fades
Hawaiian Punch: I've learned to cut my hair. It was hard at first and don't get me wrong, I've messed up. But you know what? Hair grows back and every 2 weeks you need to cut it. It's all about tools. I started with the Wahl Senior and now I have 2 Magic Clips and a Detailer. Now I can cut my hair better than me trying to explain the barber what I want. (The barber or stylist never gets it right in my area.)
Roshan John: I can’t even trim my moustache without making a mistake. Amazing stuff bro..
JDMSTUDD: Bro you make it look so easy.. one day i will possibly cut my own hair.. until then imma have to go to the barber shop.. fresh and clean cut. I subscribe and liked your video. Cheers bro!
WSG Antic: You made it look easy got a lil bold and tried this myself was scared to go so low so I ended up with a taper that kinda goes around my ear didn’t really touch the back just shortened it looks good with a hat on
Luke Stanford: Bro, love the vidI've been losing my shit since covid shut down barbershops!! I've literally cut my hair ever two weeks like religion since as far back as I can remember and have tried to learn how to do this art form myself ever since but haven't felt confident to take this on until coming across you tutorial so thankyou broI feel like I'll never have to pay $50 a fortnight ever again so this is probably the biggest investment I could have learnt through the most fucked situation of the 21st century so this is a big positive outta a massive nigative..you the man
JayCarl: Yeah, I wasn't as successful. Finally glad my hair grows quick
Alex Martin: That cut you did on yourself came out hella clean great stuff carnal
Jordyn_ official: I always have that line on the bottom and when I try to blend it out I tend to go to high. But I seen that I'm using to much clipper instead small strokes. I used to watch @jaytee the barber but I noticed that you give instructions in detail.
King RocketX4: How long does it takes you to cut your own hair from the shaver to the fade and line up ?
Antonio Rodriguez: Damn dude you make this look so easy i wanna do it now lol
Julian Hamama: Literally writing notes on every vid you make ! Dope cut man !
Neko_The_Barber: Sergio!!! This tutorial is smack it's very informative and super thorough and detailed , I bought that same Babyliss taper blade and slapped it on the Surker Sk 807B it has a 5 position click taper lever and it's , Im recommending a great off brand clipper to you it's called " Orihea SuperCut " it has a 4hr battery and a metal housing , metal 4position taper lever , and a digital screen that tells you the battery percentage and rpm, I have a wah 1006 taper blade on it and it's definitely , I'm curious to see what you would do to it as far as a blade change and would love to hear your thoughts on it, Thanks Again Faded Culture for another banger!!!
LUIS YOUR DADDY: Bro that cut is fire and you explained it pretty good. Keep up the good work G
Amrish Patel: I'm gonna try this fading technique, for my first DIY haircut using number 1 on the sides & back while the top will be number 6. :)
mrbass093: I’m about to cut my own hair cause these barbers are charging Hollywood prices thanks bro
Joshua Ortiz: awesome video! Super helpful and great tips !
Marcos Quinones: Damn bro!! Your cold AF, I just graduated from barber school in March I’ve been cutting my hair and I’m getting better every time, great tutorial
B Rich: Happy New Year bro. This is the best self cut fade I have ever seen, the cut is fire!
Fidel Correa: Thanks man this helped me out a lot much appreciated
Zzasou Z: Your the great barber ever couse you cut your hair by yourself in that amazing level imagine how you cut other peoples hair
ForThor21: Fresh ass cut my dude I'll be checking your videos because I'm trying to learn to do my own.
TheFadedDog: Thanks for all the tutorials SB. It’s the best fades I’ve ever seen
Sean Shamma: Tried this and my haircut came out great
BoostAzul _FK8: Bro you kill it with your self cuts
Alaa Loll: Perfect, this is the best self hair cut I have ever seen on Youtube, Thanks Bro. Happy new year from Egypt
T.B. Gurung: I love your self cut fade, fire as always bro ❤️❤️❤️
Keith Frank: Great tutorial! Thanks
Boo!: Just some thoughts. My hair is never never that tidy to begin with, it’s like a 4 month grow out sometimes 6 the way things are going nowadays. It would be cool to show how to section and sort out the really bad hair first to get it useable for a fade. Also my hair is thinning on top so if I just took the clippers and shaved it I would look super bald lol.
Yelsin Chacon: Bro, you got yourself a subscriber and a fan. What a sweet cut man
Norman Lee: Your are mi professor since the pandemic started. Thank you for giving me the confidence to cut my own hair.
Herbet Wingstine: Great tutorial. How would one go about doing this but with longer hair on top (few inches) - would it be the same process or would it look funny / like a bowl cut?
Andres Garcia: That's damn good cut for self cutting. Bout to try out today
TrancEy: I started watching to learn to how fade better, now I’m just watching coz it’s addictive to see them guidelines disappear Easily the best content I have seen on YT for fades, keep killin it bro. Been getting compliments on my fades lately, so they are getting better. Only question is how best to work around uneven skull shape, which cause slight short patches as you roll over the bumps. Guessing apply less pressure as u pass over them with a clipper?
Dennis Black: Thank you so much, I now never will leave my house again
Ole Devon: When using your half guards to blend out the giudlines do you always use the corner of the blade to take the giudlines out?