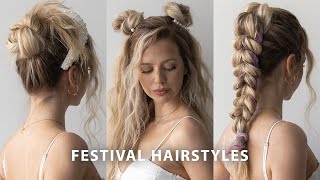
6 In1 Festival Hairstyle | Cornrow Braids With Extensions | How To Hair Diy
- Posted on 06 May, 2019
- Hair Knowledge
- By Anonymous
Need a hairstyle for festival? Or you have upcoming busy school week and no time for hair? How to add extension into braids? Would you like to play rapunzel with endlessly long hair? Dutch braids with extensions are simple hairstyle that last easily many days! And more smaller your braids are, the more easier they last! These braids are called also feed in braids. You can use for extensions almost anything you can find! I used yarn and thin ribbons. You can use kanekalon hair extension, or any enough thin material! This is great easy hairstyle for thin hair, thick hair, for long hair, medium hair or maybe you need extensions for short hair! This is so fun to do and it's so cool that no matter how short your own hair is, you can make it look long with this! This is definitely the best way to make you hair grow fast! This style is also great for kids - school hairstyle or just for fun! Your kids will definitely want to these braids again as you can play a princess with super long hair with these!
In this tutorial I show to you step by step how to braid in extensions and recycle these braids to the 6 different look!
This video including
Parting hair
How to braid cornrows / dutch braid
How to add extensions to the braid
How to braid yarn braids to own hair
1st hairstyle Half up hairstyle with extended braids
2nd hairstyle High ponytail with feed in braids
3rd hairstyle High bun hairstyle with dutch braids with extensions
4th hairstyle Cute and fun pigtails with cornrows with extensions
5th hairstyle Big double buns and yarn dutch braids
6th hairstyle Top knot, overnight braid curls, beach waves and extended cornrows
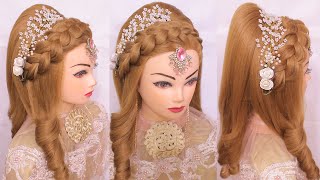
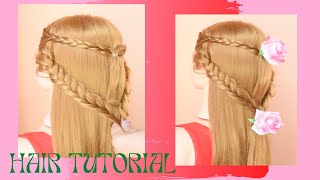
If you need more advices to braid cornrows, check out this tutorial:
CORNROWS FOR BEGINNERS
Creating partlines
Creating a partlines is important part of braiding. Changing the shape of the partings you can create incredible cornrow hairstyles! In this easy hair tutorial I show to you how to braid side cornrows. When you part the hair, you need stable hand. I suggest you make the parting with determined hand, not slowly and carefully. But you can always fix the partline afterwards - it doesn't need to be perfect with one stroke!
Dutch braid, how to braid cornrows
Take a small section of hair and separate it in three equal sections. Beginning to bring hair strands from side under to the middle. Add hair to the braid from both sides of the braid. Focus to hold the hair strand you are moving, tightly between two fingers. I use thumb-fore finger and thumb-middle finger holdings.Notice that YOU DON'T NEED
to hold all strands tightly! I hold the strands on sides with my ring finger and little finger, so they are easier to pick up when I need to use them. In theory you can let them go 100% if you want and it doesn't effect how tight your braid will be IF you tight the strand you're going to move before you start to moving it. The strand you moving MUST be tight and that settle how tight your braid will be.
HAIR TIPS:
If you're struggling with part lines, I suggest you to try wet your hair before parting. In that way the most smallest strands won't escape from your fingers so easily.
Braiding technique (how you hold the strands) is easier with bigger strands at first. But once you learn to hold strands you can braid using one hair at time without any problem! At the beginning the braiding is easier when you can see / feel the strand in your fingers.
Search the holding that works for you! Keeping the strands in fist doesn't usually work as you cannot keep them tight enough in that way!
Beginning the braiding from top of the head and move downwards. In this way you cannot poking the braids all the time.
THE MOST COMMON PROBLEMS
Braid is too loose.
Focus to hold strand you are moving tighter. Notice that before every move you need to pull hairstrand tight again!
Hair stick out between the stitches
Sometimes the hair quality is kind of that the hair doesn't naturally turn inside of the braid, instead of the braid looks like hairy worm! In this case twisting the hair strand works almost every time. So twist the hair to inwards before bringing the hair strand under to the middle.
Braid is bigger / smaller than I expect
The size of the braid you can change the best to make smaller / bigger partlines. In fine hair is very hard to make big cornrows without using hair extensions or without pancaking the braid. If you pancake the braid, it won't be tight anymore and it won't last as long as it would without pancaking.
Don't forget to click the thumb up and subscripe my channel!
Thank you!
Check out my Instagram account @myhairstyle_xo to get more inspiration!
www.instagram.com/myhairstyle_xo
#braidswithextensions #dutchbraid #cornrows
Hello, everyone. This is hair tutorials with my hairstyle EXO before starting. I would really appreciate if you would subscribe my channel and click the thumbs up for this video. Thank you and welcome to the my channel. I hope you will like what you see in this video. I will show you 6 different hair styles using favorites. Maybe you are going to the festival or you have a business school week ahead. This hairstyle is easy to do and lasts well for days. I start to create this book by making part lines. First, you need the rectangle on the top of your head. This section is for price. You can put the rest away to wait. Then I part rectangle in four equal sections. Before I start braiding, I add water to my hair, so prating will be easier. Next, take Jackson of hair and separated in three equal sections start bringing hair from side under to the middle after he first stitches, start to add hair from both sides of the braid. At the same time, I start also add extensions to this pride. I add half of the extension to this section. Then I bring the Strand under from the other side and add some hair. Then I bring hair under again from the right side and on this tram I already have the other half of the expansion. Bring the left strand under to the middle and add hair then bring the right strand again under to the middle and add another extension to the prayed prayed again. First, on the half of the extension into the parade, when you are the second time on the same side, add the rest of the extension to the parade. Don'T forget, add also the hair bring the left strand under through the middle. Add extension only have into the parade at the one time and the rest of the second time keep operating like this until your parade at the whole section into this braid add extensions to the parade all the time I used, as extension, yarn, which is 600 yarn. So about legal way, if you want to use yarn, I can wreak um this one. It shows up from the parade well, but it don't look too thick, but basically you can use as an extension. Almost anything you can find, of course, there's a lot of synthetic hair extensions and you can select almost any color you like, but if you don't have a one you can as well, you start or thin ribbons for this. When you add it the whole section into the prey, keep operating without adding - and here you can see how my first prayed look like it's very long. As you see, then I start to create a second one. First, I use water for my hair, so prating will be easier start by taking a small section of hair and separated in three sections start bringing hair again under to the middle one. Add hair from the both sides and add all the extensions to the crate. Be careful not to add too much extensions into the prayed on the beginning, if you're afraid we'll be twisting, you may have added too much hair at the same time, smaller pieces make sure that the prayed will go to the straight. If you need more advices for prating corals, like these praise our, I should guess you to us out my previous video about how to pray cornrows to yourself that video is planned for the beginners. So there's the logo tips and tricks how to ease your work. I will add the link to the description as well from the description. You can also find more tips and tricks for specially planned for a spa, create the third grade, like you did to previous as well with this parade, I need to hold my strands in different position, as the parade goes directly to the backwards and here's how these Crates look like and they work just well after half of like this. Second style is the ponytail, so just press your hair upwards and secure them through the ponytail and that's how quickly you can turn your hairstyle into the another style thirst valve. Is the updo so use the bubble to create a loop of your hair, then slit the end of the hair inside the bubble, so the ends will hide and voila. Your third hairstyle is ready. Fourth style is cute and fun pigtails in fifth hairstyle. I use elastics to roll the pigtails up to the buns, so spin, the end of the hair around the elastic and then roll the whole pigtail upwards, shake the bun and then repeat the same. To the other side, you you and the style number five is ready for the last time I take all the price and put them to the ponytail. Then I separate the rest of my hair into and prayed normal three-strand prays to the both sides, with your hair. For doing that, this is the super easy way how to create great curls during the night secure the price with an elastics then just go to sleep with these crates. Next morning, spin, the bun with the extended price, secure the shape with pins and then open your braids. You will get the soft beach weights and here's the final result. Thank you for watching this video. Hopefully you liked it, and I will see you soon again.
Comments
Punky Pappas: Beautiful and helpful!! Thank you
A Brown: Love them all, space buns the most amazing!
Nora Treviño: Excelente me encanta como realiza los peinados gracias por compartir bendiciones
Marilyn: You make such lovely hairstyles!
ღ᭄𓆩K P𓆪ღ᭄ʕ•́ᴥ•̀ʔっ: U r Soo professional hope ur channel grow up fast
Charlotte Maria: gorgeous
Paulo T. Dela Cruz: I cant believe she did this on her own
Usha Rawat: Hard working ❤️
Panchali Deb: Pretty ❣️
Riley stansfield: Lovely
Quinn Lake: u r so pretty and i LOVE your accent
kriti singh: What if we want to open the braided hair .how we will do that .....
Alexandra Henderson: This isn't cultural appropriation for one. Two: this is a good hair tutorial for all people. It's not like she's saying it's for white people by white people she's saying this is a cool look if you want to go out to a festival. Im mixed but have Eurasian hair. I use black and white women's hair tutorials for braiding or styling my hair. Tutorials aren't cultural appropriation. If that was the case then white and black people can't wear the traditional braids of most native tribes that are from the ears down. Or that you can have a dutch or French braid if you aren't European
Simran Patel: This is an asmr!!
Verenice Vazquez: Yarn is so smart
Rad pack Google: My first comment on your talent . Any help regarding YouTube talk me
Shuaib Qureshi: What's yours age
sidrah hasan: No hair extension Wool
Laisa hh: It's hard lol
Parisamore XoXoXo: Lol
Wilbert Galinato: Hi
Parker McDowell: Ever heard of cultural appropriation? Clearly not.
Sakera Grant: Hi. Girl you
Malaisah Trophy: Obsessive ♀️
Marcus Baker: If you’re white you don’t get to say it’s not cultural appropriation. This is a great example of cultural appropriation
AjTheBonnetBabe: This look a mess