How To Add A Bang To A Pixie Cut
Skip to 23:00 for the bang process!
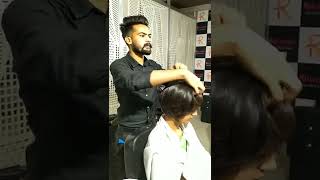
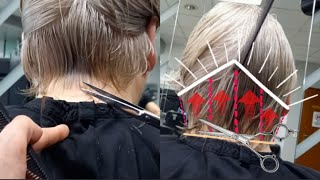
Hey guys right in here and welcome back, I wanted to record this video of me putting my banging. I wanted to switch it up because I have just been doing the regular finger waves and or just curling the top a little bit, but now that my hair has gotten long enough at the top. My bang, my little bang, has gotten long enough to add some tracks and actually cover it up. I said why not throw in some tracks, so I really wanted to show you all how I did this and seen this. Look. It'S not too much. You know to the back: it's just slicked down, but go ahead and watch this video. It is a little lengthy and I will explain in the next part as to why it is so. You can just forward to the part with the bag, because there was a few steps I had to do before that, but just go ahead and skip to this feel free to watch the entire thing. You don't have to skim if you don't want, but I just wanted to make sure you all saw how I slayed this bang real, quick like oh, but stay tuned, let's get started so in order to achieve this, look there may or may not be a few Things you have to do for me. I have to relax, like my I'm, not doing my whole head, but I'm just doing the remnar basically just around here and in the back, because they got a little got a little rough right here. So I'm going to add a sock or haircut anyway, but I'm going to just relax. That is hope. You lay down nicely and then I also have to rest my hair because, as I know, I just have blind and then I went black and so just because I haven't rinsed it. I would honestly say since then it you can kind of see it. You have to see it's like turning back Brown little bit, so I just need to rinse that, but the relaxed road I'll be using is this olive oil? I this is not really my go-to. My go-to is Nairobi or design essentials. That was gone. I think so, but either one of those two, but this one is already pre-made or whatever. So it's I use this one for like mine, it's just that's no problem and what I'll be resting. My hair with is the adorn jet-black. This is actually what I used when I covered it the last time and it's still something there. So that is that, and one last thing I have to do so when I the last time I cut my hair, I made a v-shape, so it was like going down to a feat. I don't want that anymore. So, basically, how I cut it, which I did it like this so that way, if I didn't want that V eventually I could cut it off. So basically, I just did my regular I'm caught in my regular way and not come. I hear any other time so I just did like that, and you know I made the part across as normal and then what I did was I just connected the corner from right here to right here and all I did was brought it down brought my comb Down this way, so that way I could create that v-shape. So that way this basically, I did that again just so when I am ready to cut it off, which I am right now. I would just cut it straight across and that way this area down here. They were the area down, there is um cut off, so I have a few steps I have to do if you just want to speed up for the purpose of this video, which is creating the bank, go right ahead and do so, but Oh Anna, oh no. I forgot I had a forgets to be in my hair, because these little pieces was kind of they was like sticking up a little bit, so I actually need to wet this down just a little bit cuz, it's hard. It'S gon na start hurting but yeah. So those are just steps I have to do. Not every part is necessary, especially if your hair is already color of the hair you have, if your hair's already relaxed or if you don't get a relaxed or whatever case but or if you don't have the v-shape. These are the necessary steps I have to take to get the look that I want for a moment. So, even once a sec, I just have to get some water all right, like I always start off with calling my hair out. How anybody's wondering I got this. Well, you can get this because I didn't necessarily buy it, but this is from you can get it from Sally's and if you have a membership you can get it from Cosmo Prof. But that's, oh shout out! This stuff was really in here. Thank goodness, that's pretty! Oh okay, like I need to spread a little bit more, so I'll pull my hair out a little bit I do have and when I'm don't worry, but when I'm ready to rest it cuz I'm going to relax it and you know what it cuz. I'M only relaxing this, I may relax Emirates at the same time just to speed up the process, but I'm gon na just make sure this is a damp all right, so I only wet it again. This stuff is what I have to do just for the moment, but - and that's also because I'm sprayed like some gots to be do spray, the free spray and for my hair but so bone. That'S that's that it's still in there a little bit. So it's not much movement up here right now, but it's gon na start with this relaxer and I always put this foot Vaseline on my ears and around my hairline, because the last thing you need it's what to be burned or scabbed or whatever the case. But that's really, if you leave it all way too long. So that's what I do and then I like rub it on my ears, because I'm really not doing we're not doing that much all right boom, so that is really hot. All it is to it. I'M not doing the we're not doing the front. It'S just the sides are here and that's I'm only doing this to make sure they are like completely slicked down, because I can't stand me trying to fight with my edges like how this look right here and the thing is with this down. I'M only doing this because I don't plan to I don't have to do my like entire head or whatever I'm gon na be this is gon na be laid down. So that's not doing that. So all I do is have my little brush and all I'm doing is just wiping straight from in here and then I started to apply now that I think about it. I should have put this color on first. That would have definitely needed to sit a little longer, but oh well started already so grab my mirror. I need a haircut so bad, alright, so that's it for the back. Then it's front all right. So that's literally all I'm doing I'm not going far back. Is that perimeter this sleep down the it just makes the hairstyle look so so much better. You have no ideas so much better and then because your hair can be super cute, but some edges is a little rough. So take difference. So now pretty much all I'm gon na do with this is just kind of put that on there and I'm going to leave it alone or, however long probably about 10 minutes cuz, I Shaw can see it wasn't like. It was super super light, so it won't take long to to get in there so so yeah. This will be easy if I can get the glove all right. You know this girl's been through it. They started off this baby pink. I did this when I colored it red all right so boom. This is our dorm and it'll, be more careful, of course, towards the towards my hairline, but this is all I am doing for out there. Like this my hand, no need for party and all that stuff, so just the steps of this just recapping you could either I recommend putting the color on first. I didn't think about it. I was already into it which, until too late but oh well, you can't put the color on first, let that you know stay and do a thing. And then you know apply your relaxer that don't sit for about the same amount of time, especially if you're in my situation, where it really wasn't light like the color of my hair, wasn't light so it doesn't mean to sit too long. I just want to knock some of this light out like ground. I should say so. That'S that once I do all of this, I'm going to cut it afterwards. I can just go over it with my clippers. It'S super easy or I'm going to do, is you'll see my pants. All I'm gon na do is part off hot sauce on from beginning and just take the Clippers and go across it and that's really a, but it's not much, not much. That could add on and I would have cut it first just in case anybody is wondering why didn't she cut it first before she put the color in the relaxer, but because my hair was so loaded down with all of that gots to be glue spray. The free spray I I purchase just wait until it's freshly washed and clean and then probably hit that area with a blow dryer and just wipe it on out. But I think that's good. So I'm going to let this sit for about five minutes or so not too long. It'S that's not necessary to do it for too long and then that'll. Be it all right, so I am back so all you want to do now. Is I don't you want to say you as if everybody's gon na have to go through this, but what I have to what I have to do now is just blow dry, this top out that way, it's dry, for when I cut it and as you all Can see I didn't have that coming on for long it really wasn't long at all, and it took very well. Oh another fYI, just in case anybody's wondering so. The way I watched it out was, I left the water rinse down and because I didn't want to get my nails black, I kind of like just patted it. I could have put on a glove, but I left the glove in the bathroom and whatever. So I just kind of like patted it while my head was down, so I was kind of like moving the hair around and then I did that for about a minute that way it's just rinsed out and then that's when I went ahead and rest around the Perimeter where the relaxer was and then once I realized, I got all of that out cuz. You can feel it if you haven't done this before yourself, but you're gon na feel the difference, and so after I did that. That is when I went ahead and did the regular shampoo conditioner so back to the program just want to. I just want to make sure you come to this. You do not want to start blow drying. If you have, you know, kinks and stuff like that in there I know it's common sense, but I think it's necessary to say anyway, but cut cut that area with what the same guard that you could, the rest of your hair would know just going there. No guard cuz, you, you gon na, be screwed okay, so I'm gon na find it at first. So I use the two. I usually use two with my hair, just because it's easier to manage. When is that, when is that short - and I don't have to cut it as much so so let me show you all I was talking about so this was following my line. That'S on this side and if it's a big difference, you'll be able to tell if you can hold this I've see this down, see these little hairs pop out. It'S easy to find your line so same thing with this side, so just moving most of the hair over and my line is about here ish, so I'm not too focused on making this line straight right now, because I'm not focused up here, I'm focusing on these Back corners, where I originally made my square and then I'm going to connect the two and whatever is left in the back, the extra triangle is going to be cut off. So that is how I I did all right. So it's not right here. Okay, so it looks like that's it like: that's it right there, so it looks like my corners all right here, okay, so what I need to do is now just go across and kind of meet my finger and, of course I will be checking this in the Mirror to make sure make sure I'll cut off the right amount clothes a little off, but you give you get what I'm saying, though you can see. I am, and I think I think that's about it, so you can see. I have this a little bit so now with my to guard, I am going to let this all right. So that's it! So just another swing around for you all. So this is it all of this will be laid down. Oh, this will be lay down, and this is where I think I'm gon na do the bank this way. The next time I do my relaxer is when I would do all of it and then usually when I do that. That'S when I do like the finger waves and stuff like that before right now, I really I don't really feel like doing that. Just just be honest, make sure it doesn't take too too long really, but sometimes you just don't feel like doing that. So that is it for that guys, take this clip on. That'S it for that. So the next step for me to do is to straighten this area right here. How I will be doing mine, you can do it any type of way you want. Some people really do not like glue on their hair. Some do not mind. Some have said it pull your hair out. Some said it. Don'T I'm one that says it don't so that is always work for me in those in the past, so I'm gon na keep doing it that way, because it hasn't given me any problem. So I'm going to straighten this and when I say that that means not strictly part but as far as how they do the tracks, I'm going to actually part my hair and lay them on my scalp, because you can do it like that or again for the People who have had problems you can part off the area that you're gon na leave out so part your leave out as normal. If you were doing a regular weave and then you can put the Morning Glory on, you can mold this. However, you need to to get it super flat and you put your stocking cap morning-glory, let that dry and then lay the tracks. You can do like that. That'S how I do my regular quick weaves, that's not what I'm doing right now. So that is why I need to make sure this is super straight and laid in the direction that I'm going to be landed tracks. So that way, I don't have any problems with in laying down or you're looking natural or anything like that. You just want to look match. That'S that's all you don't want my oh. She got tracks up there, so so yeah. So that is it's time for a trim also, but that day for that, so I will just plug up my flat irons and then I'll be right back when I starts alright. So now it's time for the flat iron so I'll be using this Tresemme heat protectant. It'S the keratin smooth. You can get this for anywhere. I think I got it from Walmart, but you can get it probably any air store really or I'm going like a Walgreens CVS, Rite Aid, those type of places selling these that branch tool. So I just want to let that dry, you do not want to start flat ironing if it is wet, because that is not working and it's defeat the purpose. So what that's gon na do? I am going to be using my Remington flat iron. I'Ve had this for a very long time. It'S my baby as my favorite, it looks like I just got so Red's on prayer, but whatever so I set this for 450. I have always shoes for 50 on my hair and it's never like damage to it or anything like that. So I stick to what I know so 450 for this, and I got this one Walmart $ 30 $ 30 home again. I'M telling for a very long time is one of my favorites. I prefer this one over some of my expensive ones, so yeah good purchase, so I can tell this is dry, so how I want to be doing it again. I'M going to have mine going scooping this way so that it's the way I'd want to be flat. Ironing you don't want to flatten it in the opposite direction. I know that's probably common sense, but some people who really don't who were you want to think about? Actually, I don't like they don't know, but who really would think about it that that is very important to do so. So I know this look real crazy, but that's okay, because it's not gon na be shown anyway. So this is all I'm doing guys. I am just straightening, it straighten it down. Nothing, fancy don't try to put a little curl to it. Don'T try to do any of that waste of time, because it would not be shown you are just getting it straight. So that way, these tracks our live as left as possible. So I also wanted to mention too because, as you all know, wait what's our Court. When I heard you know what, when I start recording, I did not have my bank when I first got my YouTube, but I had a bang like no, we feels like legit mine and I cut it off, but the way our style it is. I would do it the same way if I was by relaxing or whatever I would relax everything, and then I would blow try it everything together. What I would do, after that is section my hair off so section on top put that in a poncho, and I believe that, along with not straighten that I will not mess with the top at all and then I will go ahead and style. My hair clip. I will style that, let that dry and everything and then that's when I will go in and do that - do the through the bank. So that's how I'm going to do it the same way. I'M not gon na change anything up. So what I'm going to do? This after I Flatiron this, I'm not going to later track next, I'm going to pretty much put this up and out the way and then flatten this down, like I said I would so. That is how I'm gon na do it again, I'm not switching it up. Just because there's tracks and again you want to make sure it is dry, meaning your hair too short here. You want to make sure it's dry, because you don't want to try to start flat ironing your ear banging and then you know it's just messing up what you just took your sweet time and day. You don't want to do that. So I've never made that mistake and did it like too early because usually want to do my hair, I'm doing it like on the weekend like now and I'll have much to do so. It'S not like I'm in a rush, so you just wan na continue this and not drop your foot, sanitation rule. You would have to pick that up and put it in your sanitation bin and then sanitize your hands when you at home. You ain't doing all that. Please I ain't, but a hair school. They were not playing that you were not about to pick something up off the floor and just leave it or pick it up and put it back in somebody's hair. You are not going nice cuz. You ain't gon na a skateboard. We got ta practice how you play how about down fish. I can i wave my fashion girl back. I'M actually able to put this in a ponytail, though, like a little stick up on something crazy, but hey slow progress is still progress, alright, so that is it for that downwards. Just because your hair sure you may have some sly ways at the moment play if you got the right products down today that write down what she put your tracks and his stuff when it was time to time to bloom, no law after the broke. This just broke off so all right. So that's that so all I'm going to do now is kind of like move the store as a friend I'm not about to just pull this up in a ponytail. That'S really going against what I just did and it's gon na have this hair stuck up, so I am going to just kind of move this forward and really because it stand where it is. I can leave like this or, if you want to clip it or if it's long enough to make little braids whatever it whatever you want to do just get this out the way, and that way you are not touching it at all when it's time to time, To lay this down, so I'm gon na go grab their products for this back area. So what I'll be using for the mouldings? For my short hair is my same. Go-To is nairobi. Foaming lotion is what they call it from an oceans and then I'm using just black gel. It does not have to be pro style. It could be whatever. As long as is a black gel. When I have blonde hair, I use the Ecostar with you. It excuse me, and I used up the lighter color. I did not put black on my blonde, so how I do mine some people. Do it opposite ways, and I put my um Oh Laura Jim. I am, I know, I'll put the black gel first and then I put my Nairobi. Some people have done the Nairobi and then put to jail. Some people name, you she'll whatever, however, but this is just how I do it. I don't want to ever say like it's a super wrong or right way. I'M just simply lay you all know how I achieved my looks and the methods that I use and what works for me that way, if you're ever looking for a different thing, you can always try it out. If you don't like it, don't ever say like I'm doing it, the wrong way, just know that it's just a aware few is just that simple. So you just want to be Louis. I'M got enough to write with Jesus, so you want to make sure you don't don't get scared till. I put it in this area right here. That'S why I wish it was my mirror, oh because you that part is so important to me. So be a little bit and up here, and I need to make this part again - I can see that this part in the back has a gotten a little off so now. I know I need to clip this up wherever my clip is all right so because my hair is dry and they're short and it is sticking up. What I'm have to do now is just put this in it with an arrow, be the phone, and then I'm gon na have to really make sure that line is straight, because right now I'd be trying to do a lot of dry in a working. So just put some pumps in here and you just want to start wherever I just kind of go to the line and just work my way down. That'S how I do it. They start in the back. However, you want as long as it gets done, I'm not doing it all over and then once I get to this area up here, because I can see this very easily once I get to that part, that's a little bit more difficult to see it's one. I was actually on purpose put a little bit of this towards the top. This will not hurt it or you know, make anything difficult to flat iron and end, so I'm going to put some of that just so. I can really see what I'm doing so before I do that I'll, just kind of just kind of brush this down just making sure that that product is going through your hair and it's not just laying on top. So you just want to rush down again. If this was the finger ways that I wanted to do, this is when I would do it after I brushed it all make sure everything was calm through. I would do it like that so now I just need to make sure this part is straight. So, as you can see, I'm able to I'm able to separate it better up here, so I might put a little bit more. Just like I see, and so do you all see what I'm saying you think that's Nairobi makes your life so much easier. Do not do not work harder if you don't have soup, so just put some Nairobi on that part, and literally all you are doing, is party and moving up and then or moving down if necessary. Don'T rush. This part make sure that is completely straight, because how it dry is how we want to drive so put more narrow, be if you meet two, and so I'm pretty happy with that. So now I just want to Fix little just like the little pieces right dad. Honestly, whichever side you're gon na be putting on swoop towards I, I really don't care about it like that for real, like I don't even wrong, I still want to be straight just cuz. If you really like a hairstylist, you gon na just make sure each part is how it's supposed to be before you move to the next step, but this is gon na be soup anyway, so you really won't see it. But for me I just want to know that it's like still meets so because, like when I first got my hair cut. Remember I told you I had the the bang and my was going over here. I used to switch it up, but when I got it done, I had it this way and how I'm about to do it and a lot of people didn't even know. I had my head shaved like over here because you never. You never saw this like portion of my hair at all, so it wasn't until I start flipping it. The other way that they knew both sides were actually fully shaved. I think it would be weird to have a haircut up here and not over here, meaning like the bang and then have a hair right here. I don't know why people didn't think that all the way was cut. It was just the bang. I guess they thought that just was long. This hair was long right here to where I don't already know, but that's just when people was telling me. I didn't think that tiara shaved on that side, I'm just like yeah. Why would I only have it right here and right here so anywho, so I'm gon na let this stay like that? I do want to just trim this up a little bit, not true, but straighten this up some because again, this is the side that will be shown. So this is a sure view. This is how people see it. So what she wanted to do is make sure this is hey. That'S kinda! All I do now. You do like that, like doing everyone, it would not look like this in the morning. So do not do the most if you're doing this at night, which I hope anybody do on this in the morning. But if you are doing in the morning or if you can touch this up in the morning, don't put too much effort into this light. Little line because it would not look like that in the morning, I promise you I will not ever lie to you. I see some hair sticking up again in about a week is when I'll relax. All of it well obviously depends on how long disliked be putting the strike in last, because it's pretty decent, then I don't need to because again this area right here if it is well cos mine right here is short I can manage it. That'S why I said moving forward, I kind of if I'm doing like something, quick or whatever the case. I just kind of relaxed my perimeter, because that is, if that's rough to me, that my whole hand abrupt. But if I have this slick - and this is just growing out a little bit - angled sound - I said it'd be crazy, but if this was growing out a little bit where I can see my natural hair wave, I'm good to go like I can see it now. This is straight and you can see the little wave right here. I already don't care about that. Cuz. It'S still laying down! I'M not gon na deal with that texture up here, just not just not doing it or back in the back, so I'm gon na. Let this dry completely, which it already is starting. It does not take long, your hair short, it should not take long at all and man. That'S when I'll come back to pay my tax, so I am back. It didn't take too long for it to dry, but I just wan na make sure it's completely dry and nice wet anywhere, so we're good to go. I'M using 8 inch today so, as you can see where it starts, is more than life is long enough and I'll be able to just you know, razor it or whatever, when it's time to cut it. I did use this hair or my client last week, I'm mad that I didn't keep the little little label thing because I don't remember. I don't remember this brand, but it was not very expensive. This was only $ 10.99 a pack. This was a full pack of 8-inch CD, so it don't don't buy the most so and I'm using my favorites saliva Pro 30-second glue. It'S not that clear, but that's what it looks like you would never really catch me using that glue in that all gray bottle. It'S supposed to be, you know similar to this, but it's just nice takes like forever for that stuff to dry all right, so the fun part so now I want to be doing - is pretty much keeping it diagonal and I'm doing that because that's how I want The tracks to fall, you know what I'm doing really, since at least I don't, if that's how you want to, do it not a huge wrong or right type of thing against preference, but this is how I'm doing my land mine, you know diagonal. So I'm gon na start with about that. So you can see what a quarter is. Don'T start down here. That is the door. No don't start down here. That'S really unnecessary! So that's that I'll just part this off and see. I would not be putting it right here. Okay, you would not be on my hairline this way if I ever wanted to enter wind blow when it's windy outside starting to get a little cool, so the wind is blowing and stuff like that. You want to make sure that your hair is out in the front all times so the same thing with this. I would not be bringing it to this part, so I am going to be stopping it about right here. Okay, this is the part I'm stopping it by right here, very close, very, very close. So, ultimately, I keep my finger actually, where my thumb is. I cut right here so we're just going to cut it right there, like that this is all I'm gon na be using. So this is about two inches okay, so we're just going to lay this damn. Okay boom put the fuel in there. Sometimes these little hairs like to get in there. I try to get those off of my camp and we're going to lay it same way how we measured the party so that way it days right here, okay and boom. You have laid your first track. Okay, so that's that we're gon na leave it alone. If you want to blow-dry this, some people do totally fine and you're gon na blow dry it you can do that this will lay down, but that just looks funny. You can blow dry it if you want and we got ta keep it moving. So I am parting you can so I'll. Be party. Maybe see that I would say this is maybe almost half inch. So that's how we doing it. So what does that and we're? Just going to repeat, we are going to repeat: we can go in and add tracks if we want towards the end, but it's preference. I can't tell you if it's too thick or too thin. If that's, how you wanted, that's how you want it so again, my part is right here, I'm going to leave all of this out, so I'm going to be starting my track about right here and also because I'll see this. This is still part of my hairline. So, like my edges, so it's thinner of course, so you don't want to put in too much right there, because this will not cover that track this area. So it's going to be coming this track. So that's why you want to put it about right here. Okay, so I'll put it right here and then I'm going to end it about right here, okay, so I started about right here: we're going to put a cross and stop it about here, where my thumb is so slip that and boom. That'S why you know where you want to do this with expensive hair, unless you just had it with that hair, and you know you there's gon na be thrown it away soon. Anyway, I would not be doing that just because you are now cutting the hair and some very small pieces and you're gluing it. So if you were doing this in the so in and stuff whatever, but if don't click glue on expensive hair that you intend to use over so again putting it about right here and we're going all the way across. It is right here - and my part is right here, so we are going to just hold this down and you all see I'm not having any problems with this glue. It sticks how it supposed to, and that's it like the other glue. These ends would have been sticking up. I won't have any problem, I don't really sweat in my head. You know I still summertime, so people you know may be having that problem right now, but this glue has never like come up unless I've had it. Don'T get me wrong still glue unless I've had four. You know, however much time and it starts to come up, but like for example, next week I won't. I won't have any problems with this coming up. This is still going to look like that. So that's why I recommend that brand of food again this is salon Pro - is the 32nd glue? If you can't remember that just remember and tell them, the random blue bottle all right, so we are going to keep moving already and even a diagonal making sure these parts are about the same. Just inconsistent. Okay, suppose that's that turn that up and we move forward all right so now that I'm getting back here, I have more. This hair is longer then in this front, so I can actually move this track. A little closer to this part, which is what I'm going to start doing again, because this hair in front of short, so you've got to make sure it's covered enough, and I look crazy. So I want to actually start this about right here. Okay, that bow right. There bring us a cross, and this is gon na - be about right. It'S right here. It is a little difficult to see on the right side like over here cuz. I got this hearing in place and you try to look down this. It is a little difficult. I won't lie, but it's doable you've been doing. Okay, don't over glue, don't over add link. You don't have to put that much gon na put enough like glue on it, but do not have it like dripping like to where it's like now falling on this other side leg just put it on there enough and keep pushing alright. So right here follow your parts. Okay! So now I'm just looking on this other side to see where this is really ending, because I should have done that before. But so that's not, as you guys see you starting to come together slowly, we don't need you. There girl is okay, she bear so that is stuff on there and we continue. So you can always flip this to the side and again you can always go back and grab another clip. You can always add more hair. If you want, if you once you're styling, you see you look a little damn, you can always add more hair. So just so you can see right. This is you do not see any other tracks right here. You do not see any tracks, and when this is over here, you will not see any tracks if what I get done, if this is really bothering me that this hair is not completely just like meeting my hair, don't even wrong is black, but it was still It'S still not looking the same, color I'll show you guys what I do to uh to do them to cover that I should say so. Let'S continue so now again, this hair is getting thicker and thicker back here. So you can put a little closer to this. To this part, that way, when you do how a swoop is not all the way like over here, it's actually looking like it's coming from over here, so I can put it about right here, very close, so we're gon na put go across, see where we are And I'm stop it about right here: okay, where I have my finger versus where this part is that's where I'm going to stop it, so you just want to hold it and never lose your spot and boom. Okay, these little hairs that be at the top. Our little aggravating alrighty, okay, so just make sure you put it on your scalp and you're, not look at this hair and you're, not like laying it on your hair. That'S where I think a lot of people are messing up too. Who are saying it's messing up. My hair, when I do it that way, if it's done right, it shouldn't even be it shouldn't, even be on your hair, okay, so that if I was listening, okay, so again guys, my parts are all the same with. I am NOT changed and go anything whatsoever about anything of course, now that I'm starting to get to this middle corner middle corner, this top corner the tracks are gon na start getting shorter and shorter, because I should be short out here. Getting wider gives shorter. But that's the only difference that I'm doing so and also get these little strings out. Your hair, like this track hair, will have these different color strings. So I have a reason cut that out, because you do not ever want your hair to be rolling or or whatever, and you see it. This is not cute, so get those strengths out, they've I've seen red ones, blue ones, yellow ones. I think I've seen green before it's just cut these out so and if you have a client trust me, they would appreciate that too, because they don't know that this is in there if they've never really like really opened up a pack of hair, because some people Have it so again, so we're gon na start about right there. So that's just the part! This like right here is we're putting the track. That is more than enough, because, again, this area up here is much thicker, so now being careful, because that was a little bit more harder to see this at the top of my head. I can see this is where my areas right here. So I know sir, my party is, I see my part, so that mean I can stop my track about right here. Okay, let me show you so this is the part and I'm going to stop the track about right here at the tip of my finger. So what I'm going to do is just kind of drop to here with my other fingers and bring it to where my finger is, and that leaves me right here. You have the figure this stuff out on your own, especially if you are, you know, really want to get you're doing your own hair, which is totally fine and save some money. I am not against it at all, but you're gon na have to figure out little things for yourself to make it easier to make sure that people are not able to see your your tracks, like, let's say like, for example, you're sitting down. If somebody is, you know a lot of times, you don't want them to be able to look on top of your head and see any tracks. So here goes another little stream. They pop out, especially if your hair is black. They pop out. This one is actually like a a white color, really I hate to see it but right there, but yeah. This is not hair at all, so you just want to cut this out yeah and these for me, no matter which way. I'M doing this I'm pleased the first time. I'Ve ever done this because you're the one I had my own hair in the locker or when I had this pixie cut, I had my own bag, so this is my first time doing this on myself like putting the bag. Thank you so so put it in the same spot. Okay and you're gon na follow your part. If I'm gon na part, if you put enough glue, you can actually feel the coolness of the glue on your scalp. Now what you know you've made it to your scalp. It'S another look tip for you. You could always use a mirror, but sometimes mirrors. I mean again. If depends on how much time you have or whatever the case, but it I just. I don't wan na keep doing this like trying to make sure that I'm right here when I know I can feel it on my scalp something's, but don't even walk started off. I don't even remember by starting off I'm pretty sure. That'S how I did it as far as not with the stylus again. This is my first time doing it, but when it came to me doing whatever that, I need to do at the time my head, that's what I mean not necessarily the style itself, but, okay, we are going to continue so I like to live forward before each Time I lay it down and again you can see you see what I mean as far as how does look like it's coming, like I like his mind, that's how you want to look. That'S exactly how you wanted to look try to get this part as straight as possible if it's, if you're not like OCD - and you don't mind how this little part right here - it's not quite straight, then you're fine. If it has to be completely straight us ups, you, but just don't, have a where's like like that all over like really bad, so we're gon na start about the same spot as before. Again right now, we aren't doing anything differently because it's stick hair up here. So I'm just trying to find this part saying what my hair is coming out. That'S it on the sides, do the same thing I did from the area below so I can see. This is where my part is because this is where the hair is sticking out and I'm gon na just move it over a little closer. Okay. Let me make sure you off your seat so like right there, and this is where my finger is, and this is where I'm going to want to cut it. I think I'm gon na, like this style, because once I cut my bank off obviously like I feel like my pixie - was still super easy to manage, and all of that was still really nice. It just doesn't have that same. Look when it has a fool like bang to me for me like how I feel about mine, not everyone else's, so I don't want anybody to ever feel like I'm talking about like their pink sea or their color. However, they had me if I said I'm like. I don't necessarily mean it's for everyone most of the time, I'm talking about how I prefer it on myself, okay and we're almost done because, as you all can see, there's not that much hair left. So I would say, maybe about two more tracks we'll see so for this area, because it is at the top of my head when I just laid this track like all. I did was like. What'S moving this hair back, that's pinned up just moving him back, making sure that nothing was like stuck up under it wasn't, but you just want to make sure that cuz you can see this like. You can see the sparkle when you get them up here. It'S much more difficult, you can almost you basically can't see it, so I'm just making sure like if I pull this, it's not it's not up under it. So just another little little song son, all right so actually looks like I'll. Just put one small wing right here and this area right here is: what's we'll be covering that last track, it's more than enough. My hair is a pretty decent thickness, so just from the past and when I've done quick, weaves and stuff like that, I will leave about this much out on each side of my part for my um for my leave out, and it worked, I mean my hair. Isn'T thin, so I don't have to really leave a bunch out I'll leave about that, much which is actually about the same amount. Almost almost this is a little shorter, but this is almost the same amount as that, first tracker, would we leave listen as we were? Just a Tabish shorter - and we are doing so just looking at this, like I did a pretty decent job, so the track stops right here right before right before this part. So what I can do is now calm that down and you won't be able to see anything. I'M gon na have to flat iron this with my little flat irons, the pencil flat iron, because now this is trying to stick up, but that ain't no problem. Okay, so off together, this is how you will look. Okay and, as you can see in the lighting, but it is not jet-black, they dig a darker, they did get darker from the rest, but it's not just black, but we are not going to panic. We are not and we'll be good. I actually have a little crack in my top and I just touched it and got it all over my face. So really that is it for that. So now I'm going to cut up my flat irons, both of them the pencil ones for these smaller areas, which, if you want to be careful with that, you don't want to try to do too much to it like don't put no curl to it or anything. Like that, it will not lay flat, so sometimes it's. I can work with a small area like that, like what I had my my quickly. The last time like I did Flatiron it. I did it world quickly and it was still sticking up because again my hair was shorter at the time as well, but it was thicken up. So what I did was, I took my brush and I took some off hair spray and I kind of did like that. I made it lay down with product not too key itself, so I'm gon na let these heat up again. What is there not to row, and that way I can style and cut this, how I need to so I'll be right back, so the Flatirons are heated up and it's pretty much it's so forth, um because and though you're not wearing it. This way, I don't know like I just don't ever want to have like track showing it just makes me feel better about the style when it looks like this, even underneath you know what I mean so so that's that I want to show you why it's important To not have your tracks right on your forehead, because you see I mean like if the way was to blow super crazy man, you don't have anything to worry about you're, not trying to hold your hair, because you don't want anybody to see that's bad. So I think I'm gon na start razoring it first, I'm I go in with my I'm pretty sure I will with my shears, but so what I'll do right now is just like take a part of it and start to like go in where okay, which that's A thought good mouth raising to me is just like the best create those really pretty layers and then I'm going to also razor it this way. So I knew that will basically take off that long part. That was right here. You can take a part of the top, however, you want this to go. You can definitely do it that way, right now, just focus on layering and what you want to do is part diagonal. So this is not the same day. I'D know how we laid the tracks. This is actually opposite now of how we want the hair to fall. What do we do? You know flat iron stuff like that, so when we Flatiron it we're going to be putting the flat irons this way, so we actually put the tracks this way because we want to fall towards our face, but when it comes to styling and curling and bumping. However, words you want to use, you are going to start the parting. This way, diagonal that way it can fall back. You know what I mean, so that's also the way you want to do your your layers as well. So once you do that you're just diagonal again to get a section. Okay, you'll want to hold that within your fingers and start at the top and kind of like work down, and that is going to create those layers. So you really want to do that. All over and start the Razr about the same place each time that way, you know it's all. Even only thing you need to know about haircuts is making sure that everything is consistent, you're using the same angles for everything you start at the same area for everything that way when it falls down, and when you fired it, you don't have any choppiness. It'S not like a pieces up here, two pieces down here. You know what I mean you just want to make sure it is all done right. So I'll grab a piece from the very very top. Do that as well? Go I'm being a little careful up here, because this is still a part of my long piece, that's down here, because I like how this is sort of right here and plus one says bump. It won't end right here anyway, but I want to keep that fullness and I want to keep that little length, and so with that you don't want to go in too much with the razor because then you're, making that thinner and thinner and then, if it gets To saying you might as well just go ahead and cut that off, so you don't want to do that if you want to really focus on keeping that part. So I like this fullness right here. This was pretty much how my hair was. This actually looks just just like it, so now go ahead and start this. So once again we are going to car diagonal, and that is how we are going to climb. It start off this little area. Okay, that we're gon na bump. It back had one back. All right - and this is how, when I had longer hair this - is how I would do my bang area anyway, I would actually section it off before I did in the other other areas. I was section that off that way, I knew this would be going back. This way, I hope everything I'm saying, makes sense, I'm trying to make it as simple as possible, but sometimes I don't know, maybe sometimes in my head. I hope I don't think that people know what I'm talking about and you're, not really looking like way. She'S talking about, but if y'all have any questions, please ask me in the comment section below so you can see man your tracks, so we just we're just bumping it back. Nothing too, fancy ever right now and depending on how you do your layers or whatever. If you are once you pull this up in your rates, if an iron is some pieces fall right here, make sure you get those pieces because you just want everything to be curled how it's supposed to so. This is how we're looking so far. I will get this like this little piece right here. I will get that then last piece that little piece here now you have your full bang. If you have fun with it, hi everyone, if you want it to be more curly like really tighter curls do so, but you can see where these layers are coming into play like you can do whatever you want, make this fool as you want, as you can See I didn't put so I didn't. I should've counted how many tricks, but you can see. I didn't even use that many tracks and I'm still able to achieve that very full and bouncy Bank, so just know that you don't have to lay tracks. You know right on top of each other, just to have a full load. Please don't do that because that's - and this is the look you're going for don't do that. Okay, so I'm gon na show you all. Oh also last thing make sure you are comon, like the top part and the direction of high lathe tracks like, for example, with this, how I laid them this way, that's how you telecom to hair, especially when you're trying to like initially get it to lay down And stuff like that, don't force it into a whole different direction. That is not supposed to be going. Okay, so that's that and then I want to show you all that little trick I was talking about as far as how I want to get this to be, you know the same color as the hair, so what you want to do take a little cotton, swab Content, but ever you have, even if you have a q-tip, take a little longer but they'll get the job done. When is that same race? That'S your used time and as a matter of fact, what you want to do before that I don't want to miss a step. What you want to do before I almost feel like. I feel this track, so, if the other girls, I keep touching this, I feel like. I feel this track too much and if I feel like I can feel it that me I feel like in my head. I so my way to see it. So let me just look really bad, because I missed something that I don't like, which is offensive. You can't see it and then see that's the thing with my hair. It'S like my hair is thick enough to cover to try it's completely cover. You do not see it whatsoever, but since it's so close to the part, I can feel it and it's like I don't know eventually I might probably go in there and cut off that little piece just because I wanted to be completely fled. Now, when I rub my fingers, I can feel that so so what you want to do, first, the first step to covering like this color. You want to make sure that you have the hair laid how you want to have it don't put the color on first and then try to go in with your spray. So this is the Garnier Fructis sleek and shine the extra hold spray.


Comments
N. Tol.: This’ll be my first time doing anything close to this and I have like 2.5 inches of hair right now this is the best video I’ve found and you were so helpful. Thank you for this.
Noah: This is soo helpful just what I was looking for I appreciate the step by step I've messed up sooooo many extensions this looks so good!! Cant wait to try!
kbslimgoody: Although this video is old, I found this very informative. Im new to short cuts and want to add tracks to my hair and this was spot on. Answered all my questions that I had. Thank You
J Michelle Howard: Thank you for this sister. I am an up incoming cosmetologist and just cut off my black length hair for fingerwaves. Now I want some bangs. This video is perfect! P.S. you look beautiful with and without makeup
Robbie Vaughn: Great video! Looking for a great, edgy pixie look. This is it! Thank you!!!!
Trailblazer84: Thank you so much! I've been doing this style for a while the wrong way. You are the best tutorial I've seen thus far!!
Tash hun X: Will be trying!! Looks amazing love the bangs & very detailed video . Yayyyy xX
Safadinha Fanfics: Você é perfeita, adoro seus vídeos!!!
Patrice Mendoza: Your great! I was so sad about how my swoop bang turned out, but following your video i did it! I love your teaching style girl! Thank you so much
Focused and Motivated: ...I'm up doing the same style. Thank you for all the reminders and being very detailed! I decided to use curly hair though, I hope that it comes out good enough. Happy 55 years to me, From Me!
Shirley A Daniels: Thank you for sharing. Differently gave me some better ideas and I differently like the simplicity. Good job!
gworsley57: Thank you this video, because this is the style that I was looking for. A getup and go style . I am very busy at work and don’t have a lot of time to be styling some hair. Thank you
Khadija Everett: I have been doing hair on and off since highschool and that was 20+ years ago, and glad I found a video that I was excited to Learn from
Jae Bea Blessings: I'm trying a version of thus on just over 1 inch hair in top for fullness. Thanks for tutorial.
Patrice Whitiker: I love love love this easy to go style
Janice Lockhart: You did an amazing part around your head... new subbie
Conchita Porter: I always use that Nairobi foam it holds your hair down
Maratha 38: I like this video too because the steps are easy to follow.
Finding Happily - Collette Gee: Thank you this is great
Ador'e Salon LLC: You can mold your hair while wet right after you shampoo. You can also trim or cut wet and dry hair. Less unnecessary steps and save time.
KARMA GOTCHU: first off let me start here I enjoyed the video I appreciate you sharing your every day life your business with us because you already stated that she wasn’t professional this is what you do so I get it it came out cute that’s actually my favorite hairstyle so I love it but to the other people in the comments with the negativity wow people really bored in a lives
STACEY BOLTON: Unless I’ve missed it, I don’t see your products listed. Can you share again the name of the bonding gel, etc? By the way, I personally appreciate the length of your video and the details.
Mildred Jackson: I really love the style
Mildred Jackson: Very beautiful.
Conchita Porter: Yes the edges has to be slayed
CallmeZ: How long does this style normally last for you?
Britt: The end result was cute but DAMN THIS VIDEO WAS LONG AS HELL
Wanda Madison: You did dang thang yass!!!
Nappy Scribe: Nice job
Patrice Whitiker: So om getting my side trimmed just like this tommorow and adding hair ty
debbie burgess: Thank you.
Goddess Corner: Relaxer on wet hair... glad you like your results
Delilah Renee': this
Kaitlin Mcdowell: CUTE!!
Dayonlynn Bell: #SLAYED IT THO
Medora Purrier: LMBO sister cause you look like you can coomk yo azz off in the beginning...natural. Then with it done you look like the host to the one who cooked. this is a total compliment. ive been told im harsh but this is BIG UPS
Stacie Johnson: Do you have a video that shows how to use a razor?
ItsYourGurl Tasha: It was all good unilt you put the black dye on your hair .
ntombizodwa ntombi: The hair clue doesn't damage hair?
tip john smith Dr Dre Day: nice video
Lydia Vazquez: My hair is long then you have it right now. What can I do to keep the side flat . the way you justs t
Barbara W.: You did too much just to achieve that simple style.
ItsYourGurl Tasha: All that hair dye is gonna go on your clothes etc.. becasue it wasnt washed out. You should dye your hair first than everything esle . Smh 1
Ador'e Salon LLC: This video is providing incorrect information. This is a cosmetology and state board NO NO when dealing with chemicals and safety precautions.
Medora Purrier: Hey this is Ruth Purrier on facebook I watched you wntirew video . Why because you told us of markers if we dont want to hear certain sh&& ....hello stuff Jesus.
Jaqueline aparecida reis Aparecida: Qâá
Barbara W.: This video was entirely too long with too many trys. Too much talking and nothing happening. You should’ve used the Nairobi to begin with. Please make them shorter with less talking.