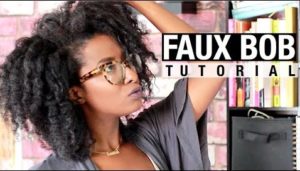
Great Gatsby Faux Bob || 1920'S Inspired Hair!
- Posted on 16 February, 2018
- Bob Hairstyles
- By Anonymous
Open for all the important details!! ***
Hey!! So I personally believe I was born in the wrong time period! LOL I should have been in 1920's or 1940's. I am doing a series on my channel called makeup through the decades. Here is how to create a FAUX BOB no matter how long your hair is!! Hope you like it!
1920's Flapper Girl Makeup Tutorial!
https://www.youtube.com/watch?v=MQzoS_...
OFRA: Use CODE: 'BRITTANYSARAH' at Checkout for 30% OFF your purchase! http://www.ofracosmetics.com/
F O L L O W M E!!!
I N S T A G R A M: @msbrittanysarah
T W I T T E R: @msbrittanysarah
S N A P C H A T: @msbrittanysarah
F A C E B O O K: facebook.com/msbrittanysarah
B L O G: www.brittanysarah.com
Follow me on BLOGLOVIN' https://goo.gl/u10Okp
Products Mentioned:
T3 Undone Waves 1" Straight Barrel
Thanks so much for watching!!!
Hello, everyone and welcome back to my channel, so today's video is all about the 1920s finger wave Bob. I have a little tutorial today showing you how to get this Bob. You can do it without the headband and without the makeup and just give yourself an awesome. Bob for a night out or if you want it for a costume, then add the headband and you're good to go. So if you want to get this 1920s finger wave faux bob then just keep watching. Ok. So here we are straight hair. Make sure your hair is parted deeply to the side. If you have a center part, you might want to fix that because it just looks better with kind of a over cross part. Now I'm just gon na section off my hair above my ears, we're gon na be working in sections here, so just take half of your hair up and get it out of the way. So I just clip that up because we'll be working with that later now, the remaining hair is gon na be hidden. So I divide it into two and now I'm gon na take each section and braid it just a normal braid. It doesn't matter what it looks like because again, this is the hair that is hiding underneath our finger wave bob perfect, then we're just dancing as we're braiding, and then you pin that up to your head, so you want to kind of wrap it around. So it lies flat against your head and it's almost like you're doing this to put a wig on, so you want to lay flat so that we can put all their hair on kind of like covering it up so again, just a couple pins, laying it flat Pinning it up so this is what it looks like because I have so much hair. I don't want to do this faux bob using all of my hair. So then let the rest of your hair go and I actually realized that I still had too much hair. So this will depend on how thick or long your hair is. If it's extra, thick and extra long definitely hide in a braid as much as you can, because you really want that length and that fullness to be gone and to be hidden in order to give it a faux bob effect. So then, again just pinning this to my head so that it lays nice and flat with rest of the braids perfect. Now it still looks like I have so much: hair left taking a one inch, curling wand, I'm taking one-inch sections of hair and I'm kind of working backwards in rows. So what you're gon na do is curl the hair towards your face. Okay, so I'm putting the curling iron in front of the piece of hair and then wrapping the hair towards the curling iron, as you can see here, hold it for as long as a Cronauer needs and then release it make sure to hold the curl in your Hand, this is what pin curls are so you take these pin curl clips, you can get anywhere any like Walmart drugstore and you pin it up. So what this does? It has allows the curl to cool and it leaves it with the bounciest tightest curl possible. So again, I'm working backwards as if I have like a row directly down the center of my head, putting the curling iron in front of that piece of hair and rolling it forward. So curling it forwards. You want to make sure the hair also lies nice and flat on the curling iron, and it's not bunching up so try to line it smoothly across the entire barrel and flat across the entire barrel, again release it hold it in your hands and then clip it Back perfect and just keep doing that so I'm gon na show you again here one-inch piece, curling iron in front of the hair, wrap it towards. Oh, I lost grip on this one and the hair. Nice lies nice and flat and then just release it hold in your hand and then put in the pin curl clip now into the second row. Instead of doing like vertical rows, we're still kind of doing like across my head as you'll, be able to see in a second so again forward. So curling iron in front of the piece of hair and wrapping the hair towards the cronin or towards your face same thing here, but now again just clipping that piece of hair in with the pink lips today you just flat metal, cliffs, perfect and then again just Keep doing that so taking one-inch section, holding it up rolling it forwards. You'Ve probably seen tons of pictures of old Hollywood stars with their hair and pin curls like this, so you just do the remaining hair on to the other side, we're gon na. Do this a tiny bit different, taking again a same inch of hair again going back to that back row, we're gon na! Take it, but this time we're gon na put the curling iron behind the head and roll it away from the face. What this does is that the S Curl shape that we're gon na be making will all be going around in the same direction or on your entire head. So it's like all clockwise or all counterclockwise, whichever way you're looking at it. So just make sure you do one side of your face towards your face and one side of your head away from your face. If that makes any sense at all and as you can see here, you can make a little mistakes. This one wasn't as tightly curled. So I just suggested it rolled it up and pinned it back again same thing: just working backwards towards the back of the head in rows: c'est la vie and is finishing up. So here is the final look all of the beautiful pin curls. So you want to let this sit. Do your makeup, whatever let it sit for a good half an hour to let the coolest curls completely cool, when they're cool, to touch just release all of the pins, and this is what you're left with so again leaves them in as long as you possibly can. For a good half an hour, my reaction to how curly these curls are I'm laughing. It'S so funny, they're, so curly, alright! So everything is out. I am just going to run through these curls with my fingers, so you just want to break these curls up because we do not actually want Shirley Temple curls. So yes, just breaking them all up as the first step then going in with a soft bristled brush. I'M just going to slowly and gently brush out the curls even more, because we want them to be soft and naturally create that S shape that we're going to go work with. Then I'm taking a wide toothed comb and now we're gon na go in to create that S shape with the curls. So you kind of just wiggle your comb through it and your hair will create that curl kind of naturally, because we've curled it in already. So the first pin clip I'm gon na put in it's gon na go away from my face, and then you just manipulate the hair and with the comb and kind of see where the next shape would be. And you can see my hair just kind of curls forward right away, so that is where it wants to go. And then you just push up the hair and stick in another pin clip as well. So there we go so one clip goes behind the back of your head and the other one faces towards your face. Then we're kind of gon na do like two layers. It'S mostly just like the big front section that we want to look like this. The back can kind of just be curly, but again I'm doing the same thing on this side as well. There we go we're just manipulating these curls and we're kind of setting them in this shape. So all you do is again push your hand up with the curl and you can see it going in the opposite direction. There go so now we have that S shape. So again you just brush through with the comb and put those clips in accordingly kind of where the hair wants to go to create that S shape so one clip forwards and one clip backwards and repeat that process tada same thing on the other side. So I'm just kind of brushing through to kind of see which direction my hair wants to go, leave it behind and then just pushing that hair and manipulating that hair forwards. There we go and then I'm gon na clip it there, as you can see then pushing it backwards and there's a perfect s shape. As you can see me do tada, let that sit for a good 15 minutes and then take them out very, very gently. So there we go, I'm just taking it out the clips, nothing really crazy to see here perfect then I just take a comb in case anything kind of sprung up or got stuck in the clip just to smooth everything out there we go see. Everything is bouncing right back into that s shape because we've set them like that. Just finessing, my little baby hairs so annoying perfect. Now we're gon na work on the bob part of it. So we have the curls. Now we need to make it look like it's a short bob, so I pull a section down and I hold one piece with my fingers and then I tease up the top of it. Then the back piece is actually gon na cover. I so I kind of like, as you can see you limited again, brush upwards to cheez-it. I still have one piece, that's kind of straight in my fingers and I use this and I roll it under and I clip it in with bobby pins into the braids. So here I go again: I take a section: pull it down brush up just the ends fold it under there. We go so kind of pushing it back because you want it to go over all the braids you had in the back of your hair, cover them and then fold under so the rest of your hair will kind of fall down on top and if you have Any layers they'll fall nicely, but all of the longest pieces are getting tucked in underneath. So you can see me, do it again here, teasing it up and pushing that long piece underneath and clipping it up and in so there we go now. I'M just gon na finesse the front part here I want it to mean asymmetrical Bob, so I'm just gon na give this a little volume, so I'm just putting a bobby pin kind of pinning it backwards so that the hair doesn't fall completely in my face, then I'M also gon na take a pin and hide it to kind of accentuate the s curl around my forehead voila, so that is kind of it for the asymmetrical bob. You can play with certain pieces, nice coat of hairspray, and then you do want to tease those last two pieces. We'Re not gon na be tucking them under, because we want this piece long. But again, if your hair is longer, you probably do have to tuck it. So just kind of based on how it layered your hair is, but I'm just spraying those ends up so that it is a really bouncy bob. I'Ve already done the same thing. On the other side, I just kept the pin in them the pins in them, and then this is what the other side looks like. It is all curled under and pinned under, but I'm just gon na kind of finesse, some little baby pieces that are sticking out and there we go so kind of just play with it. Look at that big curl on that side, and that was the finished look. Thank you guys so much for watching. I really appreciate it leave some comments down below. If you like this idea of makeup for the decades, I really appreciate your feedback. Thank you again for watching and I'll see you my next video bye,
Comments
La Porteña: This is the first time I see somebody that has as much hair as I do... this tutorial gave me hope
Suzanne Kirkham: This is the best tutorial we've seen for this style! My daughters have a ton of hair. After watching your tutorial, I feel we can make it happen! Thanks a ton!
Gina Erdman: Brittany Sarah, I just wanted to thank you so much for the helpful ideas!!!!!! I saw your video, it helped me to do my hair. (because I had no idea!!!) I had the whole flapper outfit for a Twenties party, just needed to do my hair to complete the outfit. Your video was perfect! My hair came out great! It was an evening of so much fun. Got a lot of compliments on my whole get-up! I encouraged my dad and sister to dress up for the event as well. My dad had a fake mustache with his outfit and we had the time of our lives, we laughed so hard! Thank you again for the help to make the evening a huge success!!!!! Good job on the video as well, very cute!
mimi 35c: Easy to follow tutorial, I'm going to a 1920s party and this was so helpful thank you.
russianlove3: Gorgeous! I've got a Gatsby/Roaring 20s themed birthday party coming up soon and I will definitely be following this tutorial! Thank you :)
HorseBitchBarnWitch: Amazing tutorial. Easy to follow with modern tools. I have thick hair also and I'm relieved i don't have to curl and deal with all of it haha. Thank you!!! Your hair is gorgeous btw and that makeup
Eugeniadella: WE WOMEN OF THE WORLD SHOULD MARCH TO RE-GAIN TIME FOR THIS TYPE OF HAIRDOES !!!!!
Online Makeup Academy: We enjoyed watching you show how to do it!
Nancy Oakley: This was excellent! Going to a '20's inspired wedding and this will be my hairdo!! Thank you!
Christine Miller: You look so beautiful! I am going to try this for my hair! Going to a 1920’s themed Mother’s Day lunch.
pyotr ilyich tchaikovsky: finally someone with as much hair as me. thanks 4 the tutorial! im doing this hairstyle for our school dance
Magali Lemarchand: I 'm SO in love with your hair color and texture !! This style looks fantastic on you. Fab video and I cannot wait to try it out tomorrow when I receive my new curling Iron. Thank you for sharing
Barbara J: Wow Brittany - this 1920 makeup and hair look is so perfekt for you!
Tiffany Pierce: I need to see this eyeshadow in a tutorial!! Looks gorgeous!
PhyreOfDesyre: Beautiful style!, there’s a Great Gatsby Party coming up October 14 and 15 at the Wynn hotel and casino, so just doing my research to create my look…thank you
Em.Fernandez: I need this for a great gatsby themed birthday party in 4 days lol so THANK YOU!!! And I cut all of my hair off last year so it’s now at the perfect length for a finger wave bob!
Noosh: Love this! I'm gonna try this! Thank you so much for this video! ❤️
Holli Quinn: If only I had the talent to do this. I hate my hair it’s thin and never wants to hold anything even with curl hold spray. Gonna practice doing this anyway and hopefully get it right for Halloween. Anyway you look absolutely gorgeous!
Lulu Subecz: I WISHED I had hair like yours. I'd do it like this all the time! <3
Kellie Flores: I love this style. My great grandmother wore finger waves in the 1920's.
Laura Olsen: Awesome to see the style done on your own hair. I was wondering how I could do it on myself. Great video, thank you
Esther Hulst: Both you hair natural and after the tutorial is goals <3 its so prettyyyyyy!!!
Lu Rios: This exactly what I was looking for my wedding :) I was actually inspired by Suyin on Korra you look beautiful ❤️❤️❤️
Megan Kittelstad: I love this and the makeup - going to practice later today for a party we have next week!
Melany Castillo: Thank you so much for the tutorial I follow your instructions and my hair and make up came up great
Cheli A E: Beautiful hairstyle!!
Nancy Williamson: LOVE it, your hair is so beautiful!! Thanks!
Monica Suarez: Thank you for your video! The braids was a great trick! My hair came out great! My hair doesn’t take curls as well as yours but it worked with some help from hairspray.
Ava Smith: i’m a dancer and my solo this year is a 1920’s look, you just saved my hair!
Penell E: GORGEOUS!!! I'm going to try this for my upcoming 70th birthdat party. My hair is to my shoulders and natural silver. Thanks so much.
Chris Petricola: I am going to a 1920's party. I have long hair and didn't know what to do with it. These videos are amazing. I really need to learn how to do different things with my hair.
Fiona Cahill: Yes at last somebody with the same amount of hair as I doing a tutorial I might actually have a hope of achieving! I love your colour!
Stephanie Salcido: Please do the makeup thru the decades I love the idea! Thank you love your vids
kayisfish: This was such a straightforward tutorial! Love it! I'm still struggling with it, but that's my abilities, not yours lol
Savannah: Doing this last minute for college it really helped thank you so much
MeghanT: The s shape with the clips is genius! I will probably never be talented enough to do this style on myself but I enjoyed watching you show how to do it!
Maksin: This looks very nice and actually much simpler than many other tutorials I've seen so I'm going to give it a try! If I'm doing it the first time, how much time you think I'd need??
ehopkins1234: Great tutorial! Your hair looks great!!
Rachel Smith: You're one of the prettiest girls without makeup.
Debbie Mason: Your hair is so gorgeous! Thanks for the tutorial! I'm preparing for a 20s themed party. :)
G P: Love your style and how well you show each step, but could you please show more of how the back looks after you tease and pin the curls over the braids.
Belladonna: Pin curls suit your face perfectly, way more than when it was straight at the beginning.
Hannah Stafford: YOU'RE HAIR IS ABSOLUTELY GORGEOUS!! the color and texture is goals. Love this tutorial! So helpful for my musical. (singing in the rain)
Melody Lin: i love this so much! this is so helpful
Teresa Giron: Looks pretty. I'm gonna try it tomorrow for the Speakeasy 1920's show.
Alyssa Holsinger: What sorcery make your hair hold those curls so nicely!?!
Sarah Brown: Love your hair!! So beautiful!!
Haley Dukich: my school's doing the great gatsby as a play and my hair is sooo long, so thanks for this!!
Olli Vlogs: Отличный урок! Уже Хочу попробовать и себе ♥️✨
Gwen Smith: That was awesome. Thank you for sharing
Alayna Meilinger: I have to do this hairstyle as a dancer in Thoroughly Modern Mille! I’ll use lots of hairspray and hope it stays!
Little Farm House: This is beautiful!! I have a 20s themed prom tomorrow so this is happening lol
Christina Kuhl: Thank you so much! I will definitly try to recreate this look for this years new years eve! :)
Natasha C: Interesting idea braiding and tucking to make long hair look short !
CHERIE MAINENTI: Love it. You have gorgeous hair.
Misty Thompson: Beautiful!
Akanksha Dash: Apart from eyebrows, your makeup looks like authentic 1920s makeup_ porcelain skin, matte blood red lips and smokey eyes.
Ginny Martinez: Cute ❤️thank you for sharing this.
Rose Adams: I love it!! Did you use any kind of setting gel or something on wet hair?
Natalie_Arty: Girl, you have such GORGEOUS hair!!!
Hugginsince79: I had this hairdo for my prom in 97 lol I wore a feather boa it was fierce
Mia Benavidez: Goodness gracious your beautiful without makeup , and love the hair following ur steps !!
LM Marino: Lol! I tried to curl my hair like this and ended up in a tangled mess with the clips weighing down every curl. I'm laughing so hard at myself, I'm crying.
Brigitte Photographer: You are soo attractive without makeup!! Thanks for this video. You make it look easy ha ha xx
Miss Reemer: This is the first video I have seen of yours, and I am in love with your hair color. Is it natural?
Alyssa Whitney: Im being a 20s Charleston girl for Halloween and this will help me so much thank u for doing this ilysm
Megg: Who else is here from Taylor R’s channel? She looked flawless in those vintage wedding dresses!
Amy K: Can you please come do my hair for my husbands 20's theme work party? I love your hair! You did a beautiful job.. hoping I can do that with mine. <3
Charlotte the Artist: i love vintage things!
Jody Hakala: You look gorgeous on my think you should wear this look and this make up and everything you did more often! Flapper 1920s luck I’m calling it needs to be a style of 19 2019
Kerri McDermott: Awesome - will practise - I hope it works!
Kim F# Harp: You have a ton of great hair.
JoAnn Gray: nice very pretty looks like a lot of work though great job! i want to try this
The Art of Beauty: Stunning!!!
Monica Reitman: I am going to try this for my Halloween party tommorow night, you made it look very easy hopefully I will look as beautiful as you do!!! Thanks so much
Kate Bruce: Super helpful! Thank you!!
Faiden Xavron: Stunning!!
Patrick Daniel: Excellent job!!
May Her: Brilliant!❤
Brooke Barkley: I'm Roxie in my school's Chicago musical and I'm trying to find a wig that looks exactly like this. You did a great job!!
Chelsea Doi: I love this!, but I could never do it to myself! :(
Ana Macias: I can’t wait doing this for my 43 bday
Jen and Whatever this is: I knew I recognized her! Disney channel! Lovely video, hoping to do this for a NYE party!
Nonmi Hiseddeo: It would've been nice to see how this looks in the back.
Tote Oma: Long hair was actually very popular in the 1920s.
Elle Roberts: THAT WAS AMAZING!!!!!!!!!
Kateri Kilpatrick: It would help if you turned around so we could see the back!
Aanya Brennan: If you have thin short hair what would you suggest doing for this same look ?
minakshi soni: Omg you look so pretty without a make up..
Singing with Lauren: I bet this vid is getting thousands of views today hah!! Cheers Brittany! Happy new year!
ughitsamelia: hiya!! was just wondering if this works better on clean or oily hair? loved the final look though
TeaandFiona: you have such beautiful hair. do you have a tutorial of how to take care of it?
forever bellaMua: Loved it
Madison Sturm: hey I like the way you explain the way how you do it and I hope it works.
Blue: Love this looķ
Oahu Girl Friday: Mahalo for this video! Going to try it for our pau hana at Gas Light in Kailua..they have a "secret" speakeasy feel area in the back.. lol
Pilar G: Super cute! But it looks kind of complicated. I might have to try it a couple of times before I go out.
Alyssa Yuson: you're very pretty and your armpit is sooooo ♥ hehe I just love this hair tutorial. I'll be having a party later, gatsby inspired and this one is really a big help.
ツエシンシア: nice video! could you please show us what the back of your hair braided looks in the beginning? thanks!
hazeleyes ohhhryyyon: Beautiful.