Curling Iron Tutorial For Vintage Hairstyles
- Posted on 21 January, 2023
- Bob Hairstyles
- By Anonymous
Prep your hair for vintage styles with this easy heat styling method using a curling iron.
This tutorial will show you the basics for creating a vintage style, how to make your hair sections, complete the brush out and the tools for your heat set.
Products used:
Kenra Heat Protection: https://www.amazon.com/dp/B000S6QGIQ?t...
Hot Tools 3/4 curling iron: https://www.amazon.com/dp/B00LBPMFN8?t...
Hair Spray: https://www.amazon.com/dp/B007EHSBZ8?t...
Duck Bill Clips (12 per bag): https://www.amazon.com/dp/B000NJ22Z4?&...
Denman Backcomber Brush: https://denmanbrushus.com/products/d91...
Denman Finisher Brush: https://denmanbrushus.com/products/d82...
Links are affiliate links earning a small commission from purchases
Fashion:
Blouse and watch are from etsy.com
Filmed with Sony VZ1 : https://www.amazon.com/Sony-Content-Cr...
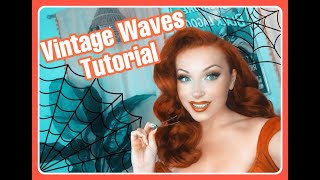
Today, I want to show you how you can create a base for your vintage hair styles. Using heat, most vintage hairstyles will require some form of curling in your hair prep before you can get the actual style. This method is a quick, easy method that you can utilize before positioning your hair into a vintage style for my heat set I'll, be using a curling iron. This one is a three quarters of an inch so just under an inch, and I think this is a great size for vintage hairstyles, because the barrel of the iron isn't too big. So you're going to be able to hang on to your curls a little bit longer. Essentially, you you're going to be replicating a pin curls just using heat to mold the style. Instead of setting your hair overnight to prep the hair for the style, I'm applying some heat protectant spray - this is by the camera brand and I really like it for setting curls. I just applied a light misting and then I'm going to brush it through with my hair brush. Next thing you want to do is grab your comb and something to create your hair sections in ductile clip or just some hair Clips. I'M using the end of the rat tail comb to create my side, hair parting, followed by those sections above the ear, and the bang section can line up with those side sections as well for the back you're going to need to create as many sections as you Need I'm just going to do two larger sections, but if you have a lot of thick hair, you might need three. In total, I have five sections three in the front and two in the back. I have left one of the back sections free, which is where we're going to start our hair curling. I'Ve gathered up most of the hair, except for that bottom section, where we will Begin by creating our first curl, remove more hair if needed and comb out the strands of hair until they're flat like a ribbon, wrap the hair around your curling iron, securing the fasten And rolling the hair all the way up to the scalp, make sure there aren't any loose pieces of hair and continue to hold the curling iron horizontal to maintain that vintage style. Once the hair is heated through carefully. Remove that section, maintaining the curl and add your duckbill clip. I prefer the larger duck bow clips, but I didn't have enough to do my entire head with them, so I did have to use a couple of my smaller duck. Bow clips the larger your hair section, the larger your clip will need to be and continue this method until your first hair section is complete. Since I have less hair in the front, I only need to do two curls in those front sections. If you're curious about the curling iron I'm using, it is the Hot Tools, professional three-fourths, of an inch curling iron, and I will have this and all the other products linked below for the back and the side sections we can move on to the bang. We can start out by combing the hair forward and creating our first hair section. You want your hair sections to be no larger than the barrel of the curling iron so about under an inch for the width and around three inches for the length. If you have some layering, it can be a little bit difficult to get all of those sections into one curl. You may want to start wrapping the hair around a little bit closer to the scalp, using the strands to keep those ones tucked inside to create volume. In the bang, I'm starting by Rolling the hair back, but then I'm pushing the curl into the hair parting. This resistance will add a bit more fullness to the top of the hairstyle, carefully, remove the hair section and replace with a duckbill clip without letting the curl Fall Apart and repeat this process, two more times for your bang section, depending on your hair parting, your bang Might have more sections if you have a very severe side part you might have to do four curls instead of three and if you prefer a middle part, you can do this process by creating two sections on either side and you'll want your curls to face away From the hair parting, once the heat set is complete, you're going to want to let it sit to cool down for about 20 to 30 minutes, because I had to use some of the smaller duckbill Clips. It'S not absolute perfection, but you still get the point. After about 20 minutes carefully remove the duck fill clips from bottom. To top, I like to save the bangs for last and begin to softly brush out the curls for this process. Any hair brush will do I'm using my Denman back combing brush that can brush through the curls and also help me with the shaping I'm going to start brushing the bangs back and try to maintain the volume that they have and begin to swoop them over. To the side, starting to brush the bang section into the remainder of the hair, depending on the style of your brush out, you may want to leave it curlier. If so, you might want to stick to just your fingers or the end of a pick comb simply brush out the top use, a pick comb and toss off the curls and add hairspray, but I'm going to brush it out completely. To give the bang section an S shape, I'm combing the section over my fingers and holding them in place. Positioning them with a duckbill clip, followed by a second duck, bow clip going in the opposite direction in that other wave, I'm just going to lightly brush and Tuck under the rest of the hair, to get a smooth soft brush out to maintain the shape. I'M adding some mist of the Kenra volume Hairspray. Finally, removing the duckbill clips and finishing off the style with a final light comb through where any of the hair has separated. So the result of this simple heat set will give you a vintage silhouette with the s-shaped, bang and kind of a full page boy effect. It'S not super curly once brushed out, but it will provide you with the shaping or definition that you might want for a vintage up to a chignon just wearing your hair pulled back with a comb um. This style looks great with Hats. Oranges worn, as is so. If you're, just looking for a simple heat set for mid-century hair styling, this one is a great one to start with. I hope you enjoyed this easy heat styling tutorial and that it helps you on your vintage hair, styling Journey foreign
Comments
Bells And Threads: I love your tutorials!! Always so helpful! Thank you
Angela Freeman: Absolutely GORGEOUS!!! Thank you so much for sharing these simple techniques to achieve a perfect vintage hairstyle! Can’t wait to try it!
Elise: So cute! Also, what you are wearing on your lips? ❤