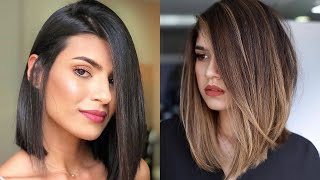
How To: Cut A Graduated Bob Haircut - Layered Bob Haircut Tutorial
- Posted on 26 November, 2019
- Bob Hairstyles
- By Anonymous
How to Cut a Graduated Bob Haircut
Layered bob Haircut Step by step
Textured bob haircut tutorial
*Giving is hold forever*
Welcome to Cali laughs: this is a monkey take over this little education indicated. A film agency leaves everyone in today, so today we're doing a really beautiful classic haircut. It'S in turn my favorite of all the classic haircuts. It'S a graduate above the first dollar tuition on a beautiful model. Natalie she's here joining us and she's agreed to have a lovely change as well. You can see the length that we've got, but we're going to have this lovely little graduated shape, which is going to fit in nice and tight on the back and the ceiling coming into this beautiful graduation on the front. The graduation is gon na. Go all the way across towards the front as well, and what I'm going to show. You is a really easy way to get the beautiful graduation he's sitting in the right place. First, up, let's go into a little bit about the sectioning of sectioning started with this lovely curve section we see here, and this is going to be the base of our graduation. So this is where we're really going to be building our graduation plan. All the way up, so this is really where we're going to see the graduation building from after that. We have these sections you see here, and this is really where the graduation is going to sit on top of that point. So it's giving us a good base of the guidelines. We were building the graduation to and everything after that is going to come and sit onto this graduation that we've created there afterwards. You see at this point I've separated another section from the top and to the front as well, and so this next section will again work into our graduation and I've separated the front for a safe way to create the length in the front with less graduation. I'M going to show you - and this is really my secret to getting the graduation exactly where you want it and without too much graduation to cut off afterwards from there on. We have the top sections as well, and these will really sit off that we've got a strong base from the rest of the haircut, but just to show you where I've started of styling. With this scent section, I've literally just cut it, and this is really a huge factor for us. It gives us the length we have in the outline which we are going to refine and cut it after it, and it gives us the weight line. So this is the real weight that you're going to see. Whenever I did this haircut, I always turn my client on my model to the side, so I can really see where the weight is building. So if you look from the profile, as you guys are, you can see the features and we try and keep hair off the face. So we can see the features we can see the face and we can start to visualize where our weight is going and where it's going to sit towards the face. But this is really giving us the build up of the way that we see it. And so what I'm going to just check this first section in there, but it looks great for me. I normally go a little bit longer than I think just to have that chance to tighten. If I want to as it's the first section, it always is the most important in terms of the length away, so you can see the first section is a little triangle section in the center. What I'm going to be doing is I'm going to be pivoting from this point, so I've got my center section and I'm really going to pivot. From this point, I'm not going to move from this point. That'S going to be my guideline and they'll start pivoting around the head. What this does is it's going to allow me to start the siding, but then Phi one in the front as I over the REC. They have more towards the center I'm going to be creating more longer lengths in the front. If I start to pull the hair up, what I'm going to be doing is I'm going to be ending up shorter. So again, this is really important, guys, the more you pull back the longer you get in the front, the more you pull the hair up, the shorter you end up. So if you want to end up really short in the front, there's no point in putting it all the way down. If you want to keep the length in the front, you've got to really pull the hair back in order to maintain that towards the front. So, that's why that first section gives you the weight and then the sections after that start deciding the length that you're gon na have in the front as well guys - and let us know where you're treating in from let us know where you're watching from we love To hear where you guys are from, if you have any question, don't hesitate to ask my lovely friend George here is here to help us and arms with all the questions you have, whether they have people from Northern Ireland from this title and New York from Montreal. Great, so what you can see here guys is, with this next section of God: I've actually got no hair to cut from the top section. This is really important. This shows you that your guide line is stationary. In other words, your guide line does not change from the center. If you do your triangle sections and you start pivoting and you see hair in the top - that needs to be cut. What it means is, it means you're putting new hair into your guide line and therefore your guide line is no longer stationary, it will be moving and therefore you will be changing the shape of your graduation in the back now, because we want a really nice curved Sections we're making sure that that guideline is stationed it for us, so you can see that second section starts the way around and we start to get the length that we're going to have here, which is really important as well as we work up. We want to build the graduation higher, so we're not ending up with this really low graduation either. Now this is really easy to change. As I said, if you want the graduation to end up being longer, you pull the hair more back. If you want the graduation to come higher on the face, you put it higher up as your work, you have to visualize where your hands are going, so it's not just what you're cutting, but it's way of going with the haircut as well. That makes a huge difference, because every section will allow you to see where you're going further through the haircut. So what I'm doing now is I'm the styling, how much I'm lifting up this next section, because I'm deciding how short I want my graduation to be in the front. Okay, because I wanted to come shorter in the front. It means that I'm elevating my sections as I work as well, so we can see the graduation is not if you want to have a little bit more caution in this haircut so that your balance is better. You can always do one side and then the other. So that's one section, one section one section one section and you can keep checking your balance for reason why I feel quite confident and we're trying to move quickly within the haircut as well. We want to just do one Sun, so this is what I would do in the salon situation or in a stress situation. But if I'm teaching, I will normally teach the students to do one side first and then the second side until you feel confident with this technique. Now you can see the length here on the sides and where it's falling. This length is really important. This length we have here is actually the shortest point of the haircut everything after that will curve up and go a little bit shorter as we get towards the front. That'S why it's so important, so my trick here, which is really important, is that I actually start from the corner and work my way up. If you start from the middle and you work your way down, people have a tendency to over elevate and when you're over elevate, it ends up being too short. So what you want to do is you want to start at the hardest point and pull the head down so that you have the length to end up towards the front. So what I do here, my secret here we're the important secret is, I actually start from the corner, because this is the length we're going to end up in the front. So I find my guide line and I start to cut from the corner working my way up. If you have any questions on this haircut, please guys don't hesitate to us. We love hearing your questions as well. So once again, I work from the corner and I work up towards in the middle, most people work from the middle and work towards the front they end up too short. This is a safer way of working where you work from the corner and you work your way back up, but there's another little secret. I do which helps grab all the inconsistencies and I call it walking the dog. It'S not a very technical term, but it simply means whenever you go up, you come back down, so you've gone up and come. The other reason for doing this is to grab any inconsistencies. So we have a tendency when we do this to have some inconsistencies, because what you're trying to do is you're trying to create a curve shape with very straight fingers and if you imagine, trying to credit curve shape with straight fingers as you move around the head. It'S almost like you're, creating very little corners as you work, and so the best way to avoid this is to actually work from down to up and then from up to down. This will allow you to have more control and make sure that there's no little inconsistencies in your work either. Well, our first questions a lot of first questions as well. What do you think, when the intention to do some different textures for this haircut yeah? I think different textures is really important. To be honest, I think, more importantly, is this area of the skin is very stretchy. So if we look at this area of the skin, we can see it's very malleable. You can really move the skin and what happens is if you put way too much tension, you're, actually deforming the shape, and when you look at it again, it won't be a very clean line. So normally in these areas of the skin, where they're very malleable, they have a lot of movement to them. It'S better off to perhaps not have so much tension and then, when you get to another area like the top of the head, that doesn't have so much play it's better to use more tension now. Tension is very good for blending things. So you know if you want to have a very blended graduation without too many weight lines and things like that, it's actually a really nice idea to use tension. Tension helps everything blend. So if you imagine it like a spring, when you pull the head, it's almost like a spring, so what it allows you to do is it allows you to just everything to jump back and when it jumps back it just blends better. So as I'm working, I'm conscious of my balance as I'm working, so I'm just having a little check as I go. It'S very very important. Well, good cutter should be able to cut the haircut and check as they go and that way, there's less refinement. At the end, if you find you have to do a lot of refinement and there's a problem with balance and things like that, normally it comes from when you don't check your work as you work, so you have to check as you go along. Basically, always just checking the balance as you go, it's much easier to refine it. If you find the problem before it becomes a big problem, so you find the problem when it's still in its infancy and it's much easier to fix. I hope that answers your question about tension if you'd like so the other question about tension was how much tension do you use now. So now it's enough to really feel a pull of the hair. You want to feel the pull of the hair, but you're. Looking at the skin, you don't want to see the skin deforming too much. You want to see the tension, but you don't want to see the malleable. You don't want to see the hair moving too much as well, and so that's why you want to get enough to really get a firm grip on the hair. But you don't want to have too much that you're deforming the skin and therefore your shape won't be. What you see, I think, not forgiving this, I think explanation so to say enough tension to get this yesterday, but not to pull the skin yeah. That'S exactly what you want! You want to feel that there's a nice bit of tension like it's about to each other. Back but you don't want to have too much that you're deforming the skin so again, I'm coming to a really important part, I'm coming to the bit. That is the shortest point of the haircut and it will give us the length towards the front. So my elevation is lower and I'm starting from the corner, I'm starting from the corner and I'm working my way out, there's always a little bit more hair to cut each time and because that is because we're trying to create a rounded shape with our straight fingers. So straight fingers trying to create a round shape and you're always going to get some little micro corners. I like to call them into work, which you just have to go back and refine. Now. This is the first part, but after that, we're going to do the cross-check now of the bottom, so once the cross-check at the bottom is done, it's going to allow us to just make everything's perfect before we move on. So this is really the foundation of our graduation. How do you know okay? So what we'll do you guys for those of you that are just cheating? You will give you a lovely little recap: I'm Michael! This is George. There we were thinking. We are from slate higher education and what I've just done is I've just on the first part of the graduation, it's really the most by the pot. So if you're just tuning in at the end of the video, I suggest you go back and watch this bit. Is the most important bit, but just to give a little recap of what we did was we started from a census section, a nice little triangle, center section. What we did was we pulled this hair out and we decided where we wanted our weight to be within the haircut, so this will rarely decide where you want the weight to be how much build-up you want of the haircut. So we can see here the graduation leader is really determined by the weight that we have, so this will really give us how much roundness of the head we're going to see what we did after that was. We took pivoting sections and we worked around the head. Now, the higher you go with this, the more higher you go, the short you end up in the front, the lower you go, the longer it gets. So if you want to go for a long bob, it's better to pull your fingers back towards the middle. If you're going for a shorter Bob, it's better to pull them out, but the best thing you can do is look at your fingers. Imagine your fingers where you're going. If your fingers are this high, can you imagine where the graduation is going to be at the end? If your fingers are here, can you imagine where the graduation is going to be at the end? So as you're working around the head and you're pivoting the higher you go, the shorter it ends up the lower. You go the longer it ends up. So it's really up to you what you want, and so we thank both sides now, but now we're going to cross her over. This is where we really get everything perfect. I'M only looking to get things 80 % correct. So now I'm really going to refine it and get it better at this point and make sure it's perfect before we move on to the next phase of the haircut. So the first thing we do is we check the two corners. So we have the two very corners of the haircut and we just have to pull these down and we feel them. We feel the length we make sure it's the same on both sides and then we want to work our way up. The head shape just grabbing the hair from the very top and looking as we go at the balance of the haircut now, if we need to refine a millimeter or two, we can always come back in and just grab anything we feel like we need to so Once you've made sure that those points are the same on both sides, you now have a reasonable guideline from the top area. So from this point where my comb is, you have a guideline, but you really want to make sure the whole thing is correct. From the middle and from the left and from the right, so what we're going to do is first we're going to work through the middle and make sure that the middle is correct. So then what we can do is we can connect the top part. We just checked to the middle as well, so we have the middle, we have the top and then what we'll do is we'll connect the sides as well. So what I'll be doing is I'll, be moving the hair away and I'll be cross-checking. Now it's late. What we like to say is we like to say that horizontally is our shape and vertically is our technique, and so what I'm really doing now is I'm just checking my shape, I'm just looking at from left to right. Everything is balanced as well, so I'm trying to not over elevate I'm trying to keep things at the same level of elevation that I did when I first came through and pivoted and I'm just taking off tiny amounts that I can see just to make sure it's Correct now, how am I taking a clean section here? Well, it's all about the peace sign. What I'm doing is I'm actually doing a peace sign. I'M putting my peace sign into the comb, so one hand goes through the bottom and pushes the hair away and the other hand goes to the top and pushes the hair away. And once you do that, you're grabbing a small section. So once the crown goes in one thing it goes underneath one finger goes through the top and it grabs a small section to work with and so again just holding it, with my thumb, pushing the hair away, taking a small amount, putting my finger under and over And I'm just grabbing a small amount and I'm cross-checking it so we're really not looking at the hair from top to bottom, I'm not bothered about the hair from top to bottom. We work through a vertical section, so I'm very sure my graduations nice, I'm just trying to make sure that that center section is nice and balanced on both sides. So what we've done is we've done the top part with cross-check. The top part we've now crossed checked this Center. Now we're going to connect the side to the center as well, so we're just going to tilt the head a little bit and then we're going to start working from this point to this point and connecting it in so we take a curve section that incorporates a Nice amount at the top and a nice amount of the middle. Remember the top was checked for that's a guideline. The bottom we've checked. So that's a guideline. So what I'm doing now is I'm essentially trying to connect the dots at this point? So I'm really just lifting the hair up and remember the comb goes at the same direction as the section the fingers follow the comb and what I'm looking for is. If there's any little inconsistencies, I'm just looking to clean it up as much as possible. So, there's nothing stopping the flow of the graduation again mask 5 section coming from the top to the middle, so we have a guideline from the top guideline from the middle and then again what we do is we lift the carry map to the same point and The same angle that we had in our section and again we just start to refine. It got some more questions. Yes, we love questions. Thank you. Land developers is that when eclipse, he they even in Sullivan, so no actually, I died. The only reason I really separated the hair from your life, this was to show you guys the sectioning, so it can be very cleaner for you. I feel like if I didn't have this many clips. Maybe you guys wouldn't be able to understand about the specific sections. I was talking about so it's a really good question and the answers and our I don't normally use this many clips on the southern. I could work through this with just taking sections as I go but, as I said, I feel like for the education factor of what we're doing today. It'S better. If I have two clips in so you guys, can really see what I'm doing and I feel like. It'S good for people who aren't that confident yet to be able to really see that are what you're doing and make sure you haven't missed any bits. You know I find a lot of hairdressers sometimes get a little bit of lost in what they're doing, and so I feel like it's better if you have two it's better to section off and make sure that you don't get lost in your section. So you know what you've done and you know what you haven't done essentially, so I think clips can be a great tool to use to help you see better and make sure you have that's a great question and thank you for asking. I always keep the hair very wet, because I find the more wet the hair is the more control you have and so for me, it's very, very important to make sure that there has a nice and damp at all the times. If there has not nice and damp, it means you lose tension and you lose control. You know we all know that dry hair just tends to slip out the fingers as well. So that's really essentially what we've done so far. We'Ve done the base of our graduation. We'Ve done the first part we've taken our pivoting section, so our first one we've decided the way of it. So we've really seen how heavy the graduation is going to be from the first section. After that, we started pivoting around now the more higher we went with our pivot, the shorter you're going to end up at the front, the lower you go with the pivot, the heavier and the longer it's going to be it so really, if you want to go Too long pull it in or back if you want to go high, pull it higher up and you'll actually see what your fingers are forming. After that, we just did a little cross-check from the two sides. Make sure that was correct did a little check over the top once that was good, and if we needed to refine it, we would. We then work through horizontally in the middle of check in the middle, and then we connected the top to the side. The top to the middle, so the top to the middle and then the top to the middle, the top to the middle. To talk to the middle. Don'T worry guys if you haven't quite followed that completely as well, so that's slack education, Facebook and after this video finishes it will be going live on that. So we kind of got our next section. Now you can see that this section incorporates the hair up to the top of the ear. So this is another very good point: people who is wonder what goes behind and what goes on top. Will you see this hair here? This hair is literally below where the ear sits, and so this hair will be coming behind the ear it will not be coming over the top of the ear. If you pull this hair over the top of the ear, naturally it will sit behind and then you'll get a long piece. So when you're doing a one length or anything like that, it's very important to take the hair that naturally sits behind the ear and pull it behind rather than putting it over the top and then when it falls back, you'll find a long piece as well. So what we'll do is we'll remove the hair on both sides that incorporates this area to the top of the ears making sure their hair is nice and damp so that it's not getting in our way at all as well beautiful. So I'm just going to wet down my hair, so by the way beautiful battery is getting a beautiful makeover with us today. This is the beautiful Gorge as well. Is here to ask me any questions you have. So if you have any questions or let us know where you're from we'd love to hear it as well cool, so what I'm doing now is I'm taking my next section, I'm going to take again my Center parting that I had from the beginning as well, and I'M going to work through one side first and then the second side afterwards, and so this is a bit of a thick section. What I'm going to do is I'm going to be splitting it into them now my secrets are taking nice curved sections as this. If you find the center of the spine, you know that you're in the middle of the haircut, you can actually put the coin land flat and then turn it. And at this point, if you hold it more sensual you'll find that you're grabbing the correct amount of hair afterwards as well. So it's just a really nice thing and I'll show you guys that again, so don't worry if you missed it, what we're doing is we're using the hand like a bit of a pivot here and we're going to work through one side first and the other. So again, finding the center curving it flat and then holding it in the middle and coming down grabbing on the hair that you don't want to work again and just putting it over out your way. So just taking it out of our way. At this point, I'll put another clip, so it stays secure and I'll grab this one I'm putting a little clip, so it stays secure. As I said, I'm using a lot of Clips here, so you guys can see better now. At this point, it's really important to comb the hair, so you want the head to be masculine kind. So it's ready for you. It'S almost like preparing the house to need those you're climbing the head so that your hands aren't interrupted. Now, there's a thing where you could spark here, like I said, a lot of people start from the middle, but I find once they get around. They end up too short, and it's too short in the front and really the front is what we care about. The front length is what the clients cares about. So what I do for safety reasons and I find it works best - is actually starting at the corner. So if you start here at the corner, what you'll find is that just decided the length that you're going to end up already so from that you're very safe rather than starting from the center? And you start from down and you work up. This is a much safer way to work and you'll find that actually, you control the length and the front much better, which is really really important, something we really want, but to keep make sure that you've got a nice smooth line. We do something called walk. The dog we always come back and we just go from the middle to the bottom again, so that's right from the bottom to the top and from the top to the bottom. So by that way, you're just grabbing any inconsistencies. You have and you're making sure the graduation sitting really nice. We do the same on the second side, we start again from the corner and we work our way across now. One thing I did to really help me maintain the right length is I'm using my fingers as a bit of a guideline, so I have a bit of a measuring stick here, so I can really see what length I'm going for with my fingers. So I could feel how far away I am from the neck. If I lift it too high, I can't touch the neck anymore, so I know that that's wrong elevation, so I'm looking both where my fingers are going so the lengths that I'm going for my fingers, but I'm also feeling how far away I am from the head Shape to make sure that I'm doing it correct, and so each time you pick up some hair, you should have a little bit more to cut from what you already did, just because you're trying to create a curved finish with straight fingers so working through that you Then connect to the middle and what you can do is you can do what we said, which was walking the dog, a very slight technical town and just come back and grab any little inconsistencies you have so that you have a smooth and beautiful flow of the Graduation, so it's really nice now. What I'm going to do is I'm not going to cross check this section because I'm still working on one more, so I'm going to do one more. So we've done a little graduation up to the top of the ears and then, after that, I'll cross check so again we're just taking the hair that beautiful we're going to make sure that it's nice and wet. So we have more control about shape. So we really want to control that technique, so they're, adding more water to it. Perfect so again, curling the hair really well making sure the hair is ready for us making sure it's prepared we're going in the right direction. So it's all ready for us. So the less we can stop the better. We don't want to grab the hair, stop comb grab the hair, stop comb, because at that point we'll forget our elevation moving and consistently. So it's better to really comb the hair nicely so that once you start you've got nothing! That'S going to stop you from moving forward, so it's just going through and we're just combing the hair and we work our way to the middle and then remember once we come from the top. We work our way back down, just to make sure we've got no inconsistencies and we've grabbed all the hair that we want to as well. So really, what I'm doing is I'm not using over direction as such, I'm naturally using the over direction. That'S in my fingers, but what's really creating the shape, is that angle of my fingers? So if you can see the feed angle, what it does is it's coming and it's going all the way to the back, and so, if my fingers were different, then the shape would be different. So it's my thing is that I'm looking at that at creating the shape for me and it's a really easy way to think about it. The shape that you're creating is due to where your finger position is so each time you pull up higher to get a little bit more lift is what we're trying to do is we're trying to lift the back up and create this beautiful graduation and once we've Come to the middle, we just walk our way back as well and just grab any little inconsistencies that we might have cool so guys. If you have any questions, please don't hesitate to ask. Let us know where you're from please like and share. We really appreciate it. We love giving free education. Hairbrained we've been doing it for almost two years now, so we can't thank the community enough as well. So that's a really nice graduation starting to build and what I'm going to do now is I'm going to check as well, because we come to the point where we've done a major part of our major zone of the haircut before we move on to the top And we move on to the length of the front, so we're just going to be cross-checking this now. What we're doing is because we work through horizontally like this. I think the shape is very nice now, so this shape is nice. So what I'm going to be doing now is I'm going to be doing a little check of the balance on both sides. So I'm just going to be grabbing the hair from behind the ears pulling it down and just making sure the vents at the same on both sides that we can feel so once I'm happy with that. What I'll be doing now is I'll be working through the center. This is just to check the graduation, so I'm not checking the shape as such, I'm just checking the graduation. So what we do is we pull that hair out and we just have a little check that from the bottom to the top. Everything is nicely blended. One thing that will help you blend things more is lifting things a little bit higher. So if you elevate the hair a little bit more than what you did when you first cut it as always about cutting off too much, not changing the shape, what you're going to be doing is you're just going to be softening the graduation, and this really helps With things like blending, you know so, if you're not really getting in weight lines and the haircut this is a beautiful thing to do - is just lift the hair up just smooth through it and just elevate a little bit more than what you did when you first Cut it and you can see the amount of hair we're cutting, is very minimal as well. So we're not changing anything here, we're just making sure that the lens gorgeous so again just moving the hair out of our way, taking a vertical section, making sure we're grabbing at the helm and combing it to the right place as well, and then just elevating the Hair a little bit more so that's a beautiful secret of mine is just elevating a little bit more helps blend of a little bit better, so guys. Try it in the cellar and you'll see that you get that really nice beautiful, blended graduation for the last section is obviously the length at the front as well. So we just want to be very careful here. We want to make sure that we're pulling the hair a little bit more back, so the bit more over direction has your a bit more pulling the head back now. If you see that you're actually cutting a bit of hair off like a little bit too much more than a millimeter or two you're changing the length in the front, and so that's not a good idea, so you just want to pull the head a little bit. Further back so I've done one side and now I'll do the second side as well, so again just taking vertical sections, but you don't want to do. Is you don't wanna interrupt the hair from its natural place that it's sitting so you can see their head sits and actually here so what I'm going to do is I'm going to pull it to where it naturally comes out and I'm just going to be elevating A little bit higher and I'm just gon na be refining that graduation. So it's just a little dust just to make sure everything blends really nicely and then you just come down and we see that flows beautiful. So this is a real good secret. So I thought about two sections: there. I'Ve checked the bottom of the graduation before and now I'm just checking that that top part we just did blends nicely, and so this is going to allow me to not have to keep re, checking and rechecking. I really checked what I've done already and so now, I'm looking to just make it blend. Tell us if that makes sense, guys tell us if everything I've said makes sense so far, if you're following it. If you want me to go back, I can always go back as much as you want and explain more that's another problem as well. So just let us know that everything is making sense for you, but that blend is really nice, just beautiful. So we've come to another major part as well, so what we did was we worked through the center hitherto ground through the other side pivot around created our graduation lifted. Up after that, we took horizontal sections. We started from the corner because this is the length that we get in the front. So it's very important for me that that length is maintained and it's correct, and once we have done that, where we work through horizontally, we just came back very clean. We just cross checked everything as well, so guys. Let us know if that's making sense and please let us know whether from and if you have any questions, we've got people from Israel, England, Cyprus, Greece, JCC, is high, so James is cutting director and he's right now watching them. So is our cutting director. So I need to make sure they do a good job today, hunters. So what we're doing now is we're. Moving on to the next section cuts anyone important this questions, elimination to sort them aside, including a clustered you need to make a collection. We will fix it that in a cluster or would you go back and fix it with the regular section. So I like this question, it's a very good question and last of the answer I think the answer is quite simple for me. If it's a major problem, if it's a real big problem, if you're talking about a centimeter of difference, you need to go back to your original way of working. If we're talking about a millimeter, you can take it while you cross-check. So it's all about the amount of issue that you have if it's a fundamental issue. If it's we're talking about a good centimeter problem, then you should go back to the beginning and check it again. If, in fact, it's just a small problem, a couple of millimeters or a millimeter, then it really, I believe, it's okay to take that loss wearing a cross-check. So it's about the amount of the problem with your face enough of these hope. I hope that answers your question and there is it. So what I'm doing now is I'm taking a section which incorporates to the front of the ears for what I'm doing here is I'm just going to subdivide it. So I'm gon na take this subdivide and you're gon na see what I've already done here is I'm gon na take the same thing and we're going to come down now. Actually the shape of the section is what I'm trying to create underneath. So if I was going to try and create a much steeper graduation, so if the graduation angle was going to be like that, my section should mirror it, because my sections are like this: I'm going to try and keep my graduation as such. So the way I always try and explain its experiences, it's like when you're going to get a tattoo. Do you really want the tattoo artist about draw it before they commit it to your body, and I think it's the same for us when we do hairdressing. I think it's really important to actually draw your haircut with your sectioning before you commit to cutting it. So what I'm doing is I'm following the section with my fingers and that way I've already sketched the haircut before I'm committing myself to cutting it. So it's allowing me to really see what I'm doing before I commit to doing it as well, and so that's the one side I know now I'm going to go it back and just come and refine it again to make sure there's no real corners there or Weights or anything like that, so we just always start from the corner. Remember that's my big secret guys, my big secret to getting the right length is actually starting from the corner and working your way back. If you start from the middle - and you work your way to the front, you might end up too short at the end, so it's really important to start from the corner, low and work your way up. This will help you control much better. What you're doing and make sure that the length that you're hitting is the right length so again, it's starting from the corner and working our way up, making sure that has nicely combed as we work so that we're grabbing all the hair consistently as well using tension. Because tension is going to allow it to blend, and especially at this point, there's nothing with the scalp. That'S going to come back or deform the shape of the, and so it's really nice but pushing the weight forwards again, because this whole haircuts about pushing the weights forward so now we're pushing the weight forwards as we work great. So we got that last section. That was well on top and then we'll be doing the secret of the front, which is the big secret of this whole haircut. This is how I get my graduation to sit in the right place with the best graduation, I believe in anyone else. So that's a nice bit of spray beautiful. So if you guys are enjoying this education, please share and please like we really appreciate it, and so now again the secret is the coming from the corner. This corner is the length you're going to end up in the front, so it's very important that I hold the head down at the length that I want to create the length of the front. If I get this length long, the front is going to be wrong. That'S why it's so important to just make sure that you're cutting it if the right length, hence why we start from this point. So I always like to start from the hardest point and then move on. I think if you can get the hard part out of the way first, it's going to allow you to just focus on the rest of it and not worry so I'd like to get the hard things out the way first. So what we do is once we hit the middle. We then do the same thing. We come back and we start working from the center towards the front again and we grab any little inconsistencies beautiful. So again we can see the shapes really building nicely coming along beautifully. So now we go through our second side, again combing the hair nicely down and again what I'm doing is I'm looking at where the length is going at the front. I'M also feeling with my fingers, so I've done a little measurement with my fingers to make sure I'm at the right place and then we work through again nicely elevating every time. So, every time you move up the head elevating more and more each time we work each time we work each time we work beautiful. It'S tighter it's time, you're cutting the new section to preview, the elevating yeah. So we are ending now you know that's a good question, because people always kind of ask for what what elevation should have been, how how high should I lift the hair to and, to be honest, the answer is kind of already there for you. So, whenever you've done with graduation, there is a certain amount of graduation. What I mean is there's an angle that you've created in the hair. If you elevate too high, it's going to end up being too sure that what you're going to be doing is around in it. If you elevate too low and you connect to a lower point, what you're gon na have is are going to have a bit of hair that sticks out and doesn't connect to your graduation. So really, there's only one place that you can elevate the next section to where it connects and if we hold the hair out, you see the elevation that we have there, and so that is the correct elevation. And so, if you're not sure how much elevation you should use, you can always come back and check vertically. So vertically is really what we're doing to check out elevation. So if we come back vertically, we can have a good look and we can just see where the elevation is. So what I'll do is when we do the next section, I will be showing you Dan secret of how to find the correct elevation, but for now before I move on to the all-important front area, what I'm going to do is I'm just going to have this Opportunity and I'm going to cross check the front again or the back side again. So what I've done is, if you can imagine, I've worked through horizontally and so in our slate world. Horizontal is our shape, and so we can see that this is the shape that we've created now and then this way is our technique. So this is our graduation, so I've done my triangle shape. I'Ve done my shape. Those are shorter in the back longer in the front, and now what I'm going to do is I'm going to cross-check vertically to make sure that my graduation, my technique, is sitting nicely. So I do the same thing I did before. I have a nice vertical say through the top work through the center. Now I'm not worried about taking very small sections here, because what I'm actually trying to do here is make everything blend beautifully, so I'm just busting the hair to make sure that it blends beautifully. So for me, actually, the bigger the section, the more it blends the better for me because I want more to blend. So, if you imagine, if you try and do this in 35 little sections, what chance do you have that 35 little sections don't connect? Well, there's quite a big chance if you can do it in five big sections and there's a much better chance to connect. So this is only for the cross-check, but when I cross-check I'm trying to take big sections because I'm not trying to change my shape, I'm just trying to make sure that everything I do blends nicely, and I remember I'm elevating more than what I did when I First created it because I really want to make sure that I've every chance of making it as soft and it's blended as possible. So that's a really good secret is making sure that when you cross checking your cross checking vertically you're pulling the hair up they're just busting the hair, and you just want to make sure that everything is blending really nicely beautiful. I'M in the last section and after that, we'll move on to the front as well. Elsa says that she likes your explanation. Can you get really clear it color does, which I would love to afraid I can tell oh. I can only comment smile, so I could show you, but I don't think your clients will be very happy with that. It might be a lot of fun, though so we could always try that next time. I think the thing is a lot of people need to think about cutting hair the same as they think about coloring hair. You know every single colorist thinks about what tone they have. What'S that under time of the hair, every hair color before they start, they think. Oh, I want to make something boo. Therefore, I need to do a certain different color. You know you don't just throw blue on it. You have to think of the undertones and what really neutralizes it, but unfortunately, in cutting. Not many cutters really think about the headshake that they have and the head shape is really it's under time of what you're working with so whatever you do will mold differently around different people's head shapes. So if you have someone with a very flat head you're going to have to go for a heavier graduation in order for it to really have a nice head shape and then the truth is, and if you have someone with a head that sticks out a lot. You can go for a flatter graduation and it will actually look the same result. And so that's the interesting thing. The same cut well as if you cut the same way on two different people and will never look the same because at the end of the day, everyone's head shapes different, and so it will form around the head shape. So what you have to do is really have to imagine the head shape and imagine where the his falling was always say that the head shape is like the canvas that your art sits on and so any mold around it. Thank you. So what we're doing now is we've finished the first major partner with banner graduation underneath on Michael Pitt Cellini's. This is the lovely George Michael Aris. This is the beautiful matter that as well, we've come to a really major part in the haircut now it's where we do the front, and this is a little the finalists. This is where you really want to make sure that you get anything right as well. So I have a little secret here to getting it correct as well. I see a lot of people making a mistake in my opinion when they do this haircut now, when I talk about mistakes in haircutting, I'm not talking about anything. I was there not creating what you imagined in your mind, so if you do a haircut and it's 100 % what you imagined it was going to be in your mind, then it's correct. If you do a haircut and it's not exactly as you imagined it in that, I believe it's not the correct haircut, and so what we want to do is we imagined in our mind the lengths that we're going to have in this haircut and so now, what I'M going to do is I'm going to do my little secret here, which is actually hold the hair, downs or one length so instead of creating graduation - and you see a lot of people when they cut they kind of pull the hair back they over direct it. Now this is fine, but no one can really tell me 100 %, where the hair is going to fall to and how much graduation you're going to have how much graduation you're gon na have to cut out afterwards, and so what we do is we actually pull The head down as a one length and then connect the graduation afterwards. This gives us maximum control and allows us if we want you to change the haircut afterwards as well. So if we feel like we need to, we can always cut it a little bit shorter. If we feel like it, but at this point, what we're doing is we're giving ourselves maximum chance of hitting the right place by pulling it down, and so we've got this beautiful one lengthier now and we've gone to the exact place we wanted to because we've held The head down, so if we have pulled the hair up, we might not have known where it was going to sit exactly. You might have said the jaw. It might have sat a little bit lower a little bit higher, but this way we're sure, and so now you have a bit of an issue. You have an issue where you can say the back is graduated and the front is now our one length, and so what you have to do is you now have to actually graduate the front in order to connect it, and so, if we pull the hair up, What we find is we find a corner, and this corner is where your one length is connected to your graduation and so by picking the hair up. What we're doing is we're going to start graduating the front as well, and so we're not cutting the very front hair, because that is our guideline of the length want to create. We'Re looking at the hair underneath and the hair underneath is to make sure that we're not cutting any holes in it and what we can do now is. We can just come straight back and connect into our graduation. We would cut from before, and so this is what we're doing now to connect the front into the graduation. So now it's beautiful, it's been graduated from the back to the front and we've done it with absolute pinpoint precision to make sure it's the length we want. We kept so now we're doing the same on the second side again, making sure the hair is wet for maximum tension. You guys this is the real secret of the whole haircut. So it's really really really important. This part really important, because we really want to make sure that the length in the front is correct. It'S the secret to making sure that it's exactly rather than your client hospital as well. If that makes sense, guys give us a thumbs up and let us another. So again, we're pulling the head down, I'm feeling where I am I'm feeling that I'm at the same event, that I did on the other side as well, and so I can really make sure with pinpoint precision that I'm cutting the hair to the exact right place. That I did on the first side, okay, which is really important. We just want to make sure it's the same, and what I did for safety is. I probably go just a touch longer than I think just to give myself a chance if I've in case I do it wrong. So if you go too short on the second side, you end up having to do the first side again, which we don't really want. So it's better to go a little bit longer than you think and come back and refine. It then go to short straightaway. So that's what I always do. I always go a little bit longer than I think on the second side, just to give myself a chance to refine it as well as I'm just going slowly just cross-checking as we go making sure we're hitting the right length. That'S beautiful now that I live in the hair up and we're gon na start to graduated in so we're just picking up the hair finding the point where we can in from the front - and we should also put them in both over so making sure we're not Cutting the hair from the underneath, because the hair underneath is our outline now and so we're making sure that we're only cutting the hair from the top and not from the bottom. And now we have this beautiful graduation, which is connected from the back to the front. So we really got to make sure that the weight is pushed towards the front so that they have flicks it nicely and pushes forwards as well. So we can see that they has talking to us and it's saying it's happening. So I'm happy when the hair is happy. Beautiful we've come to a really major part now, so what I want to do is give you a little bit of a recap for those of you that are just tuning in thanks for tuning in so what we're going to say is we started from a section In the middle, at the back and the reason why we chose to start here and not any lower and not any higher is about the way. So if we wanted the head to stick out more, what we did is we went to lower with our section because the lower you go with the first section, the more it pushes the hair out the higher you go with your first section, the more likely you Are to go flatter, so if you have someone with a flat head shape, you're better to go lower. If you someone with a headshot that really sticks out or they want to go for more modern flat, graduation you're better to go higher, as you have more of a chance of growing flatter as well. So once we did the first section in pivoted we took our first section. We decided the length of our graduation after that we started pivoting round now, the more we pivoted up the shorter we ended up in the front, the more we pulled towards the middle in the back, the longer we get towards the front as well.


Comments
Siren Savior: Excellent excellent instruction on my favorite shape. Thank you thank you
Jason Curling: great video very informative hard find good video on style bob haircut! I think very pretty, thanks! could you please do for next video on how to do buzzed triangle nape of bob haircut ?
PeaceWithDefenseOnly: #1 This style is perfect, but 240p in 2019 when we are at 4K and 8K is coming?! :o OMG...
Christoph B.: beautyful model!
Love2TravelAway: Best cosmetology hair stylist art teachers
From Foreign Eyes: I would have loved to watch this. But I was not about to sit through a video with 21 commercial breaks. Are you freaking kidding?!?