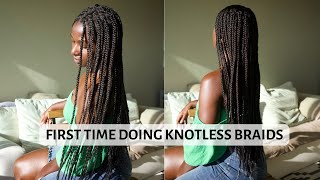
Criss Cross Knotless Braids | Viral Tiktok Hairstyle
- Posted on 02 December, 2021
- Braids Hairstyles
- By Anonymous
Like, Comment, Share, & SUBSCRIBE ✨
Hello my lovelies, welcome or welcome back to my channel. Make sure you guys follow my social media and subscribe.
Knotless Braids Tutorial
Product Mentioned
•Freetress Braiding Hair
•Shine N Jam Magic Fingers For Braiders https://go.magik.ly/ml/1cxqw/
•Blue Magic https://go.magik.ly/ml/1cxr0/
•Rubber bands
•African Pride Moisture Miracle 5 Essential Oils https://go.magik.ly/ml/1cxr1/
Social Media:
Ig: DesiaJean https://instagram.com/desiajean?utm_me...
Snap: ayyedesia
Twitter: DesiaJean
TikTok: DesiaJean https://vm.tiktok.com/ZMRDHDDKw/
Business Email: [email protected]
Equipment:
Camera: Canon EOS M50 https://amzn.to/3qzHReH
Editing Software: IMovie
Lights: MountDog Studio Softbox Lights https://amzn.to/3qyRUAJ
Music:
Epidemic Sounds
*FTC disclosure: This post or video contains affiliate links, which means I may receive a commission for purchases made through my links
Hey y'all: what's up so today i'll be trying to do the knotless crisscross braids on myself, so let's go ahead and get started, but first go ahead and hit that subscribe button down below. So i will be using the freetress, braiding hair. Of course, i always use this one and then i'll be using the shine and jam magic fingers for braiders to define my parts and sections and then just to keep my ends moisturized, i will be using some blue magic. I do recommend to use a hair butter, but i didn't have any and then of course, i'll be using some rubber bands, and then i decided to oil, my scalp with this african pride moisture miracle oil. So i'm just going to go ahead and part. My hair down the middle and then across from ear to ear, to separate the back, where i'll be doing my knotless braids from the front, where i'll be doing the crisscross rubber band parts and to make sure that my part is as clean and straight as possible. I will just go ahead and apply a generous amount of that shine and jam to my part and then just clean it up with my rat tail comb. Okay. So after i make sure that that part is as neat and clean as possible, then i would go ahead and start on the back of my head: um, just pre-parting it and then braiding it, and i am using my laptop just to help me see what i'm Doing and just make sure that everything looks pretty decent back. There actually seen this trick on tick tock, where someone used their um ipad in their phone to see like they facetimed yourself just to see, and so, since i'm recording with my camera, i just decided to hook my laptop up. So this part is going to go by a little quickly, just because i do have a full, detailed video on how i do knotless braids up on my channel. So i will just go ahead and pick the link somewhere on the screen or maybe down in the description box, for you guys to go and check that out. But i will just go ahead and show you guys once how i start my knotless braid, because after that, it's pretty easy. You just braid all the way down. Okay, so i'll just go ahead and apply some that shine and jam to this section to make sure that everything is nice and clean and then i'll go ahead and split it into three parts so that i can begin braiding. So i will just braid it once and so then i have a piece of hair on both sides of my middle finger and then i would go ahead and add in one piece of hair, like hook it onto my ring, my middle finger so that it covers Both pieces of hair on each side of my ring finger, then i'll go ahead and braid it down once and then add in another piece: braid it down, and then i will go ahead and just keep braiding down, adding shine and jam as i go to just Make sure that everything is nice and clean and then once i get down past my hair, then i would go ahead and add another piece of hair and then braid. It once and then add another piece of hair, and then i would just braid it all the way down until i get to the end. Once i get to the end, i'll leave just like a little bit of hair, that's unbraided, and then i would just go ahead and tie a knot. And then i just repeat this whole process until i'm done braiding. But again, if you guys want to see like a full, detailed video on how i do my knotless braids make sure you guys check the description box okay, so this is what the back is looking like um. This is actually the next day because i did start my hair, pretty late, and so i just finished braiding it um the next day. But to start on the front um i did go ahead and just part off like a section, and i am just going to go ahead and clean that up using the shining jam and just really make sure that that part is really straight. Then i will go ahead and part this section down the middle and then just really define that part. So now that one section i parted off, it is now into two parts. Okay, so once i make sure that that is nice and clean, then i will go ahead and part one half down the middle. So i have two parts and then i will go ahead and add some of that shiny jam again just to make sure that that middle part is nice and clean. And then i will go ahead and add more shine and jam to the front part and really make sure that um there's no flyaways, it's nice and clean and together and then i will go ahead and tie a rubber band around it. And then, once i tie a rubber band around that front part, then i would take the second part and add some shine and jam and twist it, and i just do this just to make sure that the lines are nice and clean, because if it's not you Just rubber banded everything without making sure that the lines are clean, you're going to be upset and you got to start all over and then once i do that, then it is time to cross. So i will go ahead and take one of the front pieces and add some more of that jam and twist it and i like to twist it because it will definitely define that cross. So once i add some of that shine and jam and twist it, i will go ahead and tie the two parts together with the rubber band and then i'll just do the same thing for the other two parts and then there you have a cross so um. It looks super good and clean and then i would just go ahead and do the same process for the other sections. So, on each side of my head, i lit i'm literally going to do three different sections um that each has like their own crossing. If that makes sense, you guys will see what i'm talking about, but i literally just repeat this whole process, so me, okay, so for this section um it's a little different, so i do have three different parts in each row that i did and then i'm also Going to be tying the rubber bands differently, so obviously i did go ahead and tie rubber bands around the front two parts and then crossing them. I am going to go ahead and start to tie a rubber band around the second section and then, before i finish doing, the rubber band is, when i'm going to add in the front part and cross it so that i'm not using multiple rubber bands. But i really wanted to make sure that the top of my head was super secured, because the sides of my hair is thinner than the top part. The top is more thicker and i just really wanted to make sure that it was super secured on there. So that's why i started to tie the rubber band around first and then cross the hair and tie it around so all in all, i'm using literally just one rubber band for each part. If that makes sense. Okay, so once i'm done crossing and rubber bending the front, then i did come out with 12 rows, six on each side in those three sections on each side, and so i will just go ahead and start to braid all 12 of those rows and then once I'M done braiding. This is what it is looking like and i'm just going to make sure that everything is nice and clean by applying some of the lotta body, foaming mousse and then once i apply that to the top of my head and down my braids, then i did go Ahead and dip my hair into some boiling water, so this is it um. This is the end of the video. I really really love this hairstyle. I do want to say make sure you guys are not tying the rubber band super tight in the front. You will definitely have a headache your head will hurt, but i hope you guys enjoy this video make sure you guys give it a thumbs up, comment down below, share and most definitely subscribe. I'Ll see you guys soon. You

Comments
Lakeitha Adams: Love it! You look Amazing How many packs of braiding hair did you use?
Nana Ama: You're amazingly beautiful..love your hair
Destiany Mckelvin: Beautiful
Claire's odyssey: Love your content girl Love from Uganda
Plush Furr: U look 15 yrs old. Yassss QUEEN gorgeoussss
shafiqFPS Gaming: i never give up … Oneday i gona be youtube