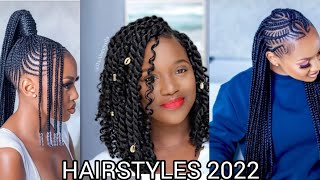
How To: Cornrow Braid Hair For Beginners! (Step By Step)
- Posted on 18 April, 2017
- Braids Hairstyles
- By Anonymous
These traditional cornrows are the foundation of any hairstyle ranging from sew ins to crochet braids, the list is truly endless! Once you master being able to braid cornrow braids with extensions you can pretty much do anything like feed in braids which are also known as invisible braids for example. Breanna Rutter teaches in this tutorial how to do cornrows with extensions on your own hair! This is definitely a beginner friendly braid tutorial so that you can get how to braid cornrows on your own hair or on someone else. Breanna used only 2 packs of kanekalon braiding hair to do these braids with zig zag designs! Comment down below your video requests so that Breanna can know which hair tutorial or braid tutorials you want her to do next!
These are the products I used for my Cornrow Braids For Beginners! https://goo.gl/0LaUej
CORNROW WITH EXTENSIONS HAIR SUPPLIES
2 packs of Kanekalon Braiding Hair http://amzn.to/2mvidVN
Red Braiding Hair http://amzn.to/2mvidVN
ORS Edge Control http://amzn.to/2mQLqO
Rat Tail Comb http://amzn.to/2iJlL6o
Hair Cutting Shears http://amzn.to/2hVVg09
Duck Bill Clips http://goo.gl/Jyxrkg
Wide Tooth Detangling Comb http://amzn.to/2mviyZ8
CHECK OUT MY NEW HAIR TUTORIALS YOU MAY HAVE MISSED!
How To: Feed In Braids FOR BEGINNERS! (Step By Step) https://youtu.be/yDYRPcRZxeI
How To: Goddess Braids FOR BEGINNERS! (Step By Step) https://youtu.be/g2ealpvva8Q
How To: INVISIBLE PONYTAIL https://youtu.be/khA436-g82A
$5 High Ponytail w/ KANEKALON BRAIDING HAIR! https://youtu.be/tpYE14_IN00
BOX BRAID SEW IN??? https://youtu.be/sGW41bCEpX0
Buy My Books, DVDs, and T-Shirts At
Website http://www.Howtoblackhair.com
Personal Instagram: http://www.instagram.com/BreannaRutter...
Facebook: http://www.Facebook.com/OfficialBreann...
Thanks For Watching!
DISCLAIMER: All suggestions, tips, prizes, techniques and advice given are for informational purposes only and should be used at your discretion and best judgment. I highly recommend conducting strand tests when trying or using new products, hair appliances and product mixes. I am not responsible or liable for adverse or undesirable effects including hair loss, hair breakage or other hair/scalp/skin/body damage as a direct or indirect result of the suggestions, tips, prizes, techniques and/or advice given.
FTC: I am not representing, being paid by, or endorsing any of the product brands in this video & I purchased everything with my own money - UNLESS OTHERWISE STATED in video/blog content. There are links to products that might be helpful based on the content of this video/blog. Each of your purchases via our Amazon affiliate links supports our cause at no additional cost to you.
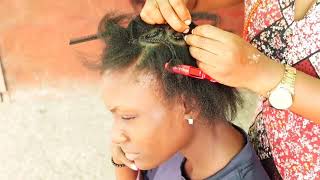
Hey, ladies, this is Brianna from howtoblackhair.com, and I want to show you for beginners exactly how to do. Traditional cornrow braids, subscribe to my youtube channel to watch me break down more hairstyle for beginners so that you can do them on yourself for free. One of my youtube goals is to get my channel to five hundred thousand subscribers and I'm more than halfway there, because I currently have three hundred and seventy eight thousand subscribers so subscribe. So we can go ahead and get started with the clips to begin you're. Only going to need a few supplies to do this, look for this style and you're only going to need about two bundles of braiding hair. That'S it! You don't need much hair I've already braided most of my hair and, as you can see out of a large chunk of hair left and I'm going to be demonstrating how to do it with red braiding hair. The first thing you want to do is go ahead and begin removing your ponytail holder safely from your hair, so that you can use your wife, cheese, comb to detangle and prep your hair for braiding. So now after the tangling, you want to pick the end of your rat tail comb and you want to make sure that you follow the parting of your break. Now I could have easily done my cornrows straight to the back, but to make things a little more interesting, I wanted to add a zigzag braid pattern. So, in order to do the exact, as you can see here, you're just digging and zagging your hearty and make sure that you're following the parting that you have for your previous break, so that you have a baseline as far as how you need to actually part Yorkers and always move your hair from side to side so that you can double check to see if the width of your party is just right once you finish, tithing for your braids you're, just going to grab your homie tail holder and you're going to secure the Rest of your hair out of the way, and now that we're done parting, this is how one side of your part should look. So I'm just touching my hair part just a little bit to show you how to be fine, you need to have, for your heart feels very clean now this is how the other side of my part looks as well, and then, when I move my hair, you Can see that I have the same amount of consistency of hair on my Scout for my braid, you want to make sure to put any excess hairs out of the way so that your braids are very neat and you're, going to take your wide tooth comb to Further detangle, your section make sure you get very close to your roots, so that way is fairly smooth. If we're going to use edge control to flick down the very front of our brain. You only need about this much so now, taking the end of your rat tail comb you're, going to part out a small piece of hair in the beginning. This is a starting point for your brain and then you're going to prepare the braiding hair in your hand. So you're going to grab a large chunk of hair and divide it into two pieces. Make sure that one piece is actually a third of the size of the original piece of hair. You have here so you have a third in two-thirds of the size of hair grab that smaller piece and wrap it around the bigger piece. So that way, that third, smaller piece is the third leg of your braid. So you're going to pinch the hair with one hand and use your other hand to actually hold the bigger half. Then after you that you twirl your hands underneath you open your pincher finger and thumb to secure that second leg and between your fingers. Your pincher and thumb is where you're going to add legs of your real hair into your braiding hair to form your brain. When you add hair, it goes here in between your pincher and your thumb, which is your index and your thumb. Taking your left hand, that's free you're, going to use your pincher and some open up to grab that first piece of hair and that's the hair. That'S going to the middle leg. So now you see me holding and rotating those two legs so that I can hook the other leg. As you see here. This is how you interlock the legs to begin forming your grades. You always want to make sure whichever hand has two pieces of hair. You twirl it going outwards away from the other leg so that you can turn the middle leg to its outside leg and then every time you add, hair from your scalp make sure it's directly underneath your fingers. If you do not do this, it will cause you to have a lot of tension at the very beginning of your brain. That causes a lot of hair bumps and hair loss and traction alopecia, and you don't want to have any of that happen. That'S why it's very important that every time you're rotating your hands, you're always driving hair right underneath the braid, so that the tension is very easy throughout the entire gravy process. So if you don't really get how to do it, yet it's perfectly fine! I just want you to continue watching, as I give you tips along the way so that you can understand exactly how to braid. Now, every time you rotate your hands and you have one of your hands-free, you want to make sure that you grab the hair going outwards. So the outer leg has concerned and become the inner leg, and you have to see alternating back and forth so that you can create the braid. So, as you can see here, I'm rotating my right hand so helps the outer leg and I'm doing the same. For the other side, and then you want to make sure also that your schooling, your hair, along the way, so that your real hair doesn't stick out and look. Look if you want your eyes to be very smooth and that comes from making sure that you're not only crossing the legs but that as you're doing it, you're smoothing your hands here, so that your hair and the braiding hair is smooth every time you overlap legs To form your brain so make sure all of your braids have the same thickness then chop a little piece of braiding hair from a neighboring leg to add to that leg and then just continue braiding as normal. You will not be the difference with your brain is finished whatsoever, so now you're just going to continue braiding, making sure that you always overlap one leg over the other you're only going to be overlapping the outer leg, not the movement. The middle leg become familiar because you overlap the outer legs over the middle leg, so just make sure that as you're watching you're listening along as I'm explaining how you want to braid - and you actually practice this yourself - because the best teacher truly is practice - make sure You'Re practicing this on a mannequin head or your head, so that you can perfect doing cornrow braids, because this is the base of almost every single hairstyle. We'Re almost done with this braid. But I have to show you a difference between this style in this style that you see here. This is what you call invisible cornrows, and this is a critical core mode that everyone thinks up, but this is not the traditional formula in order to do this style, you have to feed it in features of hair along the way. I already do a tutorial on that look, so go ahead and check it out on my channel after watching this. For now I'm getting back to the braid and I'm going to show you how to extend the length of your braid. You always want to grab the same thickness of hair and you want to hook it underneath your index finger so that you can feed it into your brain. This is very similar to doing the inducible braiding technique, but the beginning is a lot different. That'S a huge difference between this and under four braids. So now, after freeing that hand again you're going to hook it underneath your index finger again and then continue braiding every time you add braiding here you want to make sure that when you look it under one of your hands, which is my left hand, you're going To bright a couple times to free your right hand again, so that you can grab the remaining leg to add it into your brain. That'S exactly how you expend a phone no-brainer super easy, so I'm just consuming so bright all the way to the end, making sure that I'm always feeding here from my scouts directly into the brain which is located underneath the bread you don't want to pour hair. That'S too far away because it causes the front of your braids to pull a lot on your reach. Now you just want to continue braiding and smoothing down, and, as you can see here, this is even a more clear way to show you how to outer leg. Always become the middle leg and let's also make your braids very, even and thickness and finish the bottom, just to top a little bit of hair from one of your neighboring breaks, so that you can continue to braid all the way down to the end. So now that the cornrow braid is finished, all the red hair really help you to see the difference between the braiding hair in my hair, so that you can see everything very clearly. So if you really appreciate this tutorial for beginners be sure to give me a thumbs up to, let me know that you want to actually see more videos like this. It'S very important that you master doing for oh great because it serves as the base for so many styles, ranging from sewing the crochet I mean the list is airless and you can be so creative with your according to create such gorgeous looks like this. Thank you for watching my tutorial and I can't wait to show you more be sure to subscribe and thumbs up so there you can actually see more videos for me, I'm currently at three hundred and seventy eight thousand subscribers, and one of my youthful goals is to Get my channel to 500,000 subscribers I'm more than halfway there, so I know with your help. We can make it happen with this channel. So if you want to see more, I leave some comments down below. Tell me what fabulous tunics and be on the lookout. For my next video bye, bye,


Comments
Breanna Rutter: ❤ Comment down below what tutorial you want to see next??? SUBSCRIBE & CLICK THE BELL ICON to get a notification when I post new videos!
deborah allen: You are such a wonderful teacher. Thanks for sharing!
Tina Pearson: Hey Breanna I really love your tutorials I've learned so many new techniques, I really would like for you to do a video on feed in flat twists or goddess twists. Thanks
Stephany DuPree: Hi Breanna I have watched your videos for about 4 years now on and off. Love your videos but I feel like this one was rushed but continue helping us look beautiful on a budget
Kenaka Wig & Beauty shop: Love your videos! you are so professional,love your nails,keep up the good work,x
Diane Hall-Harvey: Breanna, you are an awesome instructor with the patience of a saint. KEEP doing what you're doing because soo many of us need your help! Agape love, Diane in NYC.
Lorraine G.: Thanks Mrs. Rutter. I know how to do my own hair in cornrows and box braids I even know how to do extension box braids but at last I'm trying to learn to do extension cornrows on my daughters and on myself. So I'm have to rewatch your video a few times to get it to look right. I like the feed in extension cornrow that is a good technique bc it allows you to deal with less hair at the start like you would braid your own hair grabbing more hair in along the way. Thanks.
moon 00: you're an awesome teacher thanks for sharing
qtbeddecor: Love the zig zag braiding pattern. Thanks for another awesome video. xoxoxoxoxo
Mônica Visual: Vc é a melhor
queen star goddess: all I want to say is thx thxthx you I really appreciate you explaining and very detail. thx you so much I did my kids hair and really didn't mess up..I been paying females to do my kids hair every two weeks thx to you I don't have that worry unless it's something I can't do you the best and to you haters y'all just mad because y'all some house techs and mad someone going to step on y'all toes y'all need to stop lieing talking about y'all in the shop and getting those illegal taxes.....
Tarabobara: this is so helpful, the problem I have locking in the hair so I can start on the real hair
minnifield_wifey1: Can you show use how you do Lemonade braids??
Chanel A.: Can you make a flat twisting video for beginners
moon 00: is it a way that you can flat twist with kanekalon hair?
TooMuch: I'm sorry but... This is a big no for me
Miss CC Miller: Now I like this one.
SassShea: I taught myself how to cornrow & I can only underbraid...I literally cannot do them the regular way lol
Shan Kaye: I want 2 learn how to braid so bad its depressing omg
Allena Rust: Nice! :)
Isoken Aninye: Good one.
Diamond: I wonder if you can PLEASE make a vide on how many times you should wash natural hair and how. I used to use Acv rinse every week bc I didn't want to use shampoo. But acv rinse dried out my hair and my scalp became itchy. Now, I don't put a lot of product in my hair so I should not be using shampoo every week. I don't know if I should co wash every week instead? But then your hair becomes dry I've heard. And I don't know the difference between wash & go and just simply co washing. I don't wash my hair more than once a week, in the middle of the week I do the Loc method. Can you please please help meg , I'm struggling.
Kiza Nyota: good job
LaNiyah Harris: it looks good
J B: Those look really weird. Too much hair at the top
Zanae Austin: Girl wtf!!! You know you down bad for that hair what was you thinking
Thelma Mcneese: Hi Breanne my name is Thelma I like your videos on growing hair but I need to know I brought some Paul Mitchell tea tree shampoo and conditioner and some black Jamaican castor oil in trying to get my hair to grow is this a good step
Kena kwinzy: This video has to be deleted, sorry sis!
da family:
DR RODZ: It’s looks cheap, she needs to use better hair.
Ivy Garcia: God is not gorgeous that looks like it hurts
Derp Derp: what are you yelling?
Livekidreezy Yt: Ewww wtf
Nyia Keys: ummh no