Heart Shaped Braid Designs || Trendy Heart Braid Tutorial
- Posted on 04 September, 2022
- Wedding
- By Anonymous
Heart shaped braid designs || Trendy heart braid tutorial
This braided heart design is easy for a beginner. And I promise you as far as you can braid hair you can make this design, simply follow the instructions in the video step-by-step. Braided heart makes a hairstyle more adorable and really cute it makes your little girl feel special.
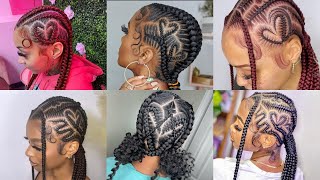
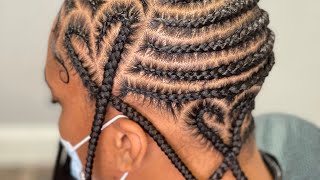
I have included some pictures to give you ideas of different places you can put your braided heart on the hair to incorporate it into your hair design.
#braidedheart
We love wearing hearts in our hair! The gorgeous heart braids took over in 2020. Even if you are not a huge fan of braids, this is a type you’ll certainly want to try. It’s chic, cute and surprisingly easy to make.
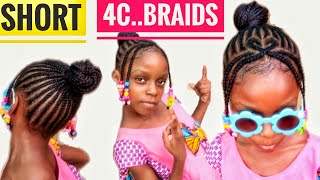
Black girl hairstyles. The Black Kid Cornrows And Braids Hairstyles, African Hairstyles. Protective Hairstyles For Natural Hair, heart shaped braid designs, heart braids black hair, easy heart braid hairstyle, heart hairstyles, heart braid tutorial, mermaid heart braid, easy heart hairstyles, love heart hairstyles.
#HeartDesign On Natural Hair
This heart shape bun hairstyle would be perfect for Valentine's Day, a wedding, flower girl, Prom, Homecoming, etc. We love wearing hearts in our hair! The gorgeous heart braids have taken over in 2020. Even if you are not a huge fan of braids, this is a type you’ll certainly want to try. It’s chic, cute and surprisingly easy to make. Below you’ll find how exactly to pull it off with 15 examples for short, medium and long hair. black girl hairstyles, cornrows for black kids, braids for little black girl, natural hairstyles for kids, easy toddler hairstyles, braid hairstyles for black kids, black girl braids, braid hairstyles 2020, little black girl hairstyles, Black Girl #love #lovebraids #heartcornrow
Videos mentioned!
Flower braid;
Heart braid;
Afro mannequin hair (Nkechi) review;
AFFILIATE LINKS
SHOP MY AMAZON STORE for products i use and love:
https://www.amazon.com/shop/chydiaries...
GET 20% DISCOUNT WHEN YOU DOWNLOAD TUBEBUDDY WITH MY LINK:
https://www.tubebuddy.com/Chydiaries
FTC Legal Disclaimer - Some links found in the description box of my videos may be affiliate links, meaning I will make commission on sales you make through my link. This is at no extra cost to you to use my links/codes, it's just one more way to support me and my channel! So, thank you
TO SUBSCRIBE TO MY CHANNEL, ITS FREE:
https://m.youtube.com/channel/UCpoq8Vn...
CHECK OUT LINKS TO MY PLAYLISTS FOR MORE OF SAME VIDEOS!!
Little black girls hairstyles:
https://youtube.com/playlist?list=PLdp...
HAIRSTYLES FOR BLACK WOMEN:
https://youtube.com/playlist?list=PLdp...
Relaxed hair diaries:
https://youtube.com/playlist?list=PLdp...
Braids hairstyles for black women:
https://youtube.com/playlist?list=PLdp...
Toddler natural hairstyles:
https://youtube.com/playlist?list=PLdp...
#Shorts on my channel:
https://youtube.com/playlist?list=PLdp...
Self help videos:
https://youtube.com/playlist?list=PLdp...
HOW TO MAKE BRAIDED HEART,Heart Design On Natural Hair,braided heart,heart design braids,braided hearts in hair,braided heart step by step,heart shaped braid designs,heart braids black hair,heart braid,braided heart design,heart design in hair,heart braid design hairstyles,heart braids hairstyles,heart braid designs,heart braiding styles,heart braid step by step,heart braid for little girl,heart braid ponytail,heart braid hair tutorial,heart braid easy
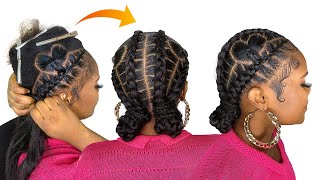
Hi my loves welcome back to my channel, so i saw this tutorial by the dollhouse on instagram and we are recreating it today, so the hair is four braids to the back with heart braids. So i proceeded to share my mother's hair into four into two equal parts and then into two equal parts, so half four equal parts so that we are going to start making the hard braids and, as you go along i'll, tell you what i learnt while doing This and what i will do differently or what you know. I learnt the hard way. First of all, when i started off, i didn't look at her picture very well or her video very well, and i started making the hearts into the sections. I was wrong. It looks as if the line cuts through the middle of the heart, so you have to start from the top section and make the heart into the the heart. Is the heart connects the top section and the lower section out of the four sections you have of the braid, so you can see my line passes through the middle of the heart. If you look at it that way, something that she did was the heart like for this first for the three hearts, we have three hearts between row, one and two right. So we have the first heart is facing the towards the center of the head. The next one faces towards the ear and then the third one faces towards the center of the head. I saw that this thing was done for a reason, because you need more hair to yeah. You needed more hair, two parts, two of the hearts are facing that side. If you're, not careful, and do this casually or carelessly you're going to end up with like after making the heart, you won't have space to braid the the bigger braids through. That was what i noticed so you have to you know and also consider the head of the person you're, making the braids on, as that will affect the shape of the heart or the size of the heart. When i was making this i became confused. I was like okay, she has three hearts here. I have three hearts here: how come she see hard space like enough space for the braids to pass through, and then i went? I was looking at the head of her hammer there right. The mother's head is bigger than this one, her mother says bigger than my mother's head, so you have to also consider if you're making this on the child, you have to either use less number of hearts or smaller, smaller hearts like i'm, just letting you know what I didn't consider that affected the process and i had to redo the hearts again, so that was one now making the second heart you can see. I used like the line in the middle. The very first tutorial, like my most popular video, that is almost at one million views right that video i showed how to make a heart, and i started off with like a line like just two lines you make like the letter t and then cup the middle. It makes it so so so much easier to like make the section of a hat on the hair, so that was what i was using. That'S why i made like that cross, because the hat had had to connect between two of the sections right. So i made a line running through the second section into the first section and then made the shape of the heart and it made everything so easy, so easy so easy it made it so easy if you cannot, if you're not experienced enough to just carve the Shape of the heart like easily on hair then use the exact technique i used here, and it is going to be very easy for you. Okay, so now it's time to start braiding the heart and i just make a line down the middle sharing, the heart into the left and the right side, and as i mentioned in that video again, we make like a two o'clock and a four um ten o'clock. Um inside of the heart, i have seen people start making this slime like towards the top section of the head, and it gives your heart a weird shape. If you start from the middle or even going down a little bit, it makes the heart look more. Like your heart and not like an up so i make the line down then share that half section into two by making like a two o'clock on an on a clock like on the clock, the arm of a clock when it's pointing to two o'clock. Something like that from the middle of the heart, and then i braid in from the top turn around all over to the bottom. No guys, okay, see! This hat is different. Sorry, she didn't make like the normal shape of heart. We usually do she had just one braid going all through, so you start from. I don't know, just look at how i started, but you braid the hat almost like a w right. Instead of making half and half this is a little bit different yeah. I actually made that mistake. I had to redo the hair, and i forgot where i edited the video so yeah you braid it just like that. Try to go down into each corner as it is going to make the braid look better, guys, you're going to be turning around and around and around the person's head, because, okay - maybe just because i was filming - i couldn't just turn her around, because i had to Make sure the bridge was facing the camera? Okay, don't worry, you won't turn around too much. You just turn your client on the chair, you're fine, so she braided it and leaves the tail this way. So this first hat and the third hat will be going into the first row of jumbo braid, all the braid going to the back. Then the middle one will be going into the second row you're going to see. So i have explained hybrid hat, i'm just going to let you watch why we braid the remaining two and that will be all of the i'm not going to show how we braided the whole head, because it's going to take one hour. So just watch carefully so that you have it down. It'S really easy. I have made the line down the middle and now making my 2 o'clock or 10 o'clock um, and then i will just braid from the bottom of the heart up onto the fat and top section, make like a w reverse braid again and go down into the Pointy bottom now, when you're, adding the braids, you have to be careful so that, where you put the tail of the braid is just going to form like the end of the heart. If i add, if i had added the tail of the heart too early, i will have a gap at the bottom of the heart and it will look as if it is leaking. So you have to be mindful of where you add it to just form the perfect heart you're going to understand when we get there. So i'm just going to stop talking too much for now and let you watch and just get used to the heart and how to make it, because once you have this down, the rest of the hairstyle is going to be so much easier. Guys know it doesn't get less interesting. When you see i wanted to keep quiet, but it's difficult wait. My model is my assistant, so you've seen her make my hair and me make her hair right. So when we make sometimes we're just trying out um hairstyles for tutorial purposes and then we just try out hairstyles on ourselves, so that when clients come you're sure you have it set and ready right. So i had someone say: oh, she loves the style, but she doesn't like the color. The color of the hair extension i used was for demonstration purposes. I used a darker color of braiding hair and a lighter white, actually white color of braiding hair, because i was trying the can't fit in crotchet method of feeding in cornrow, and i wanted to show something. I noticed when you're, using a brighter colored hair extension and when you're, using a black hair extension, just to show that it doesn't look as perfect as when you are feeding in hair extension, the regular way. So when you use the crotchet paint to fit in the hair extension and before braiding the hair, there are like these slight differences that you might not notice. So well, if you're, using a natural colored hair that you would see very very clearly on the bright colored hair. So i was just demonstrating that that was why we chose the colors that we chose. Don'T use the colors that we used use whatever colors work. For you so i'll be back on these four sections. Guy. On these four sections, i used one two three three different methods to make: the braids going to the back, so the first one was can't stitch. Braid can't fit in. If you don't know how to stitch. Braid how to mix it braids like if you struggle with making stitch braids and you struggle with feeding in hair like making feeding braids, but you can cornrow, then i showed how to achieve this hairstyle using that method. The second one was for people who don't have problem with stitch braids, but they have problem with feeding in hair extensions, so we've made, i showed another variation of how you can do it and then the third one was with cast is read, confident, constitute, but cannot Feeding then, can feed him boca nostalgia. Something like that. I remember again, but we had like we wrote down what we wanted to teach from this tutorial and went through it line by line and all the techniques are different, you're going to see them. But i didn't explain like i caught the clip to make this particular tutorial to be how to achieve those heart design straight back braids, but i have already uploaded the can't feeding can stitch, can't stitch book and feeding tutorials they're already up on my channel. So if you want like to see if you cannot stitch and you cannot fit in and you want to learn that specifically not interested in the hat and if you just really want to focus on that, i made a video and went through each step step by Step and explained it well, so i just shared the video that way, so that no one is too long and then i am not boring somebody that can breathe like can feeling i can teach that just wants to see how to make the heart. I'M not burying that kind of person with unnecessary information. I just repeated the tutorials and then i'm also trying to create plenty content. You know without making anyone too long, so you can watch that the braiding gel i am using is shine and jam, and this is the first method. If you cannot stitch - and you cannot fit in this tutorial - is for you no no. This is only for people that cannot stitch. This is a hack to make not the hack, like a dummy proof way to make stitch braids. If it's giving you headache, even one percent headache, just use this method and rest sis use this method and rest. It is not even as slow as you would think, as you would think. Forgive my essence. English is not my first language. I am a nigerian it's so okay. At this point i have explained like there's nothing i'll do in the video that'll be straight to you. You understand what i am doing, so i'm going to just play some music and stop talking too much enjoy. If you have any question, if you have any questions at all, the reason i am here is to teach what i know as much as i know. So if you feel i know anything, you want to do just ask me and i will gladly respond in the comment section bye. You
Comments
Needy4Jesus365❤️🔥: Woww‼️That's soo beautifully❤️and uniquely❤️designed‼️ BE BLESSED‼️
Lovelie Joseph: Very nice