How To Part Hair For Box Braids, Passion Twists Etc Using Rubberbands | Natural Hair
- Posted on 02 October, 2020
- Braids Hairstyles
- By Anonymous
Hey babes. This is a detailed video on how to part your natural hair for box braids, passion twists etc It is very beginner friendly and I hope it helps someone. xx Lola
WHAT YOU'LL NEED
2 mirrors
comb and parting comb
rubberbands
shine n jam
a lot of arm strength:)
CHECK OUT MY PASSION TWIST TUTORIAL- https://bit.ly/30tdcn2
CONNECT WITH ME ON INSTAGRAM- https://bit.ly/M2HKvtCy
BUSINESS INQUIRIES? SEND ME AN EMAIL- [email protected]
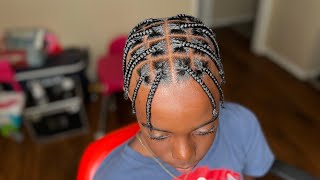
Hey guys, what's up and welcome back to my channel so today i'll be showing you how to part your natural hair for box braids fashion twists, whatever style you're trying to achieve so, let's get started first thing: you're going to need are two mirrors, so i have One in front of me and one behind me: you're also going to need shine and jam or some type of like edge control to part your hair and then you're going to need some rubber bands, i'm just adding some oil to mine. So it doesn't break my hair and also so it's easy to just slide out when i'm ready to take them off and then you're also going to need a parting comb. This is the one i'll be using and then some hair clips and some hair ties just to keep your hair out of the way. So first things. First, i'm just combing out my hair to make sure i don't have like any serious tangles. My hair is blown out and clean, so yeah. That'S how i'm starting, i think, it's easier to part on blown out hair, so i'll definitely advise you to do that now. Your ears are great landmarks for parts in your hair, as well as your nose. So just keep that in mind. It will help later so for the first section, i'm going to be making a part from the top of my ear on one side to the top of my ear on another side, and i'm just using my fingers to make like a rough part and i'm going To use my parting comb to clean that up in a bit so now to start cleaning up the part, i'm just going to use my parting comb to try and make a straight line like i said, we're making our first section from the top of the ear On one side to the top of the ear on the other side, so that's going to be like kind of our first section, i love to work in sections because it just makes everything easier. And yes, you guys, i can see the back of my head clearly with the other mirror. You have to place them in a certain angle, but just like work, your way around it, and you find the angle where you can clearly see the back of your head. So i'm just cleaning up that part as best as i can. It doesn't matter like how clean it is right now, because we're still going to go ahead and clean it up later. So now i'm just going to put the rest of my hair away. So it doesn't disturb me and i'm going to start working on our first section now. This first section is at the top of your ear, so you can make it into as many rows as you like, depending on like how small or big your style is going to be, i'm only going to be making two rows, because i wanted these like sections To be quite big, so two rows is perfectly fine, so i'm just going to clean up that part and i'm going to be using some shine and jam as well just to make sure that the part is as straight and as neat as possible. So now that i've gotten a straight part, i'm just going to begin sectioning off this row and i'm going to have three boxes in this row. I'M going to use boxes you guys going forward. So the boxes are like the different sections of hair that i rubber band. So i'm going to be making three boxes on this very row. You can do two. You can do four, you can do five, it all depends on the size that you're going for so now, after making those first um three boxes, i'm just going to go ahead and start with the section above it now. These three boxes are going to be very important, so make sure that they are looking right. Okay, so now i'm just going to go ahead and um straighten up that part. Like i told you guys, i was going to come back and straighten it, so i'm just adding some of that shine and jam just to like help my hair slip down. So i can like part it properly and, as you can see, i'm just going to go ahead and straighten up that part. So here you guys can see that i turn, depending on the side that you're um parting, you might need to use your back mirror as your front mirror. So these mirrors are definitely interchangeable. Don'T feel like you have to just face one mirror the whole time. So now for this next row, like i said, the bottom row is going to be very important, so what i like to do is start from the middle now. The reason i'm doing this is because i'm doing the brick layering pattern and i don't want any two parts to fall directly over each other. So i like to start from the middle just to make sure that that like line is going to be in the middle of the box below it that way, no two lines are going to be over each other. That'S how you get the brick layering pattern, and i find that starting from the middle is a lot easier than starting from the sides, because whenever i start from the sides, i just end up like matching up the lines all of the lines end up being on The same line so i like to start from the middle and make sure that none of the sections are going to fall over each other. Then i start using my rubber band to secure them. So i'm done with the second row and, as you can see, none of the like boxes are directly over each other. It just has that nice brick layering pattern. So now i'm using the arch of my eyebrows as kind of like a landmark to make like a u-shape going around my head, and this is going to serve as our next like row and i'm just straightening it up on my parting comb and now that it's All straight i'm going to do the exact same thing i was doing before i'm going to make sure that i make a part in the middle first so that none of the parts match up with that. Like part in the middle of the bottom row, you guys this is very difficult to explain. Just watch the video and you'll understand exactly what i'm trying to say. Okay, so after making that first section in the middle, as you can see, the part is going to fall right over the part at the bottom and i've gone ahead. To do a couple of rows now and, as you guys can see, you can't see any of the parts when i let my hair down and that's the entire idea. That'S what we're trying to do so that when you're done with your hair, everything just falls nicely and like you're, not just seeing parts everywhere. Your hair still looks really full. So when i'm done with this section, i'm going to be back to show you guys what i do next. So when the u shape, is this small i like to just go ahead and square it off, and i do this by making a part going from the left to the right side. So, just a straight part, going from the left to the right and i'm going to go ahead and just divide that into about four or five sections. You still want to keep the brick layering technique in mind. Just make sure that none of the lines are like directly above each other. So now i'm going to make a middle part and your nose is the best landmark for making a middle part. You guys. So if you make a straight line going from the middle of your nose up into your hair you're, going to end up with a part, that's in the middle of your head, so you guys can see what i just did there. I'M just going to go ahead and use my parting comb to just try and like straighten that up. Um just make it as straight as you want, but all i know is that the part is in the middle of my head, because i followed my nose. So now that the part is cleaned up, i went ahead and i just sectioned off the right side, the right side, you're seeing on camera. I went ahead and did the parts for that side and, as you guys can see, i made them a lot smaller than the back, because i still wanted the front of my hair to be really full and i also made sure to line up the parts with The parts on the side of my head as well so now i'm just going to go ahead and repeat the same thing on the other side, and this side was really easy to do, because the parts on the right were done. So all i had to do was just match up all of the lines and made sure that everything was following each other, and this is pretty much it to you guys now. This process is definitely not easy. I'M not going to sit here and act like it was easy. It took me like hours to do and this is over an hour footage i've edited into eight minutes. So it's definitely not easy, but if you want your hair to just have a more professional look, then i'd say it's definitely worth the stress that it takes to get your parts looking this nice. So that's pretty much it for this video you guys. I really hope that this was helpful in a way. I know i wasn't really good at explaining, but if you watch the video, i'm pretty sure you'll be able to follow, so i really hope you guys like this video. Please don't forget to give me a thumbs up and subscribe if you haven't and i'll see you guys in my next video. Thank you so much for watching bye.


Comments
Luciana Agbaire: Your smile literally makes my day well technically night❤️
Tiktok Royalty: im 12 years old and im trying to do my own box braids and my only problem was the parting so thank you, you helped me tremendously
Shantel Wiley: I loved how you explained the brick pattern parts. Made me feel all confident like I can part now lol..
90’s R&B Lover: This was so clear and easy to follow. Thank you. I'm new to doing my own hair so I needed instructions. And you saved me.
Wendy’s: this makes doing your own hair go by so much faster! used to take me 6-8 to do my rope twists and box braids because i parted and sectioned as i went but the time was cut shorter by doing this❤️
Naturalhair_zw: You have beautiful hair, it looks so heathy
tyla marie: this is one of the best tutorials i’ve seen for parting! thanks girl ❤️ and i like how you said it took you a while to part, other youtubers are like “it only took me an hour” and i’m like damn and i’m goin to slow
Modern Lady Vibes: I can't tell you how long I've looked for a video that covered parting. As an FYI, you could have made this video 20 min and I would have watched it all. It's that very top where you are dealing with the U shape but still trying to make squares that gets me every time. I would have loved to watch you do each individual part for that section. Still a great video all around, thank you!
zorabritt: Incredibly beautiful hair and great, easy to understand instructions. Thank you so much!
luvly ivey: I’ve been braiding my own hair since I was 7 thank you for the extra parting tip
Steph Voyard: doing my mom's twists later and needed to brush up on parting! thank you so much this video was wonderful
Tricia King: Love how you explained the brick layering in detail. I understood it perfectly well. Your hair is healthy & gorgeous. Thank you
hello 👋: i love how you explained and showed it in such a easy way for us to understand. this video is going to help me part my hair better. thank you so much!
Brianna Broughton: girl thank you, this was so helpful & informative!!!
brianna m.: this helps me so much! can't wait to try my own passion twists again. thank you!
You Opened Mandora's Box: Thank you soooo much for this video . I really needed a detailed parting video and this was perfect
G88: This was the best video I’ve seen for parting so thank you so much for this!
LeeAnn Moliere: Omg I never really comment but I just had to say THANK YOU!!! I've been struggling for 15 years trying to part ny own hair...every attempt ending in tears and broken items. It's for the parting that I dread doing my own hair and just today threw my mirror across the room out of frustration. And then I took a break and found your video. You so effortlessly demonstrated how easy it really is. The angles and your explanations made me so hopeful and then it turned out like you said!! I am so grateful to you madam!!!! THANK YOU THANK YOU THANK YOU
Amazon Ibia: I'll try this and see how I do really. Parting is a huge challenge for me. I never really part my hair.
Tiana B.: This video saved my life! My fav to reference for parting. Thank you so much!! Excellent job
QueenOfTheDamned: I need to learn how to part PERIOD. I suck at it. I'm trying to learn to flat twist and cornrow and I wanna be able to do cute styles with them like you do!
Idowu Ajayi: Wow! It's videos like this that make me wanna start braiding my hair myself! Will definitely try this out just to do mini twists on with own hair first then I'll see how it goes!
{Natural hair with Hope} Hope Council: Thank you for posting this video, I have always struggled ♀️ with parting my hair!
winkydinky toodlesnoot: this is the most helpful tutorial i’ve ever watched thank you so much
Audreydee74: Thank you! This is exactly what I was looking for!
YourOwn Self: Thank you for making this video and for actually showing us how to do parts and especially for showing us how to do the back of the head!!!
Keshia A: Wow! Super helpful and informative. Thank you so much ☺️
Patricia Johnson: Really good job! Thanks for the advice!
M&M: You explained it perfectly, it was everything I was looking for!! Thank you, thank you❤❤❤
Auna Jackson: Thank you so so much for this! I didn’t of the term “brink layering” that make TOTAL sense! I feel more confident in making my parts. Thank you
Wild Halo: Thank you so much for this. Your hair is so lush and gorgeous!
nicolewasnt_here -_-: THIS TOOK SO LONG BUT WORTH IT. Thank you sooo much this helped alot. Now I can blend my braiding hair for my senegalese twists while being confident❤❤
tee jackson: Omg thank u for this simple yet VERY helpful video!
Tiana B.: This video is a life saver!! Thank you so much
Bla _Ze: That’s how I do my hair and that’s years now. Love doing my own hair.
Ty Ny: Ppl are charging money for classes on this and here is this information, for free. Thank you queen
Sabrina Young: Very helpful video. Thank you! Your hair looks so healthy and voluminous. It's gorgeous!!!!!!
Jamila Watson: Thank you for this video! I did your method and it wasn’t the neatest but it looks really good for me doing it by myself ♥️♥️♥️
Lia: This is a good method! Thanks so much I’m going to try it
Kortney Brown: Soo helpful!!! Thank you!! ❤️
Fatima Shehu: Thank you so much for this, I really needed it
Malkia Benzy: This was so helpful as far as line up. Thank you for sharing
Truphena Lwanga: Love the technique & the explanation...not to forget the beautiful thick hair. Thanks so much....such a lifesaver.
Brittany AZ Curly Girl: I am going to do my own twist and this helps so much! Thank uou
Kaye Samms: You just showed me exactly the part I was looking for to restart my locks. After almost two years into my diamond shape lock journey, I was not liking the way my hair looked in terms of the shape and how it fell. The parts were too far apart, not over lapping, and overall I just did not have that full look I expected when I started with diamond shape. I recently took out my locks one by one..smh. that was not a easy job, but I did it. Now I'm ready to restart my locks with the perfect shape that I know I will love. Thank you for sharing!!!!
Ameisha Maria: Thank you for this video! Best self parting video I’ve ever seen!
misanthrxpee: you were very good at explaining, thank you so much ❤️❤️
Sydturated: Thank you for the video! It encouraged me to try parting my hair bymysekf for the 1st time ! Mine didn’t come out as neat - but I pushed through !
Jesus is Real: I got it brick layering Yesss I would do my daughters hair read this way nobody told me to do it this way I love the rubber bands that’s very creative and very helpful Thank You
Health overlength: This tutorial was so thorough and explained so well wow. Thanks so much !! ‼️
Tanika213 213: You explained this so perfectly thanks
StyleHairven: The shine and jam makes the whole parting way neater
Ella Malala: It's my first video of yours. I'm not much into beauty videos, but I subscribed because you gave me amazing insights too. I've been thinking about this way of "pre-sectioning" hair beforehand. I'm glad I saw it today.
Masters Way: SO HELPFUL!!! THANK TOU!!! What a beautiful head of hair you have Sis!
Melaina Smith: THANK YOUUU. I watched so many other videos about parting that explained absolutely nothing lol. This was so helpful!
Mira Coachman: Always had trouble parting and the way way you explained how to part from ear to ear and etc was veryy helpful.
phareedah's world: its soooo detailed, totally love it
Luh_Rosa: Omgg thank youuu!!! I’m 14 n wanna do my own braids n I don’t know how to part my hair alone I always ask my mom this video was so helpful
Naturally Cely: I’m going to try this method... very helpful... thank you
Melanie Oyadina Smith: Thank you so much, best parting tutorial for beginners like myself that I have watched
Grace Adon: You did that girl ! Very helpful !
Tammy Luna: Thank you so much for this
anna32sunny: This has been TTHHHEEEE BEST video explanation that I have seen yet. Thank you so much!
Sadie: This was sooooooooo helpful!
Janay R: Super helpful! Thank you!
Nisi Farley: Thank you for sharing this really helped me part my hair for doing my Kinky twist style.
Sunday Uhunoma: Wow I love this❤️❤️, so detailed
Natural Hair Guru: Beautiful, healthy hair and healthy scalp!!
Shawnya: This was super helpful!
DG: This it the BEST tutorial video I've seen so far and makes me feel like I can actually do this!
Zaria Milligan: This was so helpful!!!
Lady Angie: Thanks sooo much, I have your texture of hair. This was so helpful to me
Mari H: This was a very well done video!
Carnisha XO 2.0: This helped me so much!!
randi pike: This was so helpful thank u beauty
Akpayen Victoria: I love the fact she included a lot of arms strength in the description box. Making cornrows on my head is a whole arms workout.
Ilivetopleasenanami: Im trying to start my own dreadlocks today and I am terrified I'm going to make the part uneven, but I don't want to ask my mother for help because my ego is through the roof with stuff like this. This video is really helping guide me through this whole process! Thank you ❤
Tashana J: Very helpful. Thank you!
leah campbell: Brilliant video, just what I was looking for thank you. I did my hair and had to take it all out because I didint like the parting method I used.
Nhya Elien: This really helped. I didn't know parting took much detail tbh. Im learning to braid my own hair because I don't trust anyone with my hair anymore lol. I'll try to do this without two mirrors cause I don't have one big enough.
nikkilynn120: Very helpful video! Thanks
Drine The Poet: Great tutorial!
Ernestina Amiteye: Love this tutorial ...❤️
AdannaG: Now, this is how hair videos should be made! Clearly explained and easy to follow. Well done.
oluwatosin ajayi: I love this teaching Thank you so much
Makeupswatch Fan: Your hair is so beautiful, you make doing your hair look so easy ❇️❇️
Kimmy Lee: So helpful thank you
cameraun johnson: This was awesome very easy to understand
Kamsiy Nwankwo: Amazing video thank you so much!!!!
Jay Anoka: Thank you for this video, it’s well detailed
Dessy: Thank you sm I could never get the parts right didn’t have a method and now I finally se someone fully do it
Akili Turner: You made this look so easy
Renisea Kincaide: Very helpful thank you so much.
karen horton: You explained just fine❤️
KM: Your hair is phenomenal !! LOVE
LELE EXPRESSIONS: I like using this video as a reference when doing my hair because parting is the most annoying part of doing your own hair
Pearlena Alan: Great video thank You your hair is so thick and beautiful.
Kerrisha D: great video. Can't wait to try it
sheree blandin: The most detailed parting video i have seen yet..thank you
Tonya West: You did great, thank you