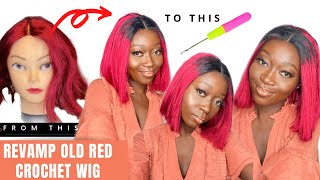
Diy Crotchet Wig Cap
- Posted on 11 November, 2020
- Braids Hairstyles
- By Anonymous
DIY CROTCHET WIG CAP
How to make crotchet wig using expression.
How to make frontal with expression.
How to make curly hair with expression braids.
Hello everyone welcome back to my channel.
In this video you will learn how to make your curly pixie cut from beginning to end, and with just one expression braids. You will also learn how to make your frontal in this video as well.
Be sure to watch this video to the end as it's fully packed with everything you need to know about this style. Watch and enjoy yourself.
please don't forget to subscribe,
Like, comment and share this video if you like it.
Products used.
Ventilating Needle, Aliexpress
Ventilating net, Aliexpress
Dome Cap Aliexpress
Rollers. Aliexpress.
Styling mouse,
1 expression braid.
Hello, everyone welcome back to my channel if you're new, to this channel, i'm styled by sonia, and i make hair tutorials, diys unboxing and review lifestyle and vlog. So if these are the things that you are interested in, you are definitely in the right place. For my returning subscribers, thank you so much for always coming back to this channel. So in today's video i'm going to be teaching you how to make this beautiful, coily pizza cut and with just one braiding hair, and also you will be learning how to make your own frontal as well, because i made the frontal i used in this tutorial. So guys, let's get down to the video so i'll, be using this expression, braiding hair color 139. So you can use any color of your choice. For me, this is the color i'll be using for this tutorial and i'm going to go ahead to cut the hair into five places, because that's the length that i want. So if you want it shorter, then you make it. Then you can cut your hair shorter and i'm gon na go ahead to um stretch the hair as well. So if you still haven't learned how to or you don't know how to stretch your braiding hair, i recommend you go check. My previous video on how to stretch your hair okay. Now, let me just quickly pull the hair, so we can get into the tutorial properly. Okay, i'm going to go ahead and place the the dom cap and the ventilating net as well on this dummy head. So the items i used or the product i used for this tutorial, i bought them from aliexpress. I mean the dom cap, the the ventilating needle and the ventilating net as well. I bought those three from aliexpress so guys, let's get into the video proper, so i've just placed the net and the cap on the dom head. So what i want to do now is uh sew, the the net. On top of the black cap, i mean the dome cap, so guys just watch me as i do this. Okay, guys, i'm done with the sewing. I'M just going to cut out the dome cap away from the net, so it will look more transparent and more natural by the time we are done with the whole wig right now, i'm just going to start crochet crocheting the the braiding hair on the dome cap. So guys just watch what i'm doing. Okay, i've pretty much done a lot of the um, the crochet or the back hair that i just realized that this hair or the braiding hair at the back is not um. You know it's not flat, so they are just. You know popping up like the way it's not supposed to be. So i just realized that i can't do with this hair, so you don't make the same mistake. So i took everything down and i reduce the amount of extension that i put at the back. As you can see, the amount of hair a little used are so tiny and that's the reason why this hair became more flat. So i'm just going to comb this hair right now, so that you can see how flat is looking compared to the way it was at the beginning. So don't make that mistake if you want to do uh, if you want your braiding hair to be flat when you are doing a weave just make it take the tiny amount of hair that you know be enough or you know would be flat, so don't make It big when you are doing, except you are doing another style that you don't want to be flat. As you can see, you can see the way the hair is so flat, so make sure you don't make that mistake, because it took me a lot of time to start losing and redoing again. Okay, guys i've done a part of the um, the frontal, as you can see, i've ventilated some amount of hair in on the neck. So i'm just going to teach you from the other side. So i'm just going to teach you from the other side how to ventilate orange on your neck. Okay, guys, as you can see, i just passed the needle through the nets and i just ventilate two strands of hair on it. But the way i did it, i when it gets to the front like in front i ventilate, i use two strands of hair so that you look more natural, but at the back or the center i took more like three three to four strands of hair, so So guys this is literally what i was doing doing so. Basically, i just passed the hook or the uh or the ventilating needle through the nets and pass the hair or the braiding hair through it and bring it out. You know you can see the way. I'M ventilating, like you, are doing a normal crochet, but just that you're using a tiny needle and also a tiny piece of hair. That'S the only difference so guys. Just watch me as i continue with the ventilation me as you can see, i'm still ventilating, but don't get me wrong. This took me a lot of time, like almost two weeks to finish this up, because i i was doing other things as well. So just take your time, don't worry, because if you hurry you, you are going to do something. Maybe it might not come out well so when you are doing a frontal or a closure, most especially a frontal, take your time to do it don't be in a haste if you want the end result to to look good or you want your uh, your efforts, Not to be wasted just make sure you take your time in doing it. Okay, guys, as you can see, i'm done with the whole hair and we are going to get to one of the most beautiful parts of this tutorial and, if you want to, if you want to see how i made this hair coily, you want to continue to Watch this video, okay, guys i'm just going to brush through the hair again, so i make sure to make sure that everything is well detangled. As you know, it's not a human hair. Okay, guys, i just went ahead and washed the hair and i'll be using this rollers for the coiling part. Okay, guys, i wet the hair with water, as i mentioned before, and i've already done some part of the rolling off camera, but i'm going to teach you or show you how i did the rolling right now so just continue to watch me just make sure to Just to make sure that the hair is completely tangled, i still went ahead and comb every bit of hair that i'm going to roll. So this is how you should do it so make your work neat and you know to make sure that your expression hair is free from it's free from tangling. You know, because you know it's not human hair, so just make sure you detangle it properly. So you don't have you know you know uh the kind of hair that you you don't want, so i'm just rolling the hair now. So just watch me and see the way i'm rolling the hair and you want to make sure you roll it till the very bottom and make sure it's tight. It'S tight as well me me, so i'm left with some piece and i make sure i just roll the part i want them the part i want to go back. I roll everything backwards while at the side, because i'm going to make some, you know calm down from the side. I just roll some to the side, as you can see, i did the at the two side, so i'm just going to roll everything. The remaining part of the hair, now i'm just going to roll them back if you want, if you still want to see the end of this hair as in the way i styled it, i know you already saw the results at the at the beginning, but if You want to see how i styled this course you want to keep watching this video. I know you don't want to miss any part of this video. Okay, guys before i forget, if you are still here - and you are still watching my video and you haven't subscribed to my channel - please do sh. Please do subscribe to my channel and don't forget to turn on your notification bell. Okay, now i'm gon na uh put the hair in water. As you can see, this is hot water and you have to be careful with this hot water. So you don't burn yourself, be very careful with it. Okay, guys, i'm just dipping every part of the hair. I took it off the dummy head, so i dip it in hot water, as you can see here, and this hot water i mixed it with because it was really bright. So i just miss it with uh some cold water, so it doesn't uh get too hot because if he's too hot, like very, very hot the way i boiled it, it's gon na make it's gon na mess the hair. Somehow, if it's gon na melt it somehow, so i just mix it with some hot cold water. So now i'm drying the hair right now with a with the toe. Well, as you can see, and after this i'm just going to go ahead because i just used only uh normal water, i didn't add anything to roll the hair, because i was going to put it in hot water. So, that's why i decided to use the uh styling mousse after putting it put it putting it in hot water, because if i had used the the styling mousse before i put it in hot water, it would have been waste. So, in order for the course to be more stronger, i decide to use the styling mousse after the hot water, i'm just going to go ahead and unravel it because i've already dried it. I dried it with a blow dryer. So it's all dried now and i'm going to unravel the rollers so that i can style this hair. You still want to keep watching this video - oh my goodness, i'm so in love with this, i'm so so in love with this just keep watching and see how i end up ended up. You know, styling, this beautiful piece of cots me: okay, guys! This is how it's looking it was kind of somehow, as you can see, but i'm just going to style it and make it look good just the way i want it to be. Okay. Now, let's do the styling me me: okay, guys, as you can see, that was how i made this beautiful pizza court coily pizza court week. You can see how beautiful it's looking, i'm going to um wear this wig and not in my next tutorial so guys. This is the end result. This is how beautiful this has. This hair, you know, turned out if you can't imagine that i used expression in this hair. Okay, guys, if you enjoyed this video - and you have learned something from this video - please don't forget to like and comment down below and also please, please share this video to your loved one share. It share. It just continue to share this video and also don't forget to subscribe to my channel if you haven't subscribed to my channel and don't forget to turn on your notification bell, so you don't miss out on my next video. Okay, guys we've come to the end of this tutorial and i'll see you in my next video bye and thanks for watching love. You guys


Comments
Sha S: The wig looks so neat and perfect. Love the color and the style. Awesome!
anu: This came out so beautiful!! I love the color and the style!
Girls United: This came out so beautiful!! I love the color and the style!
Wholesome Nourish: OMG girl you are so good at doing hairs. Loved it too. This was a very detailed and informative tutorial thanks for sharing
Crafting Mum: Great tutorial, very relaxing to watch :D I really like a colour of the wig and those beautiful curls ;O
Hello Batty Shop: I love the color that you sent for. That red is so pretty and perfect for the winter months. I wanna try this method out
minshi: This colour looks great! I loved this tutorial
Antonella's vlog: Lovely hairstyle and amazing tutorial Sonia! :)
Kawana World: This came out beautiful and I really love the colors
jamilfamily11: This is a talent. You did an amazing job . It looks absolutely beautiful
EyeCatchy Nails: This came out so beautiful..❤.. Love the color
Coach Imma : Awesome work! This looks so beautiful. Wish I can do this.
z N: Thats really a wonderful idea to make your hair like that...I would definitely try that
Kimberly Barker: Great job, wonderful results, congratulations! God bless you! Hello from Limon, Costa Rica.
aruna Shah: Very well explained and the outcome of your efforts is awesome.
Jennifer Luv: This came out very well I love the colour very beautiful
TheRandomTopics: Came out so beautiful!
Fajira’s Concept: This is really beautiful and well explained. You are so patient oh because this requires a lot of patience.. Thanks for sharing.
Deepak Bhardwaj: This came out so beautiful
Priya Singh: You did a nice work..it looks amazing
The Paisley Dispatcher: I’m loving the color and the wig is beautifully styled
jeonivy: This turned out really pretty :) good job!!
Life of La'Emaj: Great job.... Looks good! Nice color! It takes talent for this
Pinkrangergirl UK: That came out brilliantly! Love the colour.
CheChe Okoye: This looks beautiful. Bought this perm rods but didn't know how to use it. Glad I watched this video
Victoria Nsafoa: It’s a talent to be able to this! Awesome job
ALL GIRLY: It looks very nice! I love the color
Abubakar Tanko: Wow, came out so beautiful
Jojo Rarity: U explained it so well. That's beautiful. And need alot of patience to do this. So thanks for sharing this
Joyce: It is so beautiful Can you please do more videos like this
Mercedes Sacramento: It's so pretty ✨you did amazing ✨
TeeTop: This looks amazeballs
NB Healthy Living: This is meticulous but turned out really beautiful. You're really good at it.
LakerZone: This looks beautiful. I've never tried this color. Now I'm interested.
ReddiTrash: This was very useful!
Ellas fam: OMG you are really good i can imagine starting all over ♀️ but good thing you did an amazing job well done for me i guess i dont have that kind of patient but the two weeks is worth it thanks for sharing ❤❤
Theresa ajise: Wow sis, you are blessed. Your hands does magic. This is perfectly beautiful . Let me go and be practicing, maybe next year I will be able to make one for myself
Bunny Ears: Nice DIY wig ~ the curl and the red colour look perfect~
Super siblings: Looks beautiful
Lab Yu: love the color!!! amazing but looks like lot of time to finish it!
Elbia Tours Dominican Republic: Thank you for showing us in this easy way
Farheen M: You explained very well, thank u for sharing
Prissy Naria: Very detailed, thanks for sharing.
The Roof Kitchen: Love this look..stylish made
Lois Amo_Richmond: This is great. You are good and talented.. Thanks for teaching us.
Patience Odame: Really beautiful. You took time to make it
Lifestyle with Euniceversatile: Wow, enjoyed watching the process.
vanessa shaw: Magnificent!
TeeTop: another great hair tutorial
A little bit of everything: very helpful tutorial!
Nanny Hania: wao super perfect :) you did amazing job :)
Crystal Gould: It takes a lot of work doing this. Looks good
Zahera Vlogs: Omg this is so cute ❤️
Tanusree Roy: Very beautiful wig. Never tried
Farha Sayed: The color looks fabulous
Mercedes Sacramento: Omg this is so cute ♥️✨
lina madison: This is so beautiful
CestJackie: You are so talented~ And I love this color~
ayyyeeeitsamanda: The red is gorgeous!
The Paisley Dispatcher: Great job beautiful color
Immaculate Enyeribe: Omg this is real hard work. And turned out really beautiful.
pretty faith Family tv: So beautiful and amazing
Shorts Gaming: So beautiful
life with busca: Wow this really look beautiful and amazing
Stephy's product reviews: For a moment i thought that was human hair, until i watched the full video, this is really really lovely, and watching u doing it makes it look easy,will be making mine as soon as i get the chance, if i can't hope I'll be able to contact you oooo.... you are gifted
The Van-Fam!: I love the color!
AJSimple Cooking: Wow . So that's how wigs are made. Interesting process.
Jewell Rachael: To me this is talent! You are very skilled and very patient, and I can’t believe it took you 2 weeks. Great job!
Kit Kat: Oh so thats how you do it... You did it like an expert
Fafa and Family: OMG.. it's awesome.. looks like the real hair
Jewell Rachael: Fantastic artwork is how I call this. How long have you been making wigs?
Omolayo Quad: I love this
Ellas blog: Wow this is so beautiful but really time consuming Keep it up dear
Tanzy The Glow Up Guru: By the way im a new subbie! Learning alot!
Susu Meme: This is so helpful Thank you so much Fan for London
Marvin Fuchs: You are super talented! Good job
Cindy of Meu & Mea: The hair looks nice and real.
Pinay Mom in Egypt فلبينية في مصر: Youre amazing... Such talented...
Inspirational Motivation: Absolutely beautiful and you talented too
Monika Singh: Love it this needs skill
Arna Chauhan: The outcome is really pretty and you're so Talented.
Ginabright's TV: Wow I really do enjoy ur content dear. I also do DIYs. Thanks for teaching us how to do this. New sub here.
Vivien ML: Wow, that's an eye opening!
Sabba tv: This is so great I've always wanted to know how to make a wig Lydia sabba
Hannah Tunnell: wow!! you are so talented! super cute!
Lifeofkimone: Your very talented♥. Continue doing what your doing. .
Natural Hair Goes Everywhere: I love that olive oil mousse
Kathryn Adams: You are really good at styling hair
Aiza Meah: Good job
Amandine Tsapi: you are so talented I really love
Positive Puja: Nice. Thanks for sharing
Tanzy The Glow Up Guru: The video is awesome.great ventilating and styling! I love the color one thing tho the music was repetitive and annoying so i had to turn volume down and just watch the video silent so missed out on the talking parts. .maybe try a different song that has a consistent in pattern. Sorry it was just driving me crazy like a broken record. I enjoyed it though!
Sankeerthanam 🎶: Such a talent u hve..so much patience to do the combing with the wig
Jewri Merchant: O wow this is so creative, you love the color
Monicia Andrews: Love the colors good wig
yamoo game: Thank you for the video.
Autism Diaries: I wanna try wigs too!!
Djvtunes Worldwide: Just so awesome
LocsNchronicles Mrs O: You have got excellent skills
Dan The Flavor Guy: Looks very nice