How To Get Your Knotless Box Braids The Same Size| Detailed & Beginner Friendly
- Posted on 19 January, 2022
- Braids Hairstyles
- By Anonymous
#knotlessboxbraids#boxbraids#knotlesshowto#howtodoboxbraids#dopeaxxpana
Shop The Dope Collection at www.dopeaxxpana.com
Join this channel to get access to perks:
https://www.youtube.com/channel/UCCCIs...
Do You Love Me? SEND ME FAN MAIL!
15501-G San Pablo Ave #196, Richmond, CA 94806
Shop ALL my fave products here: https://www.amazon.com/shop/dopeaxxpan...
OMG I LOVE YOU SO MUCH FOR ACTUALLY OPENING THE DESCRIPTION SECTION!!!!!!!!!!!!!!!!!!
***********PRODUCTS USED*************
1. The Dope Collection Edge Control: https://www.dopeaxxpana.com/store/p_27...
2. Loc and Twist Gel: https://www.amazon.com/PURE-NATURAL-LO...
3. 2 Packs of The Dope Collection Braiding Hair Color 1b: https://www.dopeaxxpana.com/shop-now/p...
4. The Dope Collection Braid Bands: https://www.dopeaxxpana.com/store/p_27...
5. Electric Kettle: https://amzn.to/35yxpgB
6. Stylist Tray: https://amzn.to/3O7ceDJ
FAQS:
Location: Bay Area, California
Keep Up With Me:
INSTAGRAM = @Dopeaxxpana (Personal) - https://www.instagram.com/dopeaxxpana/...
INSTAGRAM = @BraydedUp (Hair Page) - https://www.instagram.com/braydedup/
Facebook = Dopeaxxpana - Bre C. - https://www.facebook.com/Dopeaxxpana/
Snapchat = @Bigbrowneyeguh
FOR BUSINESS OR COLLABS:
Music by Goosetaf - Bumblebee - https://thmatc.co/?l=5574E131
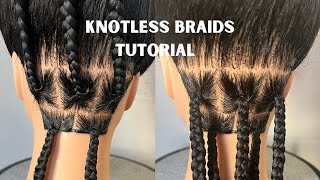
What you mean you don't know panda she's dope, what you mean, what you mean, what you mean, what you mean, what is pop youtube? Welcome back to my channel, it's your girl best panda and today i'm super excited to bring such a highly requested video in this video. Today, i'm going to show you guys how you can get your knotless box braids all the same size, and there are so many tips and tricks to help. You guys do this, i'm going to start off by showing you guys my prepping method, because, honestly, it does start in how you prep the hair, and i know that a lot of people have many different methods. I'M going to show you the method that i use and you can kind of apply it to a hair, rack or a magic hand or whatever technique that you guys use. So i'm going to start off by separating my hair, i am using my own braiding hairline. The dope collection you guys can purchase this on my website, which i'll link in the description section for you, guys dumbass panda.com, to complete one client's head. It'S gon na require two packs of hair. I'M gon na use a total of four bundles to complete this look. Um this braiding hair is afro, which means it is soft and silkier than kanekalon hair and it's 54 inches and super thick from top to bottom. So i'm super excited to finally have my own line. I currently only have one be in stock, but i will have my other colors available to you guys in the next couple of weeks, so i'm going to start off by prepping my hair pieces and they're all going to be the same size as an advanced braider. I pretty much already know what size pieces. I need for every single size that i do, but if you are someone who is still trying to figure out your sizing, what i would recommend you do is take out four to five pieces from the braiding hair and actually build a full braid and figure out What size you want it to be once you do that you can take down the pieces and you can figure out what size you need it to be. So hopefully that makes sense for you guys for me. Like i said this is the average size that i do for my medium knotless box spray, so i'm going to be pulling out the pieces and laying them on the tray overlapping one another. That'S how you're going to make sure you prevent any type of tangling when you're picking it up, and it's just easier for you to see so that you can literally grab and go a lot of people. Ask why i choose this method over braid racks and i feel, like i've, said this a lot of times, but for me i like to literally prep all of the hair before my client arrives, and this method allows me to do that. Sometimes i feel that with the hair racks i'm very limited, also in my room and my setup, i just honestly don't have space for a hair rack. I need something, that's very mobile and when i prep on the tray, i can move it around to accommodate wherever i'm standing around my client. Lastly, for me i don't know i just feel like this is more efficient for me to do, and so i have chosen to do this method. Um. There are ways to make literally any method work for you, but i just encourage whatever you do to stay consistent. That'S how you build um speed and um so yeah. This is just my method that i prefer, and it has always worked for me um. If i'm using multiple colors, then i will use multiple trays but yeah other than that. This is what i'm gon na do. So this is actually um sped up a little bit right here, i'm just showing you guys how i literally fill my entire tray and, like i said, i'm going to prep all of the hair that i'm using for my clients. So i'm going to prep a total of four bundles. Realistically, all of these pieces are around the same size, but there's honestly no way for me to make every single piece the same exact size unless i'm measuring it. If we want to be technical, so you just want to make sure that as you're pulling your pieces, they are all around the same size and that way, when you build your braid, you give the illusion that they're also all the same size. So alright guys. So here we have my beautiful client. The hair is already prepped and ready for her um. This is actually one of my little cousins who i love, so i'm super excited to do her hair. Today, um, i am going to be using the dope collection, braid band, which you guys can also purchase on my website to hold my product, if you guys want more videos about products and all that type of stuff there. Let me know in the comment section down below and maybe i can do a knotless box spray series so for her hair guys. I started off by doing a very, very basic pre part, which means i'm going to part her hair from ear to ear and down the middle, and then i'm going to part off the nape of the neck. Okay - and it's really important that, if you are someone who is working on consistency with sizing that you pre-part, however, you choose to do that. If you want to do like a lazy pre-part like i'm doing here or if you want to pre-part out the entire head, which i actually have a video on um, everything about consistency is making sure that your sizes, your rows, your boxes, are all very consistent and That will help you to make sure that your braids are the exact same size. So i'm going to make sure that i'm parting off the nape of her neck and i'm also going to make sure that i'm parting off each box before i start doing my actual box braids, that's going to help you to see and make sure that each part Like i said, has the same amount of hair in it, or at least gives that illusion and everything. So you really want to take your time with parting, because obviously, if some parts are big and some parts are small or some rows are thick and some rows are thin, then your knotless box, braids or box braids in general are not going to be the same Size, alright guys so the first knotless box, braid that you do is going to be a guide braid. Okay, so if you guys went to cosmetology school - and you know that when you go to approach a haircut, you have your guide. You want to think of this. First knotless box braid as being your guide, and i like to start in the middle because, typically when you start on the ends of this first row like sometimes those braids are a little bit smaller or their hair is not as thick right there. So i like to start in the middle for my guide, braid and basically this is going to determine um how big the rest of my box braids are gon na, be so i'm gon na build this braid and typically, if i have a new client or if You don't necessarily have a sizing chart or something like that. You can actually let your client check this braid out in the mirror and make sure that it's as thick as they want it to be um and as long as they want it to be, because, like i said, you're going to base all the rest of your Braids off of this one, so you just want to kind of make sure they give it a go. If you're someone who is like me, i literally have a size chart and my braids are pretty consistent. I literally do the same thing on on pretty much everyone's head and then you may not need to do that, but still this is going to be your guide braid. So, typically, i add in three to four pieces at the beginning of my box braid and then another two to extend it and if your pieces are all around the same size, and this makes it really really easy. When you go to your next braid, because you know: okay, i added five pieces or three or four pieces at the top. I'M going to do the same thing wherever you add your last piece of hair. You want to put a clip there and this clip is going to um help. You make sure that all of your box braids end at the same point, and you know like. Okay. That'S where i put my last piece of hair in so i know that you know on every other braid, that's where my last piece of hair needs to go so that all of my braids are the exact same length um and since we're talking about consistency in This video, i do want to say that i love to braid all of my braids down to the very, very tippity tip. I think it just gives a nice and super neat finish to your braids, especially at the ends, and it will prevent the ends from like. Looking super tangled or unraveling, or anything like that, i love to braid it down as far as i possibly can, and if you have really really good braiding hair like mine's here you will have very minimal flyways or you guys can braid down with product on your Fingers to try to prevent that, but this is my first novelist box braid. This is going to be my guy braid, and so my next braid that i'm going to be doing right next to this one, i'm going to build it and try to get it to match the same exact size. So one huge thing that i want to say because a lot of times when people used to ask me how to get your um braids the same size, i would just think of my head. Like can't you just look at it and if it's not the same size, take it down and do it again um. I want to say that that is part of an element to it. If you guys are building a braid and as you're braiding along you notice that it's getting super thick, then you want to take hair out and if you're just noticing that the braid overall is not matching, then take the braid down as a beginner. You cannot be afraid to take braids down and start over, like. Obviously, you want to try to make sure you build a system to where you don't have to do that consistently consistently. Sorry because, as a client i'm, i would be like okay, this vision took down five breaths like what are we doing here right? So you wan na um make sure that you try to build a system so that you can minimize the amount of times that you have to do that. But you can't be afraid to really take it down and focus on those little details, because that's what's gon na keep your your clientele coming back right. So as i'm building this braid, i'm already looking and matching with my guy braid, i know where that silver clip is is where i added my last piece in um. So i'm going to make sure that if i haven't already, i add that piece in right. Where that clip is um, and it doesn't necessarily have to be precisely right there, but you want to make sure that it's around the same area now, if i'm looking at these two braids side by side, they look like they're, pretty much the same size right. So we're good to go, we can keep going and braiding down. If i were to look at these braids and i couldn't notice that one was like super bigger than the other um, then i would take it down now again. You want to give the illusion that all of your braids are the same exact size, because, honestly, there is no way that every single braid on everybody's head is the same exact size. Um because, honestly, we're not weighing out each piece of braiding hair that we're putting on right. That would just be ridiculous, but you want to give the illusion that it is the same size, meaning that if it's like a tad tad teeny bit bigger than that's not a big deal. But if you could noticeably see that, like i have one super huge braid and one super small braid, then you want to take it down. Typically, if you pull out your pieces - and they are all similar in size um, then your braids will be all very similar in size. Now, if you're pulling your pieces and one piece is super thick and one piece is super thin, then that's when you're gon na get an inconsistent box braid. But i'm gon na keep um doing the same thing to this entire row and i'm gon na keep matching it to that first braid that i did do so all right. So this is my first row. It is completed and you guys can see that all of these braids look similar in size. I am going to leave that silver clip there, because, obviously, as you work your way up, the head you're going to have to start extending those braids in order for them to still finish at the same length, and so that clip is going to actually help. Me extend my braids when i get to the top of my client's head, but um. These all look like they're the same size, which is awesome and great. We can move up to the next row now as you move up to your client's head. Obviously, you don't have to compare every single braid to that first braid, because realistically we just built all of these braids and they're the same size right. So now you don't have to refer back to that first guy, but you can use any other braid around the braid that you're doing to be your guide. Hopefully that wasn't um too confusing, but it should make sense. So, as you are building your braids going up your clients head, then you want to compare them to the ones that you did before. If it looks too big or too small, then you guys just take it out and redo it. Even though you have your pieces set out on your tray, you can always break down the size of them. If you pulled a piece that was too big, you can always take it and break it down. So what that clip is still going to be useful for at this moment is i'm going to be adding in my normal three to four pieces at the top of my client's head and as i'm braiding down once i get to that silver clip. I'M going to add in two more pieces to extend my braid. The reason why i'm doing that is because, obviously, if i didn't add any hair to extend these braids at the top, then they wouldn't finish at the same length as the braids we're starting at because they're up higher right. I'M not sure if that makes sense. But you want to make sure that you are extending the braids so that they all finish at the same length. Now some people do like that. Layered look, but i do have clients who request that all of their braids be the same length, no matter where they are starting from like if they're on the side, the top wherever they want it to be the same length. So once i get once this braid. Basically gets to that silver clip then i know i need to add in my last two pieces and that's going to extend the braid and make it the same exact size and length, my so so so here, i'm just showing you guys how neat it looks when You braid it all the way down to the end and guys you can definitely notice the difference when you dip your clients hair. I feel like the ends last and hold up a lot longer when you braid it all the way down. I'M also going to show you guys how all of these braids are the same length, which is our goal right. So wherever the braids are laying on your client's head, they still finish at the same point just from using that guy braid, where you put the clip, you can always move the clip too, because i know it's kind of hard to see it's underneath. So you can always move the clip to a different braid, but y'all goals. They look so amazing. So i'm going to let you guys watch me build a couple more braids. This tutorial is almost done. If i did leave anything out that you guys would like to know or see, then let me know in the comment section down below and i can definitely help you guys out with that. My guys. So here is the finished. Look nice clean and consistent knotless box braids. These are my medium size, like i said before um. I really hope that i answered all of the questions that you guys have in this video. This is probably one of my most highly requested videos, um and if you guys want more knotless phosphory tips, let me know in the comment section down below, if you guys found this video helpful. Tell me what was one helpful tip that you guys really took with you, i'm actually in the process of building my knotless box braid course, so i'm really excited to hear some positive feedback from you guys. So, as always, thank you guys so much for watching this. Video and for tuning in, as always, don't forget to like comment and subscribe to. Oh, i can't even get it out, don't forget to like comment and subscribe to my channel and as always guys i will catch you in my next video do so so so what you mean you don't know panda she's dope. What you mean, what you mean, what you mean, what you mean:
Comments
Lei J: I love how real you are about the sizing and making sure people understand the difference between a TINY difference and a SUPER difference in braiding size. As you said which I agree it would be ridiculous to weigh each braid for the exact perfection but there are some facetious and petty people out here who takes word for word and then not only creates an even more HUGE issue for themselves and their clients but also completely misses the entire concept of what you saying and what needs to happen so that they don't have the same accidents and mistakes happen over and over and over again. I appreciate how hygienic you are not leaving residue on the tray for the next use which lets me know you have consideration and are caring for your clients health no matter what walk of life they come from, SANITATION is a MUST especially with these constant outbreaks of health concerns over the past 3-4 years. God bless you and your craft and don't allow anyone to sell you out or intimidate or blackmail you into doing anything different otherwise you are definitely doing the right thing. God bless you and continue creating great content and tutorials for us
Vanessa Rivera: The clip was game changing! My box braids are always different length even though I think I’m adding here at the same moment. Now adding a clip to where I last added hair is going to ensure that all of them are the same length. I am excited to even braid my own hair!! Thanks
Overcomer ThruFaith: This was extremely informative!! What helped me a lot was EVERYTHING lol!! Separating same amount of hair prior to doing hair, hair clip as a guide to assist with a even length for all the braids and pre parting is definitely gonna help me with doing my daughters hair!! Thank you ❤❤!!
Tonja M: The part about adding pieces to extend the top braids for an even look, explained it perfectly. This video was so easy to follow by your commentary and expertise. Thank you.
Jamilah Kirks: I always have a hard time finding a tutorial on sizing and length. So thanks so much that clip tip was exactly what I needed now I can be more confident in my braids. I love you girl thanks for your authenticity and realness
Lynelle Little: omg i started putting a clip on my braids for my last few clients and it helped a lot! i got so tired of my braids being different lengths
Alberto L Olivares: Thank you for the info. I couldn’t figure out this technique until your video!
M. R: The clip tip was super helpful! I struggled with making sure all of the braids were the same length! Thank you I have learned so much from you over the years! I don’t braid professionally, but I have been braiding Children’s natural hair and my daughters hair for years. I learned how to braid with synthetic hair from one of your videos. I appreciate how you share your knowledge!
Ms.Drea: Great video! I do my own knotless braids. My take away is the clip tip. I am definitely using that tip next weekend.
Simply Niya: I’m loving the consistency and these tutorials Thanks for sharing!
Feenics Ryzin: The tip about the clamp and marking the addition of the last piece of hair to ensure all braids are the same length…chef’s kiss!
LaRasha Mallard: Thank you so much for this video!!! Very detailed and straight to the point. The clip tip was EVERYTHING! I have been braiding hair for 20 plus year but I never took it serious. Watching your videos has helped me get back to my passion for braiding. its help me be neater and I absolutely love your edge control!! can't wait to try the braiding hair!! Do you have like a sizing chart for your braids that you can share? if not I understand.
LoveHim1st: That clip thingy and that guide braid you did in this tutorial is soooo super helpful. Thank you so much for sharing this with us. This is definitely a game changer for alot of us new... and truth be told, alot of those old braiders(Whether they admit it or not. You know some old dogs don't think they can be taught by younger puppies nor be taught new tricks.Lol)
Sophia Lindsey: I really appreciate your teachings. Now I know how to achieve the same length braids. Much love
Camie Waggoner: Your work is absolutely amazing! I’m a beginner braider and have purchased some of your favs on Amazon and it’s working perfectly. The guide part of the tutorial to create the same length of braids would be the best part of the video and makes so much sense. Thank you appreciate it
Gabby Kent: I LOVE how you broke it all down! Like the clip technique and when to add in was what got me! They are all neat and super pretty. Thank you so much!
ObsessedwithmyTresses: Omg!!! The whole entire video helped me!! I sometimes have trouble getting my knotless the same size! Thank you for this video❤
joanna masaaba: That clip trick.....I will use the next time I do a knotless braids install....was struggling to have all the braids the same length . Thanks for sharing
Que Treatz: This is exactly how I do my braids... I used to work in a salon and I was so happy that another girl who worked with me understood and braided just like me so we started doing the clients who requested the long long braids together and we would get done super fast.
Symonne Peters: I do my own knotless and I definitely prefer your tray & overlap method vs my braiding rack.
Daya Bros: this is the most informative box braiding tutorial i’ve come across!!! i’ve been trying to learn to do my own hair and this helped a lot!!! thank you so much
KayLoves U: The guide braid definitely was one of the key points for me, I also struggle with matching the sizes of my hair but when you just feel like the weight of it sometimes that helps me but this definitely helped so much ❤️❤️
Liyah Noel: I love the clip idea, I love the start in the middle for the guide, I love your idea on how you prep. I definitely can’t wait to try what I just learned.
Q. Shanté Martin: After using the tray to prep the hair, I will NEVER use the rack again. It was definitely easier to grab the hair without it getting tangled. Thanks so much for showing this!
Tiphani Hills: Loving these tutorials!! I'll be getting your braiding hair and edge control, great video!! Thank you for sharing ❤
Zo Bing: Amazing I love the entire look. You made it look so easy. I'm going to try this on my granddaughter this weekend.
Elisha Trotman: The braids look very professional, I’m doing some today for my daughter my second time.. the parting is a struggle where you think it’s even down the middle and it’s not.. but gonna keep working.. great job
Kelly Corbin: Thank you! I am a beginner and this video was so easy to follow!
Tiffany Weston: This whole video is very very helpful to me im about to put knotless box braids in my daughter hair for the first time and this is video has help me greatly thank you for taking the time out to make it
Ioza Week: the tip on making them all the same length was really helpful ! thanks ☺️
Jamila Dean: Very helpful. I can now get all the braids the same size when I’m braiding hair. Thank you
johnell boens: The clip length measure !! Will be trying this asap to make sure braids are all same length!!
Tracey Brown: I just started braiding my daughter's hair and I realize some of her braids were uneven so I thank you for sharing this is an awesome idea that will create uniform braids and cause me to be more efficient ... Also that prepart is good idea too. That stoping to .part took me so much more time and I had hard time getting braids to hold near the scalp and that was irritating
Terrie Celeste: First off,So beautifully done and I love the same size hair method it works better to me and the clip tip was helpful as well Thank you was very helpful
aretha ellis: Beautiful! I like the different tips you used to keep the braids the same size and length.
Myaa Gabriel: thank you so much! I finally learned how to do a knotless and this helped so much with extending and making sure they all are the same length❤️❤️
Ariel Martin: I really loved the ending results and I love the foundation of your form with feeding in the hair thank you so much and have a blessed day tomorrow
Miss Mee: I love the "guide braid" technique. Very helpful. Thank You so much.
Daija House: Simply everything about this video is going to help me! The clip method and sizing definitely a great tip! Thank you!
Kim Ivey: Beautiful!!! Placing the clip was huge for me. I always struggle with getting them the same length. Add to early/too late. Will definitely be doing this from now on.
Greeneyes: Thank you for this video. It has helped me to know how to get my braids the same length. I'm a beginner braider. I only braid my hair & I want it to look professional at least. So this video was really helpful. I enjoy watching your videos whether it's a tutorial or a live.
Lorren Leak: Thank you so much for your tips and techniques. This video was very helpful. The tip I learned from this video is the way you use the clip to help make the braids the same length.
Keanna Campbell: I love the hair clip method❤️ I love your videos. I definitely have learned a lot!! Thank you!!
Growing Hands By:Carol: You are such an amazing braider. I love how you prep the hair making,sure the hair is as close to the same size.Also using the clip as a guide to make sure that the braids are the same length.
Jessica Nelson: I’m new to braiding in general and I’m about to attempt doing my own faux locs. This video has helped tremendously with parting. However, I still struggle with finding a guide on how to actually ensure each box is the same size. Any tips on that?
OrganizedTanglz: I appreciated you letting us know how it’s impossible for every braid to be identical but give the illusion of similarity!
joanna masaaba: That method of preping hair has cut my braiding time in half.....literally. Thank you soooo much for sharing it with us
tanecia Higgins: Helpful to know all the pieces you separated are all the same size pieces. Some other video stylists start out with small to bigger pieces toward the end within each braid
Michele Caldwell: Love watching and listening. So thorough and detailed. I love that you take care of the hair before tou start. Thanks for this video. Congratulations on the hair line! Im hype!
Lillian Mills: You are an extremely talented young lady !! I like the guide as a reference to stop adding hair I never thought of this in braiding only in cutting
Purple Reign: Using the clip is something I never thought to do…I’ll definitely be trying that out in a few hours
Thabi Vee: Beautiful work, I love the technique too. Keep up the good work
Aunty MimiHall: So it's been years since I braided. I now need another source of income. So, back to braiding I go. This was a great instructional video. Easy to see how you added. The clip. This is the best pro tip for me. I have box braids on Tuesday. And she was stressing her braids are never the same length. Thank you
Chantel: Thank you so much for making this video, I learned a lot from it!!!❤️Can you do a video on your favorite ways to part for box braids and another video on how to keep the braids consistent/braid placement when doing cornrows?
Patricia Bradley: Thanks for teaching me how to make sure the braids are the same size great job.
Cheldyne Nesi: Thank you for the length technique! Very informative.. going to start trying that
Tee Tee J: Thank you for sharing this info. You are a rockstar for helping people. You are definitely appreciated! I’m sending this to my daughter so she can learn how to do these.
Tyekeir cierra _: Few great tips I took since I’m not as consistent with braiding but I’m back at it taking a few pieces out and building that first braid really helped I was able to stay consistent with so far 4 braids and adding the clip I realized in the second row that the braid was smaller then the 1st row then I realized that the clip on the first row I added my last two pieces but in this row I need to add one more that helped ALOT
K Myers: Thankyou for your time and efforts sistah. You've singled handedly taught me how to add hair. (The clip Tip for sure)
Queen Sydney: Braiding all the way down to reduce tangles, etc was one thing that resonated with me. I'm going to install knotless braids with beads on my own head next weekend so I don't think it's as important for those kind, but when I do basic knotless I will definitely take this advice to heart!! Ya'll don't know Pana? Too bad, cuz she's dope ✌
Pretty Black: you did a great job! you helped me learn something new!! thanks for the video
Lakia Star: Great job they came out beautiful✌❤️
Abigail Findley: I’m loving these tutorials!
Niia Nicole: I like your technique. Im taking a braiding class Sunday. Im gonna remember this. Thank you
TastiBody Sculpting: Very helpful !!!! Thank you so much
kalika moore: I love your technique and parting. That’s something I’m still learning. Parting is everything
Unique Janay: It was the hair clip for me.❤❤ love it ive struggled with keeping same size and length. Now I'm going to try the clip method thank you.
Chenell John: This was really dope this was a really great tip because my braids used to be all different lengths but I’m really glad for this tip …. Thank you in. Million
LuckyCharm_______________: I never expected the hair to come apart so smoothly using the tray and the “clip” part.. dis done change the game TY sis ❤
Cassandra Stafford: I loved how you used a clip as a guide. Thank you for the tip!
Natural Libra 64: The amount of hair to add for each braid and the clip is very helpful. Thank you for this tutorial!
LoveHim1st: Super Dope Tutorial, Dopeaxxpana! Very well spoken and detailed. Thanks Boo!
diamondinarough14: GREAT TUTORIAL especially on how to make them the same length no matter where they are on the head
Bessie Ruttley: Congratulations on your hair line
Kandrea H.: Wow . I never comment but you deserve to know that this was the most perfect, understood , explanation ❤️
Jasmine Billingslea: Question here most clients hair is thicker in the crown area. How do I go about making sure the pre prepped hair doesn’t make the braid thicker than the other braids while simultaneously keeping the same length of the braid? Do I pre prep shorter pieces for this?
Lady Kim A: My biggest struggle is getting the same size ♀️ ppl say oh thats neat but i know my parts off! Thank you for sharing ❤
MEOCEAJ: I love watching your videos ❤️. I’m a teen braider from Mississippi !! You’ve inspired & helped me in so many ways ‼️ I actually dropped my first youtube video today , so thank you ❤️❤️
Lanise Ealey: Beautiful braids as always..it was the clip for me. Thank you so much Pana I love your work and ideas. You're my favorite braider on YouTube. So DOPE❤
Bea A: Definitely I appreciate the clip method bc I had difficulty with same lengths unevenness lol but I appreciate this tutorial❤️
Danielle Lumpkins: Ok I love this thank you so much for showing us this girl. My friend wants 4 feed in braids lol and luckily her hair is thick so I wouldn’t have to add much in until the ends but I have to binge watch all of this videos to know how much hair to feed it lol. I need to start sending you pics of my work on ig lol.
Shundra Jones: Awesome video!! Very informative…. Love ALL of the tips !!! Love the use of the pan for separation of the hair especially!!!
Olivia Smith 2023: Using the clip as a reference point to add more hair was a great tip I learned from this thank you
Porshala Strawn: Have you thought about selling the hair pre portioned to the sizes? It would be time consuming but definitely convenient for beginners and people who just want to do their own hair
Nicole Johnson: Very detailed love it
Sharon Bradshaw: Loved the whole video and learned a lot. The one thing that was most helpful was learning how to make them the same length. Thanks again
Jae Bea Blessings: Goals Indeed Pana! Great tip about placing the clip for guide! You braiding hair looks like it's a good texture.
Mrs. Brittany: The clip suggestion was the most helpful for me because I never knew how get the braids the same length. I can't wait to try out these tips.
Vicky Richardson: Congratulations! That great you have your own hair.live watching your videos very detailed and great explanation
Erika Boles: I thank you for showing me and teaching me how to do a knotless braids. It’s going to be my first time doing knotless braids and I think I am going to like doing it. Because I am focus on doing braids my own self and I want to do it the right way. And if I only keep doing it, on my own head. It take practice until I get better doing it. I thank you so much. You always always do a wonderful, and beautiful job. I wish you can do my hair if I can afford it, I wish I was living there so you can do my hair. Everybody hair you do they are bless because they live there and close to where you live at. You are a blessing and you keep doing it and keep going, and you true are a blessing. May God bless you and keep blessing you ❤️❤️❤️❤️
Kerra Stylez & More: Thanks Pana for the tips…the tip that helped me out was the clip method it makes sense as a braider myself I love this idea
philimena dickson: I really enjoy the neatness of your braids, keep up the good work.
Vasheta Attaway: Thank you for the clip tip. I love watching you braid. So neat
Kimmi Cooper: Hi Pana!! I might be one of your oldest fans!! I just want to say that I really love watching your channel. You have excellent finishing results. People need to lesson closely to what I'm about to say, If you would really STOP, LISTEN/ WATCH, THEN THINK, SOMETIMES YOU CAN EVEN LEARN FROM THE PEOPLE THAT ARE YOUNGER THAN WE ARE!! KEEP UP THE GOOD WORK PANA, JUST WISH I LIVED IN YOUR STATE SO THAT YOU CAN DO MY NATURAL HAIR IN ANY STYLE ( I WILL BE ONE OF YOUR HAIR MODELS, BUT STILL PAY OF COURSE ) CAUSE I KNOW THAT IT WOULD BE THE BOMB LOVE YA BOO
Fidelis' World: Girl your so dope! You're own hair line! Keep inspiring Queen!
Mindy The Ivy Weaver: The “clip on the guide braid” tip was super helpful!
Fee_DaBraider: Love your videos!! You were very detailed. I braid hair also, but always open to learning more. THANK YOU FOR SHARING THIS VIDEO
Life of Neacy💕: I love how you break it down and show people who is a hair braider or learning how to braid a hair like myself how to tuck a real hair into a braid extensions and so on . Any advice for future pro hair braiders
Winnett McLean: I love watching your videos. This was so informative!!! I paid $400 for a braiding class and still couldn’t understand how to get my braids to look consistent. Just one question does the hair portion change for larger sizes or do you just add more?
Irreplaceable05: Thank you so much for this video. It is so helpful. I would love to see a video on products and help with products for different textures (relaxed, loose curls, etc.)