Detailed Knotless Braids For Beginners Part 1| Natural Hair + Protective Styles | The Jasmine Lopes
- Posted on 18 August, 2021
- Braids Hairstyles
- By Anonymous
Watch this video in 4K or 1080p for best quality!
Subscribe: https://bit.ly/3gb1tkO
Hey friends! Today's video is very different! I always get asked how I do my hair and decided to show you all a detailed step by step on how I achieved these cute knotless braids. If you love DIYing, saving money, or just learning new things this beginner friendly video is for you!
Don't forget to watch Part 2!
Part 1: https://youtu.be/yq30JgpQ33A
Part 2: https://youtu.be/amLn94Qz6GQ
Products used:
◆Sensationnel x-pression 3X Ruwa Pre-Stretched Braid 24"(3 Packs) - https://amzn.to/3CVCmwl
◆Sensationnel x-pression 2X pre-stretched braid 48" (1 Pack) - https://amzn.to/3ARIl3g
◆Taliah Waajid Healing Oyl - https://amzn.to/3CYUSDS
◆Edge Booster – https://amzn.to/2VWciA9
◆Shine N' Jam - https://www.amazon.com/Shine-Jam-Condi...
◆Shine N' Jam for Braiders - https://amzn.to/3CV4D62
◆African Pride Curling Cream - https://amzn.to/2W3bM3c
◆African Pride Leave In Conditioner – https://amzn.to/3z1mKFa
◆Tropical Roots Foam - https://amzn.to/3yVa1E4
◆Electric Hot Water Kettle – https://amzn.to/3iT9EUF
◆Braiding stand - https://amzn.to/3iUMhuf
*****Follow me:
Instagram @TheJasmineLopes
Twitter: @TheJasmineLopes
TikTok: @TheJasmineLopes
For business inquiry: [email protected]
Please like this video and comment your thoughts on today's video. Also don't forget to SUBSCRIBE and hit the bell to be notified on new videos.
As an Amazon Associate, I earn from qualifying purchases. If you choose to buy anything through these links, I'll make a small commission, that helps my channel, at NO extra cost to you!
#knotlessbraids #protectivestyles #knotlessboxbraids #knotlessbraidsforbeginners #knotlessbraid #knotlessboxbraidstutorial #protectivestyle #protectivehairstyles #protectivestylesfornaturalhair #naturalhair #4cnaturalhair #4chair
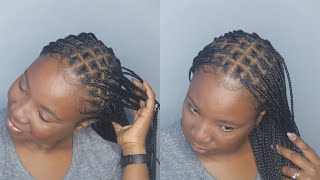
What'S up guys editing jazz here and i realized this video, i got ta, do it in two parts. The video is just way too long to be one whole video, so i will have to break it up into a part one and part two, but y'all. Please forgive me the good thing is. You will not need to wait for the next video to watch it. The videos will literally be posted back to back i'll post one and then maybe like 20 minutes later. The next video will be up, so you won't have to wait. You'Ll be able to watch both back-to-back. I hope you guys forgive me and i hope you enjoyed the video baby. You don't know what you do. You can't be replaced. What is up you guys? It'S your girl, the jasmine lopes and i'm back with another video. Today i will be doing a tutorial on how i got this cute hairstyle. Oh my god, i'm in love with this so happy that i decided to do some knotless braids on myself. I haven't done them in so long, and so many people always ask me girl. How do you do your hair? Well, i hope this video is very informative, for you make sure you like comment and subscribe and watch me go from what i had before to this. I'M so excited we're gon na get right into it. I actually did a poll on my instagram, so if you're not following your girl, follow me at the jasmine lopes and i do pose, i do a bunch of different things just check out that content up there. I wanted to do a protective style, so i asked whether i should do knotless, braids or butterfly locks and the decision still had to be left in my hands like i didn't want to figure out what i wanted to do, but we got a tie. It was 50 50 between the butterfly locks and the knotless braids, and so i decided to do knotless brace, i figured it'll probably last a little longer, and i think i want to wait to do my butterfly locks a little later in the year all right. So the products that i use are the tulip watches healing oil. I also use the edge booster edge control and i only use this product to lay down my edges. My little baby hairs. You know some other products that i used are the curling cream by african pride, as well as the leave-in cream by african pride. These two products really helped to keep my hair moisturized, especially since i have a protective style. I also used the shine and jam conditioning gel. This is perfect to you, know perfect those parts as well as to grip, the hair and another great alternative. Is this shine and jam magic fingers for braiders? I actually prefer this product more than the other, but i didn't have it on me. I also used the tropical roots foam and honestly, you could use any mousse. This is just the one i had on hand but feel free to use any mousse, so the hair. I used was one pack of this hair in this color 1b27, as well as three packs of this hair in the same hair color. I also used this rack. It'S actually a thread holder, but i use it to hold my braiding hair. I pretty much just pre-stretch. My hair and make it easier, so i don't have to do it while braiding first things. First, i'm going to section off my hair and get that out the way it'll allow for my braiding process to go a lot faster and we're not trying to be here. All day doing my hair, so let's take this ponytail hold it down. Do y'all see why i don't like doing my hair. Is it? Is it clear why i don't like doing my hair yet like this, i'm not complaining. I love that i have thick hair. I love that i have hair on my head, but with thick hair comes big responsibilities, big responsibilities. So what i'm gon na do is do a part from ear to ear and section my hair off in half my hair is parted in half, not sure. If you all can see so next thing, i'm going to do is part, my back off camera and then i'll come back and do the front all right, y'all. I am back and i just finished doing the back of my hair. I don't know if y'all can see me are my parts straight? No, do i care? No, because i am saving money. Your girls. Still ain't got a job, so i need to um. You know, save all the points i have. I can't be spending 180. 200. 250. 280. 300. I can't be spending all that money to get my hair done when i could just do it myself, you're the reason i'm going now my mind. Oh, i didn't even moisturize my hair, i'm going all types of out of order. Forgive me y'all! So i'm gon na take the leave-in conditioner just take a little bit on my hand, it's not a lot. I don't know if y'all could yeah i'm gon na. Take that much and just put that all over my hair, don't forget the edges in the perimeter and them ends, because you don't want dry hair, then i'm going to take the curling cream same amount. This is what my hands look like and put that in all over working it through the ends and the edges, and i'm also going to take some of the oil about that much i don't know if you all could oh make it a mess and put that All over my hair focus in it definitely on the ends, because my hair, i still have my dyed ends. I honestly just want to cut them off, but i'll leave that to my hairdresser, all right and i'm going to do the same thing to the other side. So i'm going to put this away and do the same on the other side, all right now that i've got that together, i'm going to take the shine and jam just this much and put that all on the part that i just made, like literally kind of Like you greasing your scalp with the jam and we're just going to put that all over and a little bit on the roots, so your hair is going to look like this and i'm going to focus on perfecting that middle part. So this is what my part is looking like. I want to, i don't know, is it centered? It doesn't look like it a lot of times i go in and just double check. Okay, all right! That'S the part, and now it's time to prep the front of my hair, we're gon na work on this section, because you all can see this. My goal is that my both sides are as identical as possible, but i know that might not happen. 100, so so you'll see me going back and forth from side to side, at least in the beginning portion of parting, the front of my head, because i do want those to be kind of identical a little if that makes any sense. So i think i am okay with this part because again, like yeah, i want my parts to look nice, but i also don't care kinda. Oh i'm ashy. Why y'all ain't tell me all right, so the beauty about this, you could put it on your skin too. So we gon na get them elbows. Chow y'all did not tell me. I was up here looking ashy, so that's how y'all feel you're not even gon na look out for me bed big bit and we're just gon na part this in half and because i forgot rubber bands. Honestly, rubber bands might be easier to do this because then you could just rubber band it off and keep going. I actually have to kind of braid my hair a little and then i twist it at the bottom, as you all could see in the back. So i'm going to braid it and then twist all the way down until i can't twist. No more that way, it'll stay one and i'll know where each section is. So, if you don't have rubber bands, you can always do this. I just think rubber bands might be a little easier than what i'm doing it makes it better baby. There'S no need nothing, you say, makes it better. What'S up guys, i am back. I sectioned off well pre-sectioned, all my hair, so everything is together. My parts are finished. One last thing i got to do when i'm braiding. All i want to worry about is braiding right now i am taking the hair, i'm actually starting off with this one. I have three packs of this. Hopefully i could just use these three packs and i could save the other three packs of the expression here for another time, but this is what it looks like. It comes with three bundles in each and i am separating the hair and putting it let's see. If i can do this, i am i don't know if y'all can see i'm adding the hair onto this wrap that i have i'm gon na show you all how i do that. The one reason why i love this hair, so much is because it's already pretty stretched it's one less thing. I have to worry about i'm all about efficiency, i'm all about just trying to get the job done as quick as possible, because no one wants to be doing hair all day, at least not me, although i might be doing this on a two day span. But that's all right that we'll see i'm detaching the rubber band. I hope you guys can see what i'm doing my screen is so small, and i don't have my camera plugged up to my computer today. Well, yeah we're just gon na take that and i usually take about this much hair. I know some people ask like well how do you know how much hair to separate from each bundle - and it's just like i don't know - i just eyeball it and fill it between my fingers and that kind of feels like enough hair. Your place is i'm going to undo this spray, forgive the light for it, it's probably shining in the video - and i hope not because that'll be trash, but i am just finished, taking out the braid that i have for this section. I'M going to take some gel and just apply that to the back of my section and honestly y'all, i'm doing this braid very blindly like i can't see nothing so we're going to take that and just add that to the perimeter of my hair. I then take my comb and just detangle my hair, a little more all right, then i'm going to section my hair into three and this one, i'm gon na do probably a little faster and then once i get to the front of my hair i'll, do some A little slower, so you can catch on. So i take the hair and i go one two three. I leave my hair here. I take a piece of hair and add that between my two fingers and go over - and i repeat so - i take a piece of hair between my two fingers and over repeat that. Take another piece of hair between my two fingers and over and i'm going to braid down a little and because i want this braid bigger, i'm going to add more hair. So i'm going to take a piece and do the same thing over again. Until i get the desired thickness of the braid that i want and take another piece and go over, i think that is the thickness that i want. I'M going to take one more piece of hair and go over all right. Then i'm going to just position my hand, so it's a little more comfortable for me to braid and i am going to finish braiding my hair down and every so often i'll. Take some jam and just apply that over my natural hair in the braid, just for me to get a better grip and also to get my hair to blend with the braiding hair. So i'm just going to braid that down and yes this is the thickness that i want my braids to be so i'm just going to continue to braid down again, just every so often applying that jam. So my natural hair can blend in with the braiding hair. It should look like this and i'm just going to continue to braid down all the way to the end. Hey me, baby, you don't know what you do to me between me and you. I feel can't be chemistry.
Comments
Simply Brooke: Hey girl! New subscriber! I literally just did some knotless braids on my hair. My fingers were TIREDDDD afterwards but worth it and said me hundreds of dollars. Yours turned out cute!! Love the color with it.
Bosslady . ciiy: Hi, I just discovered your YouTube channel, it's super nice, I really liked the Knotless tutorial, I also made a similar video, I also do hairstyle tutorials. does not exist to follow me. Otherwise great video (from France)
Margaret Lopes: Nice