Diy Knotless Box Braids On Short Hair
- Posted on 25 June, 2022
- Short Hair
- By Anonymous
SUBSCRIBE: https://goo.gl/nYhZbg
DIY Knotless Box Braids on Short Hair
PRODUCTS USED:
Moulding Gel Wax - Stylingdrez
Isoplus Styling Gel
Darling one million braiding hair #1
Design Essential Wrap Set Mousse
FILMING TOOLS:
Ringlight - Neewer
Camera - Canon T6i/750D
Lens - Canon 50mm f/1.8 STM, ‘Nifty Fifty’
Editing - Adobe Primere pro cc
I want to also say that I’m happy to have you apart of my family, you guys make me so happy! You encourage me everyday to do me and keep doing what I love,
Thank you
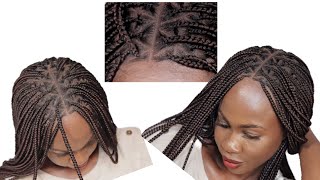
Hi guys welcome back to my channel, i'm back with another video in today's video. I am going to be showing you how i did my braids, so i did this knotless braids for the first time. This was my first time trying not less like. I always thought it wouldn't work on short hair, especially like the back, because my hair is shorter, the big than the front, but it was really really easy to achieve, and i love how they turned out. I wanted like small and long braids, so this is how they're looking i used a darling, braiding hair. I didn't cut it so they're about like this long, but if you want them to be longer, you might want to use maybe expression, braiding hair. I wanted this length and i am happy with how they turned out. I love the spacing. I love the color, i love everything about them and if you guys want to see how i did them then keep on watching. So i've already done the back. This is how they are looking. They are so cute and light and small, which is exactly what i wanted. So i'm left with um eight braids right in the front, so four on each side in case i want that middle pad. So i'm going to apply some of my gel works and this one is by styling dreads. Is the molding jello x i'm going to apply it on the part and i'm also applying this eye supply styling gel in the middle. The molding gel does work on its own, but it gets dry, sometimes like, especially when you're doing braids, like by the time i get to the last. One is gon na be dry and this just smooth out everything. So i'm not putting a lot just a little bit because i don't want the hair to be too wet. It'S not gon na be tight enough when i braid and the hair that i'm using is darling one million breeding hair in number one. I'M sectioning like three strands which are like this size and the reason why i'm sectioning three is because, after feeding in i'm fitting in like three times so it's going to be equal braids for like each strand, i don't have to go and separate. I hope that makes sense so before i go ahead and start putting hair, i'm going to separate my natural hair into three. Now that i have three pieces, i'm gon na go ahead and start braiding. So like one two, three four and the way that i'm doing it is exactly how i would do like feeding braids, so i'm going to fit in the first one here like one two, three four and then feed in the second piece. One two three four then go ahead and fit in the last piece. Um two three four, and this is how it's looking. You can't really see all the fitted pieces and all the strands are equal, so i'm just going to continue braiding my braid until i get to the end. So here's the first braid done so you can feed it in more. If you want your braids to be thicker or you can just make your strands thicker and also you can start by braiding your hair, just your hair and only fit in later, but i have thin short hair. So for me, i found that it's easy for me to start adding hair as soon as possible, uh, but also i'm trying to get like the braid done with just my hair. So one two three four it actually feels like a braid is secured. That'S when i start feeding in hair, so i'm just gon na go ahead and do the same for all my braids and you guys can just watch. Hmm you you, you hmm! So now i am done with all my braids, and this is how they're, looking i'm loving this middle part and just the lightness of them. So now i'm gon na take my mousse. This is the design essential and i'm going to apply it on top just to make everything lay flat and get rid of any like little fly aways and i'm also applying it on my edges. So i'm gon na go ahead and tie this down and while it's drying, i'm gon na go ahead and dip my hair into hot water. So i'm back now with my hair done. I just dip them in water, they're still a little bit wet, but it's fine! I'M gon na go outside anyways, so this is how they're, looking so beautiful like i really really love them and they're really really light they're, not heavy at all. I only use like one and a half pegs of the braiding hair, and this is the back so yeah. This is the final look. I hope you guys enjoyed this video and, if you did don't forget to thumbs up subscribe to my channel, if you haven't already and i'll see you guys on the next one bye

Comments
Leago Malatji: Beautiful.. Thanks.. Definitely gonna try them out❤️
Ninaboosexy sanchez: This so awesome!!! Gonna try this asap! Thanks for sharing
Amanda Isaac: you did a great job these turned out really nice
Dawn Brunson: I LOVE THE WAY YOU DO THE BRAIDS ON SHORT HAIR‼️YOU MAKE IT VERY NEAT AND MAKE IT LOOK VERY EASY TO INSTALL‼️
Lebogang L: Great idea on the knot less braids it looks like this one after few weeks your hair will not be matted ❤️
NicNacAttack: Amazing job! The parting and thickness is nice! I don't want to but I think I would have to straighten or blow dry my hair first
Tebello Moriti: Beautiful
Tebello Ramapaeane: Wow this is beautiful ❤️
WaringaBeauty: Woowwww