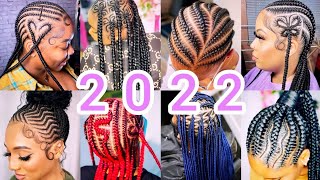
Feed In Braid Tutorial, Beginner Friendly! #Feedinbraids
- Posted on 17 April, 2022
- Braids Hairstyles
- By Anonymous
This is a BEGINNER FRIENDLY Tutorial on how to do Feed In Braids; I am self taught on braids & am teaching you what I know. I shampooed the client, did a deep treatment & steam hydration treatment, blow out & the vid starts with me sectioning & parting her hair.
-BRAIDING HAIR USED, XPressions Pre-Stretched 52 inches/Color Bright Red
-EDGE CONTROL GELS USED, Murray’s Edge Control (yellow label) & Shine & Jam
-BLOW DRYER USED, Red Pro Handleless 2200 Wats (find on Amazon)
-
FOLLOW ME!
-IG@sugarsalon
-TIKTOK@sugarsalonllc
-FACEBOOK@sugarsalonllc
WEBSITE
What'S up, you guys hope, you're doing well and hope you're staying safe? This is your favorite licensed master hairstylist m williams, with over 30 years in the hair industry, hope you've been enjoying my youtube channel today, i'm doing a tutorial on feed and goddess braids feed and braids. So i've already shampooed my hair, my client's hair. I'Ve already did a deep treatment on her hair. I'Ve already had her under the steam hydration and now i'm starting with the first section, which is for symmetry. So when you want to make the both sides symmetric, meaning even on both sides. The best thing to do is start with a metal part, because if you start with a middle part, a part in the middle, then you already know that both sides are even both sides of the head or even the same amount of hair on both sides. So that helps with making it symmetric. So that's what i'm doing right here. So whenever i'm parting, you guys, i prefer using uh the shine and jam gel because, as we know, different uh different edge control gels are different. They'Re all different. Some are kind of more wet slippery and slimy. Some are more thick and heavy and you know have more grip ability to it when i'm sectioning and parting, i prefer the shine and jam because, as you can see, it's easy it's more pliable. It'S easy to get the comb through it like some gels and edge controls are kind of stiff and that's why i'm showing you this shiny jam, because that's what i'm i'm doing the parting with. So when i'm parting, i prefer to use this. It doesn't leave any kind of flakiness or any buildup or anything like that and her hairline and nape or her neck. It goes way down far so, as you can see, i'm still going back in the back of her head. So, whenever you're parting and sectioning everybody's head size is different, everybody hair is different. Everybody neighbor their neck is different. Some people nape go way back. Um hers go pretty far back so, as you can see it's it's i'm still kind of parting back here. So, even though it's in the back, you still want to make sure that you part it correctly. So i prefer these braiding combs with the point and the rat tail on the end, where the teeth where it looks like about two teeth are missing. I prefer that now i'm a self-taught braider just to let you know, i'm a licensed master cosmetologist over 30 years in the industry. I just started braiding, maybe like a little bit over two years ago, self-taught. So these feed-in braids. I thought there was going to be like a really really big challenge to try to do them, because when you're looking at people, do them like braiders, do them different ways like some braiders, take their hair and wrap it around and do to me that's a lot Of different work, unnecessary work, in my opinion, i'm always trying to do as less work as possible, because if you can get the same result and do less work, then that's going to be more stress on your body more, i mean you know less stress on your Body, less stress on your arms, less stress on your legs because you're not standing up longer. So when it comes to you know doing hair. You definitely must know how to time manage it and there's always an easier way to do things easier in a faster way. But still have great results, so this first section whenever you're, sectioning and you're doing straight back with any kind of thing, whether it's braids or whatever, feed in braids or just cornrow braids, whenever you're doing straight backs this first section, that's over the ear on both sides. The first sections that that's right by the ear you're going to kind of curve it it's not going to go straight back, it's kind of going to curve. So you see that curve, so it kind of curves almost like the shape of the ear. You know almost so that first section on each side of the head next to the ear you're gon na curve it all the rest of the sectionings are going to go straight back, but the way the head is shaped. The way all of our heads is shaped. You know you have to kind of curve it. So that's why you see me curving it. So whenever you're sectioning, you know, you definitely want to check double check and all that so i'm pre-sectioning the hair. So i'm gon na just do like two strand flat twists. Just to you know, get the hair out the way and have it section off now she loves to wear her hair color treated. She has very fine soft hair natural hair and she loves to get all different kind of colors and stuff and um. I really would like to see her more in the salon with all this color that she has so now, i'm just going around the front, because sometimes you can be part in someone's hair and you're, standing behind them doing the parting and the sectioning and from behind Their head, it can look like everything is perfectly straight like it can. Look like it's just perfect, but when you go and stand in front of the client or you turn the client to the mirror, so you can see you know if the part is straight. If the section is straight a lot of times, it may not be so even though you're doing the sectioning and you're standing behind the client, you definitely want to go in front, especially when you see i have this, so i'm gon na go around the front. So i'm not gon na go all the way back with the part, because that would be a waste of time. I'M not gon na do that until i'm sure that the part looks straight and then i'm gon na take it on back, because if i part all the way back to the nape of her neck and her nape goes back really far, then i've done all that Kind of in vain right, so i just do that first part, like maybe section it back to maybe where the ear, maybe the middle of the top of the head, and then i'm gon na go in front of her or either i'm gon na turn the client To the mirror, so i can look and make sure that the part is straight because standing behind a client, it's gon na, always look like it's straight, but once you go and step in front of the client or turn the client to the mirror. That'S when you like wait a minute okay, so it's best to just go ahead and section it to the top of the head and then go stand in front of the client or either turn the client to the mirror. Just to make sure it's definitely straight. That'S all i was doing standing in front of her to see if it's straight so again, her nape goes way back. So you see me going way down. I'M still parting and again, people head sizes are different. People'S hair texture is different, and some people hairline on the nape of their neck goes back really far. So hers go back pretty far, so i'm still parting, but i'm still being cognizant of the parting and the sectioning to try to get it as straight as i possibly can. One thing about doing these pre-sections and pre-parting is once you've done with everything and you've got everything. Sectioned off and parted off, see i'm standing in front of her now to check the part again make sure it's right. So one thing about the pre-prepping that i'm doing once i finish pre-prepping and do the flat twist on all of her whole head. That'S gon na pretty much give me an idea of what the finished look is gon na look like it's gon na show me the finished. Look before i even do it. So that's kind of a great way to know if everything, if everything is symmetric. Excuse me: that's a good way to check it. So by doing this pre-sectioning and if you're new, to doing this, you definitely want to because i know when i first started doing the feeding braids. It was like, oh god, because it just was to me it's a lot going on when you're trying to do the feeding braids, because you got to keep adding hair and keep adding hair and keep adding hair. So the last thing you want to worry about is, if the part is straight and all this other stuff, so it's best to just if you pre-prep like what i'm doing and you see she has color-treated hair, so my color-treated hair class, i try to get them To come in at least once a month, you know, and i try to get them not to do the the you know, a lot of heat because you know when you lighten your hair or you get color and all of that stuff. It'S just gon na dry. Your hair out, so if you uh, if you do get color or you get your hair, lighten or brighten, you know it's gon na make your hair more dry because it's pulling it's pulling the melanin out, which is the darker color of your hair, and so it Tends to make the hair dryer so, if you're using, if you got all this going on with the color, which is making your hair drier and you still doing a lot of soup presses and stuff. That'S just going to damage the hair! Because the little bit of moisture that your hair is trying to hold on to you're pretty much stripping that out by doing a lot of the heat, presses and stuff. So usually my like, i don't even recall the last time i did a press on her because um she don't get them as often she's, pretty compliant with the advice that i give her because she's her hair has been all kind of colors. And so, if you look on my youtube channel, you will see that i have another video with her on it, where i did a color removal and then we did this red color, so i'm still just pre-sectioning just flat twisting the hair. That'S all i'm doing still doing that and i haven't sped this video up. I think it's one section um when i start braiding that i may have sped it up just a little bit, but so far i have not - and i always go in and blow dry blow dry blow dry now this blow dryer that i'm using i'll put that Down below in the description box, so you can see what that is, it's a handleless. It doesn't have a handle, so it's it's pretty ergonomic and easy to use. I love it and it's great for you know getting to the roots because it has a comb attachment. So this is the last section, i'm just gon na flat twist that and again when i'm doing these type braids, i'm really huge on the pre-prepping and when i say pre-prepping, i'm talking about like blow drying the hair, because you don't want to start bloat, you don't Want to start braiding and feeding in hair, feeding and braiding hair and then the client's own natural hair. It'S still kind of kinky. It'S not blown out because when you start adding that that you know feeding in that braiding hair, your fingers are going to be getting kind of caught up and you're going to see one section where that happens on me and you see my prep work. I blow dry blow dry blow dry, but sometimes your finger can just get caught on on the hair on a client's hair. Now i also i forgot to mention to you guys that i did a trim on her just a little trim on her because she needed a trim. So it's okay to do trims before doing these feed-in braids, but for certain kind of braids. You don't want to trim the hair before, because the ends are going to be blunt and they're gon na stick out the braid, but it was okay with these type of braids, so she brought this own hair in her own hair. In like i mentioned, she brought her own hair in and you see it looks more orange than red. So you see the color is off now she ordered this online. It'S expressions pre-stretched hair, which is one of my favorites hair. I like using that braiding hair, because the texture of it is coarse, so i pretty much like using it everybody that braids like they use something different. So the color, the name of the color, is bright red. But to me it looks orange and then she should have probably got that 99j or could have got. They have another red hair that i use in another one of my videos, the one called braiding and vlogging. She could should have got that color, but she ordered it online and she went by the fact that it said bright red. But you see it looks orange. So it's not really matching all that well with um the color hair that she has. But it's fine. So i'm taking everything loose on that first section and then she has that mask on with that ear loop and all of that, like it's hard to kind of, do braids and work around that. But i put the extra part of the loop on her ear. So i was just showing you there that i'm using what i'm using there that wax. So i like using that product just to lay the hair down a little bit that murray's edge wax. It'S called murray's edge wax. Now they have two different ones of that. They have one, that's a mild hole and that's the one i have and that i'm using and then they have one i think they call it extreme whole the extreme hold. I tried using that one time i didn't like it, because it's very hard and very firm and very stiff, so i like them the one that i'm using now the regular one, because you see, even though i put a lot on there, it's still pliable. So i kind of split the hair down the middle, and then i put some shiny jam in there. That'S gon na just all make the hair more pliable and more easy to use and more easy to get your fingers through. So i comb and comb and comb because at the end of the day i don't want to be, then you know feeding, hair and braiding hair in and then the fingers get caught. So i tried to do everything to avoid that, which is why you see me um, calm and calm and combing coming coming, coming, smoothing and combing and her hair around both of her ears on each side. Her hair around her ears is kind of more fine than the other hair, so we're going to get started here. So i like, when i'm braiding, there's a i like to use the more thicker firmer edge controls when i'm braiding, because the more pliable wet ones that i use for sectioning them parting to me. They'Re a little bit too slippery and wet to give me the grip that i need, so i'm grabbing some more of it. I buy that whole cell, so it really doesn't have a name a brand name at all. So i'm adding in the first piece - and you see the color is different than her hair, but it's not a big deal, still a pretty color, so i take it. I put it under my pointer finger and then i just braid i take it. I put it under my pointer finger and i braid, so you got to make sure that you're grabbing her hair as well and another thing too, when you're doing feet in braids like this sometimes uh, the braiding hair, like the ends of the hair, can start tangling Up because you're adding hair in you know you keep adding it in, so i always try to make sure i pull it like what i'm doing now. I kind of pull the hair. You see what i'm doing. I do that to try to avoid the hair tangling up, so i try to be proactive and i try to smooth through the hair, even all the way down to the end of the braiding hair, trying to avoid the hair from tangling, because once it tangles up, Then that's going to slow you down, it's going to be hard to braid it with it tangled up, so it becomes a mess. So i'm just simply putting my putting that hair in between my one two three fourth finger, which is the second finger from my ring finger. So i'm putting it under that finger and then my thumb is it's between that finger and my thumb and i'm just putting putting the hair right between those two fingers and just cornrowing, just like you normally would and making sure that i keep smoothing that hair out To make sure it doesn't tangle up or matter so i'm braiding back her nape goes pretty far back than most people, so i have to make sure, even though it can seem on most people, i'm done now, but her hairline in the back on the nape goes Back a little further, so i have to make sure that i'm grabbing all that hair because i don't want to be finished, think i'm finished braiding and then it's still hair on her nape that that's still just hanging out you know. So now i flip my fingers and my hands over and then i start braiding just plaiting the braid down. Now she got 52 inch hair like the expressions pre-stretch hair. It comes in 42, inches or 52 inches. They have, i think another. I don't know if it's 72 inch, but they have a longer one too, that i've never used. So that's why i'm not that certain about what the length is. I normally use 42. The 42 inch is mid back and this is 52 inch, so this 52 inch expressions pre-stretch hair. The 52 inch will usually come to the waist most people waste unless they got a really long torso and sometimes i may add some hair. You see me doing that. So i add it in and um all that does, when you add it in it just makes, makes the braid a little longer. So i had excerpts, she wanted it kind of long and she said yeah. So i added that other piece. So again, i'm always very careful to try to avoid the the hair from tangling up because um pretty much. You know you're gon na make more work for yourself. If you don't try to pre be pre-active with that, a proactive, rather not pre-active, proactive, so the combing, the brushing doing all that that's so you can avoid tangles on the back end and if the hair get tangled up the braid is not gon na look right. It'S not gon na be smooth and look it's not gon na look as precise, so you saw me kind of undo unbraid a couple of steps back and then re-braided it because i didn't like how it looked so you always got ta have what they call three Legs you see how it's three, when you plant so sometimes when you start braiding down and you get almost down to the end of the braid one leg may be way thicker than another leg, so you just borrow and that's what i'm doing, i'm i'm borrowing from One of the thicker ones and added it adding it to the thin one. So when i'm doing these breakdowns on these different feed-in braids, if they're not all the same length, if for some reason one or two is longer and length than the other, you know i always dip once i dip them in the hot water. You know, but i use a razor and kind of trim it down so it'll be even then i dip you know a few more times whenever, in my opinion, my advice is whenever you like, trim it down some. If you trim the ends down like, if you find, if the customers say this is too long or whatever can you trim it down some or if you know some of your braid downs or some of the braids are longer in length than the other. The best thing to kind of trim it down with, in my opinion, is a razor uh if you have a razor or if you have one of those razor combs, because you don't want it to be blunt, you want it to be like a razor cut. So that's the first braid i just did on her. So now i'm taking the second section of loose, i'm making sure all the other sections are out of my way and i'm taking the second section and, like i said, even though it's all pre-sectioned, if you need to make any changes, i think on this one i Made a little bit of a change to the nape, because her nape goes back so far, so i had to make a little bit of correction back here in the back, because sometimes you know once you add, like some tension to the hair, which i did by Braiding that one braid that i braid braid it then it may end up making something look a little bit off and so that's what happened on that nape area. So i corrected that and then again, like i told you guys, i'm really big on blow drying, because i don't want to start braiding and feeding in hair and then it gets caught up on the hair because the hair is still got a little kinkiness to it. So i try my best to do my due diligence, even though her hair is not that thick, it still can get caught when you're. You know adding when you're feeding that hair in so this is it um murray's murray's edge, wax i'm using again, i like to use that to smooth it down. Everybody has their own preference of what they like to use. You know all braiders use different stuff, so you can be on youtube and you can see one person using this another person using that you know so it's just to each its own. I like the murray's edge control. It'S not flaky! It'S not hard! Excuse me. It has a little bit of firmness to it, but not so much where, where it's not pliable - and i always when i put it on there - i put some underneath see, i'm putting it underneath, which is that last piece of hair on that nape. Because i want that to be smooth too, and i want that to be easy to grab. I don't want that to be crispy and dry back there on anybody's nape. So i add that to the nape too so that when i get down to that nape and i'm doing that last, i braid it all the way down to the end on the nape on the cornrow. I want to make sure that i grab that hair back there. So that's why i put product on that too. That makes it easier to grab, and that makes it you know stay put where you want it, so i'm just prep prep prep prepping. I comb the hair i prep as much as possible, i'm trying to be proactive and not and i'm trying to avoid tangles. So that's my little. I got so many cones and so many everything. So i don't know what i'm trying to grab here now. Oh brush. That'S a denman brush, so i'm just trying to make sure like i said, i'm really big on this because natural hair, it can look like you have combed it out like you have you know, did it your due diligence and then you can start feeling hair braiding, Hair and it can just get tangled, then you may have to start all over and you don't want to do that. So i go down the middle. Like i said, then i put the shining jam that kind of helps um keep the hair intact too. So the middle won't be dried out. It helps keep everything in place and makes everything look neat. So i have two or three different edge controls. I'M using but like i said when i'm you know when i'm sectioning, i use the shine and jam because it's very pliable, but when i'm actually start braiding, i prefer using a stronger edge control, that's more thick and more heavy and have more holding power to it. And to each his own, some people like shine and jam. They use it for everything, but i prefer using a stiffer edge control when i'm actually braiding because it for me it helps me to grip better. So i usually just take a little piece when you know like i just did that's how i do mine like i said, everybody's different and sometimes if the hair is if the client's hair is very, very um thin in the front, i will add a piece of Hair right in the front, so now i'm just putting i'm feeding it in so all i'm pretty much doing is putting a grabbing a piece of braid in hair and i'm putting it under my fourth finger, which is the finger right, which is right. Next, to my thumb, so i'm putting it between that finger and my thumb. Oh, you see my you see the finger right there, so i'm just tucking it in there between that that finger and the thumb, that's all i'm doing and the reason i'm grabbing hair on each side. Her whole her own hair, because i'm trying to make sure that i'm grabbing her hair in there as well so again, i'm very cognizant of the braiding hair, because sometimes it can tangle up because you're feeding hair in so i try to be proactive, and i comb And i brush - and i do i try to do my due diligence so that it won't tangle. So you see what i'm doing here almost like i'm combing it out and sometimes it'll get caught on the client's hair, especially if the person need a trim really bad. If they need a trim, really bad, i mean it'll, be just catching catch and catching like you have to comb through it a lot, but i trimmed her hair right before i did a little small trim on her. So, as you can see me adding more hair in it's getting a little bit more tangly, but so i'm gon na brush it out there we go and whenever you have to do that, just make sure you hold your fingers firm. So the hair that you've already braided won't come loose, won't slip or nothing. So you see that there's a huge color difference in the braiding hair and the color hair that she bought. But it's no big deal, it's still beautiful, so i'm just making sure i have that hair where it belongs, and now i'm tucking that piece in that's the thing about feeding braids feet in braids, you're doing a lot of stuff at one time, you're holding the hair You'Re making sure the hair. Now you see me i'm having to keep. I don't know why it's tangling with this hair in this section. Rather so i'm brushing this out. It seems more like it's getting tangled on her hair, so i'm grabbing another, and then you know you may wonder: okay, how much hair do i know to add. I try to add hair to each piece, especially when i'm using colored hair like this because say, for instance, if her hair was black and i was using this color. You know i try to grab as much as possible, but you don't want the braid to be humongous like super huge, so you know that's why? Usually i put little small pieces of hair on a rack because if i have small pieces, but i really want to add a bigger piece, i can just grab two of the smaller pieces. But you know i don't want big humongous, um, feed and braids. So i'm still going back and i'm still making sure that the hair isn't tangling. I'M just pumping the chair up a little because i'm in the back of her head and like i said her nape goes way back. So i'm still braiding going back put some more edge control on there to keep it smooth making sure i grab that little pieces of hair on the nape of her neck, trying to tuck her hair in because it doesn't blend with this. It'S not the same color and i'm kind of flipping my hands over a little bit. Sometimes, when i get to the end, i will flip my hand around just flip it over. So i can really grab the hair now some braiders, you know when they do these kind of braids and they finish braiding up the whole head and they have these plaits on the end. They'Ll sew them together, but most of my clients, when i ask them if they want them so sewn together, they always say no, so i don't. I know the ones that say no, so i don't ask them twice or whatever she always say. No, so so i'm still planting this down, so you still want to focus on making sure it's smooth, i still add edge control. The edge control for me helps me to have a stronger grip because i don't want to be braiding down and then some you know some of it look like i was went too loose. You know doesn't look uniform, so i continue down working my way down, but i still use the edge control to give me the grip, the strength that i need, so that i can make it so that the braid down will look uniform when i'm braiding it down And again, when you start braiding down plaiting it down, you know you're, looking at them three legs that i'm talking about that i spoke of earlier, and sometimes you may need to borrow some hair from another um section. But i look like i was okay, so just braiding down and again i have everything in regular speed just so that you can learn as much as you can so there's hair caught up in there, i'm gon na throw that on the floor goodbye. I ain't got snow love for you, hair on the floor, so now i got another bundle of hair. I always brush it first before i use it, because if you don't, it can end up being tangled up and then, when you start feeding it in you're, going to have a mess on your hand, because it's going to be tangled up hair. So when i grab a new bundle of hair, i always always always brush through it or comb through it, every time to avoid tangling and matting up when you're, trying to braid down or plat or when you're trying to feed in that's that doesn't matter what kind Of braids, i'm doing i always brush the hair out when i'm doing a new bundle. As soon as i grab the new bundle, i grab a brush or comb. So now i'm about to be on the third braid, so i'm just gon na take this loose and the parts look pretty good. So i just take this. I'Ve done two. So it looks like i did a total of six and she had sent me a picture which was just like six braids, so i'm taking everything i lose and even though it looks perfectly straight, i always again do my due diligence, because if you don't you're gon Na have a problem down the line because you can just look and eyeball and and look and somebody's hair can look like it's good to go. And then you don't do your due diligence and then, when you start braiding and feeding that hair in it's gon na be a mess. So always you know just second guess yourself by going ahead, even though it looked totally straight and look good to go still. Do your due diligence, because if you don't when you start actually feeding in and start actually working on the braid, then you don't want to be held up or you don't want. You know to be having problems braiding. So this nape of the neck, i'm back here again her nape goes back far, so i can think i have it straight, but that's the thing about the pre-prepping and the pre-sectioning. You can go back and tweak if you need to and like i said once, you start braiding, you know and it's tight and you pulling tight. You know the braid is going to make things shift anyway. So it's going to shift around a little bit. So you may have to you know, tweak it a little and so far i've only had to tweak the nape of her neck and her nape goes down pretty far and even though it does go down far. You still want to do your due diligence and make sure that it's straight back there that the part is straight, so i've blown her out, i'm grabbing my murray's edge wax again and the the way you can tell the difference between the regular hole with that murray's Edge wax and the extreme hole, because the regular hole that i was just showing you, the label is yellow but the extreme hole. I think that's what they call it. The label is black, so i recommend the yellow label for the murray's edge wax and you see how it's laying everything down, but you see it's still pliable, it's still workable and they have so many different edge controls and every braider like a certain one. I mean i have i like certain ones too, but at the end of the day you know for me uh, when i'm sectioning and when i'm prepping like i'm doing now. I prefer using something. That'S pliable movable because if you use something too firm when you go in and start trying to braid and put you know, you got to put your fingers, but between the person's hair when you're braiding, then your fingers are going to be getting caught. If you use like a strong edge control or whatever it's just going to be thick and you're gon na be trying to stick your finger through there, because you're trying to braid and it's gon na, be a struggle and being a hairstylist or braided. You know your fingers already may be hurting a little bit, so you don't want to be fighting the hair. You know so use something. That'S primable appliable, you know or whatever. That'S me so now, when i start braiding when i started, i use a firm edge control when i braid, because again that just helps me with the grip, like some people already got grip, some people already, you know been braiding in the womb and um. You know they come out the wound, breaking and see uh. Here i am doing my do dylan just again, i'm i'm blow drying and again i'm going to let you guys know the name of this blow dryer. I actually got it on amazon. So definitely i'll put that in the description down below and the different edge controls that i'm talking about it was um. I had a favorite edge control, but i can't find it anywhere. You know - and this has been a lot of stuff now - where you can't find nothing, sometimes so, with this pandemic, going on it's hard to find certain things so another one i was using. I think it and it smelled so good. It smelled like candy, but i think it was leaving a build up because on some of my clients braids when i first started using it, i was like. Let me know if you see any kind of build up or any flakiness or chalkiness, because all the edge control i use it does not leave flakiness, chalkiness or anything else. So um, a couple of my clients, told me it did so i stopped using it first. I had to figure out which one it was because you know i have a few that i like so i figured out and when i couldn't find my favorite one, i started using a couple of them, so i figured out which one it was so even though It smells like it smells delicious, like candy, but it leaves like a white build up. I don't think it flakes up, but it it does. Leave like a white build up. So again, you see me doing my due diligence, i'm um, even if i wasn't making a tutorial video, i would still be doing all all of this and usually um the amount of time it takes me to do. These types of braids are usually about three hours, and that includes the shampoo and the blow dryer, because, as i mentioned, she got a shampoo blow dryer. I also gave her treatment under the steamer because she loves color. She loves to get all these bright colors, but she doesn't get to come in as often for the maintenance. Like the the you know, once you get hair color, you need to be coming in. I recommend at least once a month. You know to get shampoo treatment and get you know under the steam hydration. So here i am and again all i'm doing is just sticking the hair under the my in between my thumb and the finger. Next, to my thumb, that's all i'm doing now, some braiders they take the hair they throw it over. They pick it up later. To me, that's a lot. Now, i'm not trying to bash anybody on my channel at all to each his own. Everybody do stuff how they do it, but for me time management is everything in this industry. So to me, that's just a lot of work. Not only will it take longer to do all them extra steps, but after a while you know it's going to be making you tired more tired, because that's a lot when you're throwing hair over and flipping it over and then got to grab it later. When you can just stick it right here, just put the hair right there and keep it moving. You ain't had to do all that other stuff by throwing hair over, and you know it's that's a that's more work on your fingers and your arms and your hands. You know you're already tired, so now i'm trying to do my due diligence here. You see me doing that. I'M trying my best to tuck her hair under i'm trying to tuck too, because you know the hair not really the same color as her hair. So i got a bunch of things going on here and i'm trying to avoid the braiding hair getting tangled up. So i'm always cognizant of that as well. So i'm still braiding on one of those sections. My finger got a little caught now when people need trims. Oh, my god, it'll be like you'll, be fighting with the hair trying to braid it, especially with these type braids, but i trimmed her hair prior to see my finger. There we go, i got it, see it's tangling a little bit. This might have been a section of her hair that needed some more trimming because it's getting caught now when people hair need a trim like i was just saying this. This is an example of what could happen like the hair, just um, it'll kind of be getting caught like that and when you're trying to get your fingers through it. So that's why i was saying i do my due diligence. That'S why i calm comb comb out the client's hair. That'S why i blow dry blow dry blow dry because they can look like as smooth as silk and then, when you get in there and start feeding that hair in they're, going that's going to be the acid test. That'S when you will know for sure - and you see her own hair - looks smooth. It looks smooth, but she probably had one little area of her hair. That was a little bit fuzzy either needed to be smoothed out more or i needed to trim it down. Some more and see me trying to tuck her hair back there trying to flip it trying to do see i'll be on the edge control, because to me that makes you know um. It makes the braids last longer too. Some people don't use a lot of edge control and again to each its own, nothing bad about people who don't, but for me i've only been braiding like a couple of years, so my fingers are not as strong as somebody who's been braiding out of the womb Or been braiding for years, so because of that reason i make sure i use the edge controls that are a little firmer, so right here, all of this stuff that i'm doing now, i'm trying to hide her red hair. So i'm trying my best to tuck it and hide it as much as i can. So that's what kind of slowed me up right there. I was trying to tuck it because her hair color and this braiding hair color is not the same. So when you have that happen, then you you trying to tuck, you know and it's fine if it shows a little with this color. She doesn't mind she said, but still you know um when you send your work out the door. You want it to look nice. So it looks like i may have to yeah add another piece, and so i'm doing that, so everybody adds differently to me. The way i add it looks kind of weird people add different ways and the way that i add it works for me, but you have to when you add you have to make sure you add a small piece, because if you add a big piece, it'll look More noticeable like you'll, be able to notice, so i'm just borrowing, hair from one of the legs and braiding down grabbing my edge control and, like i said you guys when i braid i always use. When i do the braiding part, i start actually braiding. I use a firmer one: that's more firm edge control, not the wet pliable one. I use a firm one breathing down barring, so i borrowed some hair. You probably saw me there do that and all you're doing is if, when you're braiding down, sometimes you may have one leg with a lot of hair and then another leg, that's about to run out of hair. So you just borrow you grab some hair from the big leg and like what i'm doing now see just make sure everything looks smooth and neat and, like i said when you do your braid down, when you finish with completing the whole braided style. If some of the braids are longer than the other ones, that's a very easy resolution. You know when you're braiding. Of course, you want to keep them, keep all the braids as even as possible, but if just by happenstance, where one of or a couple of the braids are longer, all you have to do is just make sure. I um suggest that you kind of use a razor to kind of trim it down, because you don't want to use some shears or scissors, and you know it'd be blunt. Like the ends are blunt, then it's going to unravel, so you want it to be where you use a razor and just trim it down and then re-dip it about two or three more times, just to make sure it seals up good on the ends. So i took that down here. I am with my trusty little red pro blow dryer handle handle this one, which i will put in the description and if you guys could please make sure that you like that. You comment that you subscribe whenever you admire somebody's youtube channel and you like comment and subscribe. That'S going to help their channel because, what's going to happen is more people just like yourself is going to learn about their channel, and so, if you, like, my channel, that's going to help other people to know about it, because the more activity that youtube sees on My channel and when i say activity i mean like the likes the comments, the subscriptions like the more activity that youtube see, then the more they're gon na recommend you know my channel like you, may be um at work or you may be at home and it Just pops up on your phone saying you know um that youtube sent us a notification suggesting that you watch a particular video or something then it'll do that for my channel. If you like comment and subscribe, so i've only had this channel, i think since november. So i'm gon na you see i'm very diligent about posting because i stay very busy as a hair stylist and i'm a licensed cosmetologist in georgia and i've been doing hair since came out of cosmetology school in 1981., and so you pretty much gon na see everything On my channel, like some stylist, you may just see weaves or you may just see, lace, closures or you may just see wigs or you may just see braids and not trying to bash them or throw them under the bus. But i'm saying nine times out of ten on my channel you're gon na see everything you're gon na see relaxers you're gon na see um just a plethora of things, so my page is not gon na be boring. You'Re gon na get advice, um, you're, gon na see advice. You know i owned a storefront salon for 13 years as some and i had a team of commission stylists. Now i work alone. At some point you may hear about like business ownership, you know about owning a salon suite. You know you may you're going to hear all kinds of stuff on my page so um and share my page. Let people know let your friends know about my page and you know: there's probably not many hair stylists out here. That'S been doing hair a really long time like me, that's you know on youtube. I don't know so. If you could comment like and subscribe and and share, you know, if youtube see my algorithms going up and there's more activity on my channel. They will definitely start suggesting my channel to more people, so you can definitely help me with that. I'M looking into doing contests on my channel, i'm just trying to figure out um what type of contest how to do them and all that, because i haven't been on youtube, but just a few months. So just bear with me. But just uh go ahead and hit the subscription um hit the subscription button so that you can subscribe. Um hit the bell so that you'll be notified. When i upload a new video and trust me, it's gon na be more to come. I do all kind of services, i pretty much do do everything and i just started braiding a little bit over two years ago, so i still have this in regular speed. I thought i had sped it up a little bit on this part because pretty much it's redundant now. I think you pretty much have kind of grasped what i'm doing, and so i'm really big on trying to make sure again that, as i braid it down that the hair is not tangling up the braiding hair. So comment like subscribe hit. The bell and share show some love for your sister over here in north atlanta. I'D appreciate it. Thank you so much so he's just watching me. I just got two more left after this one, so i'm brushing this hair. It'S a little tangly, as you can see. So also, if you have any suggestions of anything that you might want to see me do or anything on this channel any kind of discussion, i can't do any kind of uh youtube live. Yet my my channel, i think i don't know how many subscribers you have to have to be able to go live, but i try to go live on here once and it wouldn't allow me so i don't have as many subscribers, but i thank god for the Description subscribers that i do have so i'm grateful for the ones i have, so you guys just stay tuned because i'm gon na start doing contests at some point. So let you know let your friends know comment like subscribe and hit the bell that bell. When you hit that bell, it'll definitely notify you whenever i upload so i'm down to the platinum part to break down part here. So once i braid this one down, i just got two more. I thought i had sped this part up so but apparently not so. I'M still in real time here and i'm just planting it down, but, like i said it takes me about three hours. So by the time i shampoo somebody blow them out. Prep, their hair set up the a lot of times when i'm doing, feeding or knotless or something i usually try to have the hair already set up, but she brought her own hair. So i had to set that up. I think i set it up when she was under the steamer. So here is the finished. Look here, i'm hoping you like it this the finished look. Hope you like it, and this is how to reach me reach out to me. Even if you have questions or suggestions about things that you want to see on youtube, you be safe and see you soon. Thanks for watching

Comments
TheRebuilt1: good information, thanks for the insight. What is that hair product on your wrist?