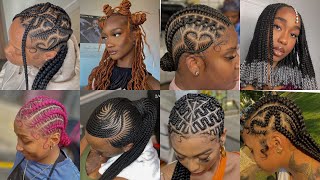
Sew In Braid Pattern With Leave Out Tutorial – (Part 2 Of 7)
- Posted on 04 May, 2015
- Braids Hairstyles
- By Anonymous
Virgin Hair From: http://www.MrsRutters.com
Instagram: http://www.Instagram.com/MrsRutters
Facebook: http://www.facebook.com/MrsRutters
In this step of the Partial Sewin Leave Out Tutorial, Breanna Rutter will teach you step by step how to braid your hair for your sew in braid pattern. Breanna Rutter has relaxed 4C hair and you can still achieve this braid pattern on stretched natural hair. If you do not know how to cornrow braid your own hair, be sure to purchase the braiding DVD to learn how!
How To Cornrow Braid With & Without Weave DVD http://goo.gl/1q6WRH
After braiding your braid pattern for the traditional sew in with leave out, you will then learn step by step how to sew on a weaving net. The weaving net protects your hair by stopping frizz from your braids from becoming tangled with the weft of your extensions. Also as you sew on your extensions, the tension is placed on the net instead of your hair. The braiding hair protects your hair by adding strength to weak and/or thin hair and to also prevent your hair from frizzing.
PRODUCTS FOR THE PARTIAL SEW IN HAIRSTYLE;
4 Mrs.Rutter’s Bundles Lengths: 26 in, 24 in, 22 in & 20 in http://www.MrsRutters.com
Black Nylon Sewing Thread http://goo.gl/rr36p4
Weaving Needles (Curved C-Needle) http://goo.gl/cugnQi
Weaving Net http://goo.gl/wdGCYp
Braiding Hair http://goo.gl/wkLSzd
Rat Tail Comb http://goo.gl/NTJJnC
Wide Tooth Comb http://goo.gl/mkXsZC
Dry Towel http://goo.gl/JN0XQP
Hair Cutting Scissors http://goo.gl/rYH7BX
Edge Control (Design Essentials) http://goo.gl/2ibYgw
Rubber Bands http://goo.gl/8bYkAF
Hair Holding Spray (Garnier Fructis Style Flexible Control) http://goo.gl/dKC7ni
Ponytail Holders http://goo.gl/vuOZqg
Duck Bill Clips http://goo.gl/SQ5SNn
Flat Iron (Nano Titanium Babybliss PRO) http://goo.gl/TbgJFv
Heat Protectant (Garnier Fructis Marvelous Oil Frizz Defy) http://goo.gl/NaspXv
1 inch Curling Wand (HSI Curling Tool) http://goo.gl/maV8uy
How To Dye Hair Extensions Black HERE https://youtu.be/y93K9gZiBww
How To Dye A Lace Closure Black HERE https://youtu.be/f0F7FWrgnPY
PARTIAL SEW IN TUTORIAL STEPS
Step 1 http://goo.gl/KFyBFP
Step 2 http://goo.gl/A029a5
Step 3 http://goo.gl/y489Rq
Step 4 http://goo.gl/QbOu2B
Step 5 http://goo.gl/t28RRU
Step 6 http://goo.gl/X3ZRVp
Step 7 http://goo.gl/rhPnPC
Thanks For Watching!
----------------------------------------------------------------------------------------------------------------------------------------------------------------------------------------------------
Free Giveaways & Weekly Updates By Email! http://eepurl.com/bN6ddr
Buy My Books, DVDs, and T-Shirts at http://www.howtoblackhairstore.com
My Website: http://www.howtoblackhair.com
Twitter: http://www.twitter.com/BreannaRutter
Facebook: https://www.facebook.com/OfficialBrean...
Instagram: http://www.instagram.com/breannarutter...
Google +: bit.ly/15gNK3M
Got Hair Questions? Email Me!
Email for Business Inquiries
----------------------------------------------------------------------------------------------------------------------------------------------------------------------------------------------------
DISCLAIMER: All suggestions, tips, prizes, techniques and advice given are for informational purposes only and should be used at your discretion and best judgment. I highly recommend conducting strand tests when trying or using new products, hair appliances and product mixes. I am not responsible or liable for adverse or undesirable effects including hair loss, hair breakage or other hair/scalp/skin/body damage as a direct or indirect result of the suggestions, tips, prizes, techniques and/or advice given.
FTC: I am not representing, being paid by, or endorsing any of the product brands in this video & I purchased everything with my own money - UNLESS OTHERWISE STATED in video/blog content. There are links to products that might be helpful based on the content of this video/blog. Each of your purchases via our Amazon affiliate links supports our cause at no additional cost to you.
Music Used
“Easy Lemon”
Kevin MacLeod
Incompetech.com
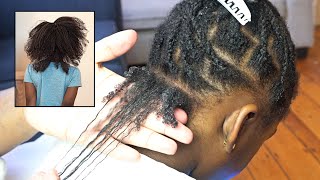
Welcome to step number two of the partial sew in hairstyle using Mrs. Rutter's hair extensions from MrsRutters.com. In this step, I'm going to be focused on teaching you how to achieve your braid patterns as well as how to someone you weaving net for your style. In this step, I'm going to be teaching you how to achieve your braid pattern, how to ew down your braids and also how to sew on your weaving net. So if you already don't know how to cornrow braid your hair, I suggest that you visit howtoblackhair.com to purchase the cornrow braiding DVD to learn step-by-step in that DVD. You will learn how to cornrow braid with extensions and without extension. So now you understand, I am going to briefly explain the braid pattern and then show you how to sew down the final braid that I have in the back. So, as you can see want, I am going to be doing is doing the partial sew in on my hair and in order to make sure that your sewin can go into a ponytail. You have to leave out your real hair on your entire perimeter of your head, so I have a braid here. I have a braid here and then I have a braid on the side as well on both sides and also in the very back of my head of the hair that will be left out. Also, where my part will be is right here in the middle. So that's where I have my real hair left out as well. Now with your braids, you want to make sure that all of your braids go to the very back of your head, so that when you are sewing them down, it will be very neat. So when you're braiding make sure to have two braids inside you going to braid those going all the way back, you going to connect them in the very back. Then right, where your leave out is going to make two braids one of both sides and you are going to braid all the way around your leave out and then make sure those two braids go all the way to the back and connect the rest of your Hair as well will be braided straight to the back, with a little bit of braiding hair now for every two cornrow braid to connect them to form one. So I have about a total of anywhere between about 10 to 14 actual cornrow braids in my hair, but in the back it turns out to be about 5 to 7 braids, because each two were connected. Now, after you connect the braids, make sure to braid past your real hair about 2 to 3 inches. So that way, you can seal it, the with a rubber band, just by tying the rubber bands near the ends, because when you take them down, it will be a lot easier to just cut above the rubber band, because that way, you know for sure that you Braided past your real hair, before you did that so now, at that point you want to lift the braid up Nestle it in between the two cornrow braids and then sew it down with your needle and thread, and then you are going to do this for all Of your braids in the back of your head and I'm going to show you how to do it with the last final braids. So you can see exactly how that's done after that. I am going to show you a 360 spin so that you can see how it looks and then I will show you how to sew on your weaving net. So now this point you can see that all of my braids have been lifted and nestled in between two cornrow braids to be sewn down, because remember two cornrow braids turn into one. You lift that braid and sew it down so now, as you can see as well. I have one last final braid here and if I lift it up in Nestle it in between two cornrow braids, that's exactly where will be stitched now, as you cannotice me just lifting this braid up, it actually extends past my head. So that means that if your hair is a lot longer, you will simply stitch up. As far as you can go fold, the braid back down and sew it right. On top of where you originally sewn the braid. It'S very simple: just nestle your braid in between two cornrow braids, continue to stitch all the way up until you run out of space and then flip it back down and stitch it. So if your hair is really long, you may need to do this two or three times of your hair short. You may not even need to flip it back over, but that's how you sew down your braid if your hair is long so now that you have your weaving needle and thread ready, I'm gon na show you how to stitch down your braid so simply lift it Up make sure you open your two cornrow braids when you make your first stitch, go underneath all the braids at the very base. That means you are going underneath. Your two cornrow braids as well is the braid that turned into one. So now, once you do, that you are going to do is pull through grab one of your strings of your weaving thread, wrap it around the needle twice and then pull through to create a knot. You are going to do this two times at the base and then work your way up. Your braid. Also, if you happen to go under some neighboring braids, its perfectly fine, now grab your string, wrap it around needle twice and pull through to create your knot. This same knotting technique that I'm demonstrating will be used throughout the entire process of sewing down your braids, your weaving net, and also your extensions. So now, once you continue stitching, you can go underneath all the braids or you can go underneath one cornrow braid and the braid in the middle. So now I am just going to go under this cornrow braid here on the side go around the braid that I pulled up through the middle and then continue making my knot now, once you are working your way up, as you can see, you only need to Make 1 knot move along, but at the base I suggest that you make two knots just to make sure that the braid is secured once you finish sewing down all of your braids. This is how your braid pattern should look for your partial sew in hairstyle. So now that your braid pattern is complete, I'm going to be showing you next how to sew on your weaving net to give your hair the extra protection it needs. So here we are at the point where I'm going to be showing you how to sew on your weaving net. The purpose of a weaving net is to ensure that, when you sewing on your extensions, the tension is placed on the net instead of your real hair. Now the purpose of using braiding hair is to give your hair added strength and also with the weaving that that's going to do the same thing as it offers protection for your hair, the less stress or tension or sewing or braiding that you do on your hair. The better the health of your hair, so the net is doing that for you, as well as stopping your hair from becoming tangled by interweaving with the weft of your extensions, because it has a barrier because of the net the. So when you sewing your weaving net down, I suggest that you make sure that when you're laying it on your head, it's a long way, meaning that the shorts are side and the back is long where most of the net is hanging down. This ensures that when you're stitching, you barely have any to trim off the sides, and you only really trim off the back of the excess net, also make sure that when you lay it down that you so right around, where you leave out will be so. You are going to stitch that all the way down very securely, and then you going to make sure to stitch the sides down now when you're stitching down your sides all the way going towards the back. You want to do so by going back and forth interchangeably. That means that you are going to start you on the left side you going to so to get about to your ear, and then you going to stop let the needle hang so then you going to start here on your side again sew all the way to Your ear and then stop and let that needle hang so then that way you can apply the same tension going back and forth to make sure that your covering all of the area of your head and net isn’t shifting when you're sewing down, make sure they are Also stretching the net with each stitch, so stretch with your hand, make a stitch and then stretch with your hand, again working your way more and more down to the back. So that way, the net is evenly stretched across and its flat to your head without any bumps or weird movement in the net itself. So now to begin, I am going to do exactly what I've taught you and make sure that you follow the steps in detail to sew down your net. Once you finish, selling down your net, just trim off the excess netting with your hair cutting scissors. So now, with your weaving net placed on your head, go ahead and begin stitching right at the beginning of your braid and use your fingers, as you see here, to keep the net from shifting. So to start, you want to go through your net, underneath your braid and back out through the net and then create your knot. So you take one of your strings and you going to wrap around the needle twice and pull through so make your stitch again in that same spot grab your string, wrap it around the needle twice and pull through now that you have secured with your two stitches At the beginning of your braid continue stitching around the braids surrounding your leave out so far with the progress that I've made. I'Ve stitched around my entire leave out area where the leave out is at the top, and now I've also sewn down the left side. To my ear and I stopped with the needle and thread intact now I am going to go over to my right side. I am going to begin stitching on this braid here and then I am going to stitch going all the way down to my ear now, as you ae stitching, make sure that you are keeping the net stretched throughout the process. So with each stitch you are stretching stretching stretching and is making a contour to your head because you want it to be very flat. So now I'm going to begin stitching here and then I'm going to finish this down to my ear. Once I get there, I'm going to going to go on the left side to keep working my way back and forth until I finish sewing down the very back of my head. So once you finish, sewing down your weaving net and you have trimmed off all the excess netting. This is how your finished base should look right before sewing in your extensions. So now that your braid pattern base is complete in the very next step step number three, I'm going to be teaching you step-by-step, how to sew in your Mrs. Rutter's hair extensions for your partial sew in hairstyle.


Comments
Breanna Rutter: YOUTUBE HASN'T Been Showing You All My New Videos?? CLICK THE BELL ICON Next To The Subscribe Button to Turn on Channel Notifications To Never Miss A New Video Again!
Chantelle Peters: Love it. Thanks so much!!
Shani Howell: I love your videos. They are always very detailed . which helps a lot.
one tab by mouth at bedtime: My hair is natural, and VERY ling and unruly when wet. Can I just say very loudly for the ladies in the back that not only have you saved my life ( and job and 4 different occasions lol, I'm an ER nurse) but you SINGLEHANDEDLY taught me how to corn row sis♀️ Not every black sista was born with this talent, when I walked in the salon the stylist always wanted to give me a relaxer or a damn Chinese bob. I just wanted to give you a heartfelt Thankyou!!! One Saturday at 5am , I'm ALWAYS first because my hair is an all day event, the stylist stood me up. I was determined to do my own hair. Well 8 months, 56 lace wigs, box braids , 12 stylists 7 hats and 3 half wigs later, and after binge watching you I'm doing it like a pro. Ladies pay attention. She's the real deal!
Crystal B: You're so talented! Love your videos!
lynn peters: love your videos you truly have talent no doubt about that
Za'kerria quarles: this really helped me im 14 and im taking cosmetology classes this really helped me thx!!
Bright Star: Very informative . Thanks
shay trenee: Step by step:):) love it
Melina and Sophia: Great step by step instructions with the net
ladynefertitibk: These are very helpful videos. Thanks.
Cara F: I had a net once when I got a full install. NEVER AGAIN! I took it down after a week of misery. Probably didn't help that the girl braided my hair so tight my roots bled. Kudos for those who can where their hair longer.
Mrs2u_: When sewing my hair down with a hair net my hair gets very dry and itchy ...is it best practice to use a net or it doesn't matter?
ushandacollins8: wait do you grab one part of the string and pull through or both sides?
Kogarasumaru V: Thanks breanna ^_^
luvableme7824: Mrs Rutter, I tried my first sew in a few days ago on my own head. I just had a quick question. if I am in the middle of a track and I run out of thread, I know to tie a knot and cut the excessive . but after I began with more thread how do I start In the middle of my tract? confused viewer...
Beatrice M.: i can't braid even watching your tutorials (and many others).I will try it with flat twists
Daveonarave: I'm sew in love with you...
Courtney Smith: when I have sew ins but worried about my edges is it best to have leave out edges or braid them in the sew in and I do use a weaving net a braiding hair im jus trying to make sure im doing everything right
Amarianna Griffin: why does she use hot glue instead of hair glue
Breanna Rutter: Video To Long? If So Watch The Shorter Condensed Version of This Whole Look By Clicking Here https://www.youtube.com/watch?v=dq-PwAxl7BU
Yvette Cousin: How do you wash your hair under the weave with a net on it.
D wan: it's telling me Step 3 is private. is the video available yet? @Breanna Rutter
MizTBeauty: Where have you been girl? Miss your videos ❤️
TheJazzie6: How would I oil my skin under the net? I get dry under there?
Christina Louise: no 4-7?
Summer Re’Yanna: so its bad i don't use net?
haitian Queen: I dont see the braiding tutorial on your channel.
Agislin Johnson: Your name sounds like banana butters