100% Heatless Mermaid/Beach Waves You Don'T Have To Touch Up!
- Posted on 28 January, 2023
- Heatless Hairstyles
- By Anonymous
You don’t have to buy overnight heatless wave tools that are uncomfortable to sleep in and look ridiculous! They never turn out perfectly anyways!
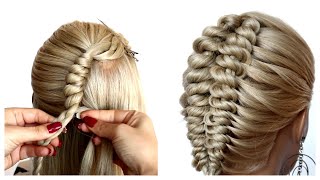
In this video I’ll show you my go to heatless beach wave style that I created to mimic the hot tools deep waver waves from this video! https://youtu.be/aP9YoRAUzlI
This is a ridiculously simple method to get natural looking beach waves. It is literally just two braids!
But the small details are key when it comes to reducing friz, avoiding kinky or straight ends, and weird creases that are a telltale sign of most overnight braid methods. I’ll show you them all!
For this you don’t need a million products! I just use this one! (Not sponsored!)
@nopooproducts lauren15 will give 15% off (not sponsored )
This is the turban I use as well https://amzn.to/3kE9ROV
I hope this helped you today!!
Lauren
These 100 heatless waves are the easiest waves that I've ever done after lots of trial and error, and they don't require fancy tools or uncomfortable things to sleep in and that are embarrassing to be seen in first, I start with towel dried hair, and I usually use This turban that I found on Amazon, which I'll link below next I gently, come with a wide tooth comb, so that I can avoid any tearing. If you find your insert to get dry use a spray bottle, wet your hands to rehydrate your ends. I'Ve eliminated a leave-in, a crow cream and a chrome mousse by using this one natural texture spray I found locally. It also promotes hair growth and allows me to wear these waves for multiple days without feeling, like I have anything in my hair, I'll link this product below. If you want to check out this girl's business, shake well and use three to four sprays. All over you. Don'T need to worry about greasy roots with this just scrunch it in gently with your hands part your hair, where you're going to wear it. It doesn't have to be perfect check out the back. It'S not perfect at all it's loose and that's going to be even a benefit now. This is the part where I tell you how ridiculously easy this is. All we are doing here is two french braids one on each side, but here's the key to actually helping you enjoy the way this looks when you take it out a lot of times. Braids, look very obvious. So what we're going to do is make sure that you pull all of the hair as close as possible to the face. While you braid, have you ever tried doing sober, braids and felt like you got a lot of weird creases and it just looked unnatural or stretched out when you finally take it out. Keeping the braid as close as possible to the Face is Going to create the appearance of this pattern growing, naturally, and directly out of the root. This one detail, I believe, is responsible for most people thinking. This is actually just my natural texture, which is a huge win, because before having kids, I used to have very curly spiral. Ringlets after three kids, I lost half my density and all of my curl, it's just completely flat now, which is so sad. It can be a real blow to a mom's self-confidence, so this heatless hairstyle has really helped me to be more at peace, with the idea that maybe my normal natural hair will never come back or be the same. But now I have a quick and easy remedy that I actually enjoy doing and wearing. So that's why I had to share this with you now once I get to the end, I'm just going to use a little elastic to tie it. This is my daughter's hair type. I don't know about you, but with my braids, my density gets really thinned out at the bottom of my braid. So if that happens to you, I'm going to give you a tip a little bit later to show you exactly how I combat that, and it's really really key to making these waves look natural or, like you, did a beach waiver with a hot iron as I'm Working here, I just want to point out that this is very, not perfect, not beautiful! I'M not going out! I'M not trying to wear this anywhere. So don't think that these braids have to be perfect. Actually, the more imperfect the better because it doesn't look so patterned in uniform. So if you're like me and you're, not all that talented or skilled at doing french braids, don't worry about any bumps imperfections, don't sweat it! The one thing that you want to be sure of, though, as you're working, is to make sure that the density of each of the three sections stays equal. So, as you're pulling hair check the density of the Strand that you're pulling hair into to make sure that you're not pulling too much hair and offsetting the balance of how much density is in each strand, next tip right here is very important to making it look Like you actually used a hot iron instead of doing braids straight ends in a pattern that gets tinier and tinier and kinked at the bottom are a dead giveaway that your hair was braided. Here'S the secret to fix it, hold the bottom of the braid and gently pull the loops at the end to make them fatter. This keeps a consistent size of braid all the way down to the bottom. It really is the difference between obviously braided hair and a consistent pattern usually achieved with a hot, deep waiver. So again, I'm loosening these braids at the bottom, but not pulling them out so far that they come out of the hair tie. It'S really important here that you make sure your hair is a little bit damp still. Otherwise, if it's really dry, it might slip right through something else that you want to avoid when you're doing this little detail right here is make sure to actually tie your hair tie, pretty tight, don't make it Loose just because you know you're going to loosen the Braid later it actually needs to be tight so that they don't fall all the way through foreign. So here you can see the size of my braid stays, bigger and consistent all the way down to the bottom, and by pulling these ends out and not pulling them all the way through I've shortened that really straight piece that we often get at the very bottom. Okay, so now you're gon na sleep overnight with these braids but make sure not to skip this step, wait a couple of hours before going to sleep on your pillow, which brings me to my next point: you want to use a silk or satin pillowcase to avoid Damage and to reduce a bunch of frizz okay. So the reason why you want to wait a few hours before going to bed is because you did this on damp hair. If you sleep on a silk or satin pillowcase with damp hair, it's never going to dry. So you want to allow your braids to dry before you go to sleep a little bit. They don't have to be completely dry, but just a little bit. So when I wake up in the morning, this is probably going to happen to you too. You might sleep on something and get a funky kink like this, but I have good news for you. This is a truly heatless tutorial, so I am not going to advise you to use heat. It'S actually a very simple fix. All I did was wet my hand and slightly dampen the ends a little bit. It softens it up and takes the Kink right out no heat necessary. Now I'm going to use the same product I used in the very beginning of the tutorial, I'm going to spray about three pumps and I'm going to run it over all of the frizzies that kind of came loose. While I was sleeping, but don't worry, these aren't going to be very noticeable when you take this out foreign ly, pull apart the braid, I'm not going to comb through with my fingers, I'm just going to gently pull it apart and I just want to pay attention To those ends right, there look how they don't get all small and kinked up like you used a little crimper at the bottom for people with finer, hair or hair that just gets finer at the bottom of your braid or ponytail pulling out that braid. At the end, after we tied it, like, I showed you earlier, that's going to change your life. Thank you. So this is what it looks like before doing anything else, except for just pulling it out. It'S not exactly perfect, but look at those ends. Those ends are perfect, but it's going to be a lot better. When I show you some little finishing details, throw your hair forward and gently start to pull apart and separate your strands. Let'S go next, do a couple more sprays of your finishing product just to scrunch through one last time for a little extra hold. I just love how close this gets to the part line, how close the pattern gets up to the part line and how it just waves right out of the root, and I just love the ends it does not look like it was braided, doesn't look kinked at The bottom it looks so natural or, like you, used a deep waiver to create some mermaid waves. I love this hairstyle. If you need a little bit more volume, you could always just kind of fluff up the top a little bit I'd do that every once in a while, and what's really nice about having this texture in your hair, is it really stays well throughout the day now The curls are a little bit looser and separated, and it just makes it look a lot more natural. I myself am kind of a hair flipper, so I flip it over to the side. This is what it looks like from the back and then I'll show you what it looks like when I flip my hair. It looks even more natural when I do that honestly, but I do like to wear it with a little part as well. Either way works. Fine, because we put that braid super close to the hairline and not away from the hairline, this hairstyle lasts me. I would say about three to four days with the first two days: I'm able to wear it down. If I use that satin pillowcase and this specific product, when I use other products, I don't feel like, I could wear it as long on subsequent days. I pretty much just do a half up, ponytail, add a little bit of volume and if there was any consistencies in the hair from sleeping on it, multiple days that just kind of gets taken care of by putting it half up and then by the last few Days, I just have my hair completely up. Thank you so much for watching and let me know if you have any questions in the comments below see you next time.

Comments
Tonya DeRemer: Gave it a try last night!! One side turned out perfect. The other not so much. But definitely trying this again! Thank you!!
Jeffrey Edwin: Another great video please consider adding this to your rumble channel as well.