Long Layered Haircut Tutorial-Step By Step //Wholy Hair
- Posted on 23 February, 2021
- Long Hair
- By Anonymous
I really wanted to make a super easy to follow haircutting tutorial with long layers, so I really hope you beauties enjoy this detailed tutorial!
I am using the Sam Villa 5.5 Swivel shears, and they are my absolute favorite shears to cut with!
Socials: @wholy.hair @lauraa.ashleyy
email for business inquiries ONLY ↠ [email protected]
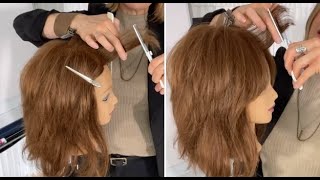
Like it's like, you go your whole life as a woman like you're like suck it in. You know you got ta like tighten it up, and then you get pregnant yeah yeah, it's just out in everyone's face. What'S up beauties welcome back to my channel holy hair, i'm here with my beautiful model and friend alicia, and we're going to be doing a long, layered haircut on her we're going to be bringing up the length of her hair till about here and then we're going To do some long, bouncy layers to give her just an uplifted youthful appearance. My goal in this video you guys is just to like simplify the layered haircut like we don't want to make haircuts complicated. We want to really simplify all of the steps and i really want to give everyone a practical way to just do your basic long, layered, bouncy haircut. So in this video i'm going to be showing you guys just a simple, easy, step-by-step tutorial on how to get a long, layered haircut. So let's get right into the video. Let'S go, let's go, let's go, let's go, let's go okay, so i have her sectioned and we're just gon na start in the back here and i'm going to go ahead and do the perimeter of her whole haircut. So i'm going to do the length first and then i'm going to go in and do her layers. So i'm starting in the back here and when you start below the occipital bone in the back of their head. You want to have your client tilt her head down a little bit so that you can get a zero elevation with your hair cut and i'm just going to come and establish my guide. So we're going to be taking this much length off all right. So once you establish the length on your first section, you just want to do the pull test on either side and make sure that it is even on both sides before you start the rest of the haircut. This is really important, because if you have it uneven on your first section of the haircut, then the rest of the haircut is going to be uneven. So you want to make sure that the first section you do is even - and it is it's the same length all the way across, so that will give us a great foundation to the rest of our haircut. So i'm going to take down another section here and i'm taking about one inch sections and when we take down the next section, we can clearly see our guide underneath here. So i am just going to be simply matching up the length to the previous section and then going on to her next section here, i'm going to have her hold her head a little more straight up, taking down her last section here in the back, we're just Gon na match up the length and then we'll go on to the sides. So, coming on to the sides of her hair, i'm going to show you how to match up the sides with the back we're just going to give this a nice comb. And what we're going to do is we're going to bring her um section by section we're going to bring this kind of to the back here and then we're going to bring it on her shoulder and then we're going to bring it to the front taking it From just above her ear here and we're going to comb this to the back sitting on her shoulder here and we're just going to match the length up and take a little bit more hair, bring it to the back and then, as we get a little bit Further in the front, we're gon na bring this to the side of her shoulder and match the length up, and especially around the client's face. You want to kind of softly hold the hair when you're cutting it. You don't want to pull it with too much tension. Okay, so we have her length all matched up on the side here and i'm going to go to the other side. Okay, now we're just gon na double check the front, because, as i brought her hair to the front, i noticed that this side was a little bit longer, which happens when um, typically like the side that your client parts their hair on. For some reason, i really don't know why um it tends to be a little bit longer when you're like doing the perimeter. So i always like to bring the hair to the front. So we can just gently rest. The hair on the client just like this, and we can come in and just trim this up to match it to the other side, and you just want to make sure that your client is looking straight forward and they don't have their head tilted down head placement. Is so important when you are establishing length all right that looks a lot more, even and then what i like to do as well. Is i like to part the hair over to either side, because hair doesn't always stay in one part, it tends to flip over. So i part the hair on either side and check to see if there is longer pieces - and there is over here so we're going to match this up to the guide on this side, all right and i'm going to do the same thing on the other side. Just flipping it over we're, seeing if there's any long hairs and there's not on this side, it all matches up so we're going to go back to her regular part, and now i'm going to go into cutting her layers all right so, like i said i just Want to make this like a simplified version of doing layers, so what i'm going to do on each vertical section of her hair? So i'm going to do three angles on each vertical section: i'm going to do a 45 degree angle, a 90 degree angle and a 180 degree angle, and i'm going to be point cutting each section for her layering. So i'm going to show you exactly what i mean on each section. So we're going to start in the front here and i'm taking vertical sections, and i am going to first comb her at a 45 and i am going to point cut and then i'm going to comb her at a 90 and point cut. And if hair falls out, we just let that hair fall out and then i'm going to comb her at a 180 and point cut okay and then what i'm going to do is take half of this section and a new section and i'm going to do the Same thing here and i'm going to follow those guides, so here i am at the 45., cutting at the 90., bringing it up and cutting at the 180 and here's our guide here and i'm just point cutting and then i'm going to take half of that section And a new section all right, so you can see our guide here. Can you see the guide? Here'S the guide so see the guide right there. So we are matching this section up with this guy so and when you comb the hair when you're doing layers and you comb the hair and you comb it out when pieces drop out, that is perfectly fine. We want to leave those pieces that drop out when i'm point cutting i'm kind of making this like jagged cut, because we want this to lay really naturally, and we don't want a straight across cut. We want to come in so when you're point cutting. You want to come in at an angle here and cut like this and to prevent, like cutting yourself when you're point cutting i like to um come out like come up as i'm closing my scissors. So i'm not closing them as i go in, i'm closing them as i come out alrighty. So i've done like three or four sections on the side here and what i'm going to do is i'm going to take this whole section and i'm going to kind of just grab. The whole thing point cut any pieces that i may have missed and again i'm doing those three angles here and i'm taking this whole section and i'm bringing it all the way up and over to our 180 and we're also, in addition to actually cutting the layers. I'M taking weight out so the difference between cutting layers and taking weight out is when you're taking weight out you're going straight in and when you're actually cutting length and taking layers you're going more at a diagonal because you're actually taking like length off okay, you can See the layers start to form and we're going to go on to um the back of her head and we're just going to continue to do this same thing around her whole head. So as i go, this is how much i'm taking off and then i'm bringing this all the way up, i'm taking that bit so so, foreign okay! So coming over to this front section here, i'm just matching up the front pieces. So i'm just kind of gathering these front sections here and bringing them all the way up, and i just want to see that they are remotely the same length. We are point cutting the all of the layers, so it's not going to be a straight across cut. So you just want to make sure that they are the same length, but that you want to point cut and get the texture in there as well. So what i like to do with these front pieces is um after i have already cut in the layers. I'Ll come up here and i'll kind of just slice cut a little bit so i'll just slice in a little bit of face frame on this front section and as i'm going down her section, i'm kind of closing the scissors a little bit and you can kind Of like bring this around forward and point cut some of this and really when you're doing face framing layers, it's a very visual technique. So you want to just make sure that your shaping is coming along good as you do it, and then you can take like diagonal front sections and kind of like comb. These the other direction and point cut a little bit that way and that'll just soften soften those pieces a little bit okay, so i'm taking this whole section and just want to show you guys how i'm kind of like point cutting her sides, so i'm taking this Whole section from just behind her ear and i'm kind of like combing it up, and it really makes a difference on how you comb the hair. So i'm combing it up like this and then i'm just coming in and turning the hair like this and i'm just kind of point cutting more so adding texture and softening this. The layers around her face is kind of what this is doing and then i'm going to half that section and i'm going to do it again and i'm just bringing this around, and i am just softening these pieces around her face. I'M going to do the same thing on the other side here, so okay, so i'm just gon na give her a bouncy round brush, blowout and i'll. Show you guys what her hair looks like after look at all this hair alright, so this is going to be her after look and as you can see, we have long layers going on a little bit of face frame and i just love how much younger this Makes her look like she literally said after after i finished she was like wow? I look so much younger, like i just feel like when you bring your look up and do those layers and kind of just bring the length up a little bit. It does give you such a more youthful appearance, not that alicia is old in any way. It looks like i slept more than two hours which i did not so she has a one-year-old so and i work in all night yeah. She actually is a nurse and she works nights and she is one of our heroes. Okay, yes, thank you. You took hot garbage and made it look decent you're a hero. This is gon na, be her final result. You guys. I really hope that you loved this tutorial and you took away some helpful tips to give your clients a long, layered haircut. This is my best friend and her baby. It'S so funny like just being pregnant yeah work. Do the baby mama dance until the final kids. Let'S go: let's go


Comments
Allie Quinata: Oh my gosh!! I’m a newbie stylist just starting and I’ve watched video after video trying to find a way to cut layers and you broke it down so simply and made it so easy to understand and replicate!!! Your newest subscriber right here!!❤️
Andrea Martin: I have never seen anyone put in layers this way, I am excited to try it! Thanks for the tutorial!
phyllis burke: Your videos are awesome. Great explanations.
Heather Hoffman: Thank you for breaking it down in such a simple way. So many people over complicate steps and make it confusing! Looks great!
Tomas - Your Hair Guru!!: Such a great video, definitely helped simplify elevation and traveling guides for me, <3 well done
A.Marie: You should do more haircut tutorials I love love love this and the way you cut. I’m hoping you’re doing well too!
Jennifer Jaramillo: Love this technique! Thanks for sharing, best of luck with the little one <3
Stephy Sheets: Thank you so much for simplifying long layers!!
Lesley Morley: Really enjoyed this tutorial I will definitely try this
katie o'connor: Beautiful can’t wait to try that technique
MnM: Now, I’m going to try it on myself. Can I say… congrats on your baby!!! You’re so cute pregnant!
A T: Whoa - the after is SO good!! She looks fantastic. You did a great job. This suits her.
Rita Washington: Thank You for sharing very easy technique
John Cortesi: Really like this! It was a very informative video, I liked it
Kyle Beauregard: I'm a barber and Im definitely interested in women's hair and this helps so much
am sav: Such a wonderful haircut and the layers are amazing....✝
Kathy Pham: Wow! Love this, I will be trying this!
P A: I like how you left the layers around the face long. Too many stylists cut the sides so short that there's no length around the face.
Kayla Spurlock: Your channel is amazing, so glad I found it. Love your teaching, tips and tricks. Thank you for making these! Will you post a video sometime doing a high lift color? High lift blonde?
Sigma Soul: KEEP UP THE GOOD WORK!♥️
Nancy Whipple: You are a wonder for all the hair stylists that subscribe to your brilliant videos ! Thank you for sharing All your knowledge in All your videos Love and Blessings to sweet Ruby
Molen Mendoza: This tutorial help me a lot ❤️thanks!!
Rachel M: Great video and explanation! Thank you!
Tracy D: Very beautiful hair and tutorial.
Yazzy Jordan: Her face is so stunning her middle part hides her gorgeous face once you flipped her hair her face just shined! I loved this video thanks for the help
Mary C: I'm self taught...well self and YouTube taught lol, but I've only been doing men's haircuts and just straight trims, for the last 2 or 3 years...I'm about to try layers for the first time on my best friend and have watched a number of tutorials, but yours is definitely the one I'm going to go with! You've outlined every step and explained everything you're doing, and WHY (which is the biggest thing for me, the reason as to why you do something makes it easier to do it). Thank you, wish me luck!! ☺️
Amanda Lowe: You are an excellent teacher!
Suzanne: Love the way this turned out! What would happen if I told my hairdresser to just do the 45 degree angle and the 90 degree angle on the vertical sections?
Melody B: I'm so tired of my hairdresser not wanting to make long layers in my hairVery frustrating!!!!!
Mesa Joy: Do you prefer to dry cut using this technique? Or would you use the same techniques on wet hair? Thanks ❤️
Sus: Love this! Were you eyeballing when you first started the layers at 45 degree angle at 9:36? Just point cutting off an inch or so? Also, is there an easy way to pull this off on yourself?
Kathleen Nelson: Wow, more work than l ever thought!. Beautiful.
Wendy: I'm in Charlotte North Carolina I have been looking for this haircut my entire life seriously beautiful
HeadHome: What a gorgeous model. As for her hair - what a stunning thick head of hair, must be a dream to work with all that mane.
Jackie Lagunas: What shears are you using? Also great video thank you!
Mai Cu: You’re angel you are so kind. You share expert experient to us. Thanks. God bless you.
Anita Nancy Almirante: Wow amazing haircut I like your style mam
Gracie Gutierrez: Love your work, just wondering- is it counterproductive to cut at 3 different angels? It seem like it would cut out previous cut angels?
Jasmine Michelle Hair & Beauty: What kind of shears are you using for dry cutting here?!
Paige Cornwell: WOW I love it
Laura Selig: God I love your videos thank you
Dwaine Quaye: Great video.
Kapree Luxe: Congrats girl!
Emilio G: Great cut! Could you upload a blowdry and cut with original sound instead of music? Thank you!!
VERONICA BENNETT: I need this haircut.
Melita Novak: Which scissors are good for this haircut....very very nice work dear lady....
JoHanna Dwigans: Love your videos, where did you get the cow print chair ...love it
Rian Lynn: You probably have heard this before, but you look like an Olsen =) I always found them so beautiful, and I was confused for a minute cause they have been mia for a long time. Exited for this video!
Tracy Bruce: What shears do you use?
Rocio Mendoza: Wow I love you.. so glad I found you!
kaberri: What shears are you using?
ProwlerMN: I don’t see the layers very minimum in front that look like straight cut. I guess that’s what that girl wanted I am looking for a more drastic layers in long hair in shape V but thank you for this video
Leslie Solano: Can you please tell me What shears are you using?
MRH Salon: Good
Ariel Martinez: Seems more like texturizing no then layers
The Hair Villa: Hey hello I love your work.. I am also hairdresser in india My big dream! I want too work with you , works under your guide if it’s possible.. Please give me some details for joining your salon I work free of cost .. I just need your help
Gloria Morales:
Marky Bee: Sorry but that has just ruined what was gorgeous hair that just needed the ends nipping off
Marisol Gonzalez: God bless. Good spirit.
Tommy Jablonski: Y do y'all always take do much length off???
Vinay Athwal: Hey i m from India Ladies hairdresser can u call me there in ur country for work
Maria Lopez:
psychobitch82: I'm sorry hun but this is not simplified...not tryna be rude, disrespectful, or the like!