[Step By Step] Layered Haircut At Home
- Posted on 22 July, 2021
- Long Hair
- By Anonymous
Hi! I tried cutting layers at home. I forgot to mention in the video, but cut side bangs for a complete layered hairstyle.
Share with friends❤️
Video I referenced: https://youtu.be/wcBQTF2eqck
Side bangs tutorial: https://youtu.be/GIo1GGs9ujs
About Me
Name - Krystal
Born in South Korea
Instagram - @krystallee22
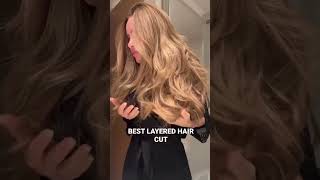
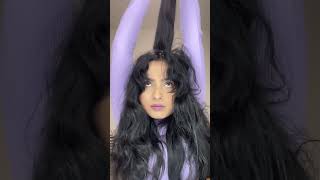
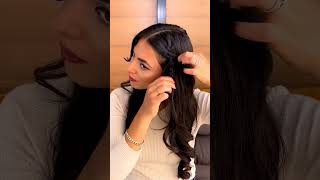
Today, i'm going to do a self layered haircut i'll, be referencing a video of a professional cutting our own hair. So it's not going to be the exact same steps. I'M going to try to make it a bit simpler and safer to follow so that you won't mess up too much at home when you cut it on your own, i'm not a professional, so you know i'm definitely going to take the safe way. The first step is to just part your hair. However, you normally do so. You can do it in the center. You can do it on the side. It really depends on your daily styling before cutting i'm gon na brush. My hair with this really cute brush that i got today and just make my hair tangle free feel free to put some water on your hair. If that helps set your hair, you can also straighten your hair if your hair is curly or wavy, so that our lengths are even and balanced. I also recommend everyone to cut your hair a bit longer than i tell you to so that you know you have a second chance and you won't mess up too bad. I'M just gon na use paper cutting office scissors at home. I guess it should work, get a hair tie because we're gon na section our hair. If you want to use hair clip, that's fine too, but i just can't find mine right now start from somewhere in the middle and then part your hair. I have a small section right here and then do the same thing on the other side, if you have a lot of hair like i do, um take more than half so that this side, hair and the rest of our hair are a bit more. Even try to take the same amount of hair from both sides so that we can have a more balanced hair okay. So i'm going to take this side here and just tie them together with the scrunchie that i prepared. Okay, now i'm going to bring the rest of my hair to the front, make sure you don't take this hair to the front because we don't want to cut it. So just be careful. Okay, so take your scissors and i'll cut, maybe like an inch or a little less than an inch and we're going to cut the rest of our hair a bit shorter to make layers. Don'T pull your hair too much while cutting because then it's going to get much shorter, so i'm just going to hold it very gently and try to cut it straight. It got slightly shorter just to make it a bit more natural. I'M gon na hold my scissors. A little bit to the side trim it so that it has a bit more angle to it. Okay, let's cut the left side now make sure the lengths are even and always start longer and trim afterwards, so that you don't stop. This is a bit longer than this, but remember we're going to cut it once more by angling, our scissors, so the second time we're going to trim our ends, try to spread out your hair, if that makes it easier. Okay, let's move on to the next section and we're gon na make another section from here. Let me send this hair to the back and try to let some hair down on the side like this and i'm gon na tie this middle part. Again, i'm gon na just leave it like this, so that it doesn't get mixed with my other hair. I'M gon na cut this hair a bit shorter than the last hair, so we want to cut like an inch shorter than this one, maybe like around here, we're basically making layers first cut it straight, but i'm gon na cut it lower than i want to so That i can have some room to trim. Okay, i'm gon na angle, my scissors to make the ends. Look more natural looks good to me. Let'S do the same with the other hair. Oh my god. Bts permission to dance just got stuck in my head. I i keep singing it all day now we're gon na take our last section. I want to cut this like an inch shorter than the last piece. So it's the same thing. I'M just gon na cut it straight first and then trim by angling scissors for making it vertical. I almost cut my fingers: let's bring all our hair to the front right now. It looks a bit too straight. It looks like stairs right. We want to make it look more natural, so let's do this i'm going to take like my first two sections, but not all of them, maybe like a little bit. Let'S just take our scissors and cut diagonally we're not really messing with the wings. It'S more about connecting these hair pieces. Okay, this part looks a bit more natural, but we need to deal with this part right here. So i'm going to take a little bit of the middle section and cut it diagonally afterwards, i'm gon na cut it straight up like this, so that it looks a bit more natural. Now i'm gon na take back a section and a little bit of my middle section and try to make them okay. Now i'm gon na do my back hair. My hair is mixing together pretty nicely, there's no staircase anymore, so i'm gon na do the other side. Now, there's no strict parting for this step. You just need to pick sections of your own hair and make them connect. This is my completed. Look, please be careful while cutting your hair, so that you don't injure yourself. I hope that was helpful and i'll see you in the next video
Comments
Stella: Most easier tutorial I've been watched so far, thanks for sharing.Keep going unnie!❤️
Hannah Carr: So helpful! Love this style on you!!
Asia Sumra: Your videos help me alot with my layered hair lol. Thank you so much queen ❤
Jane McC: Your video helps me a lot because I am gonna cut my daughter hair for the first time. Thank you!
Evanaaa alita: So helpful ! ❤️ And you look so pretty
emmeline: thank you !! i have been wanting to get layers recently
Lyza Peteros: I love your hair tutorials sm
gachatuby: i did this tonight even tho it looks a bit blockist i am happy with it thank you!!
Yun dara: it looks beautiful on you ♀️
Army Land: You always uploaded the video when I needed the most ♀️
Shreya Kanthe: This tutorial is so easy. Thank you so much......... Love from India ❤❤❤❤
cherry blossom: You're seem so nice and smart, I hope you get more recognition
Namjoons lost airpods: Really pretty
이재민: 진짜 여신이세요!! 항상 이쁘시고 늘 감사합니다
Amira Mimi: Amazing tutorial can u please drop your haircare routine your hair looks so healthy
楊豐禎: New follower, feel lucky to discover your channel ❤️
park sun-hee💕: Love the fact that you responded to all the comments not sure if you will respond to mine since it's been a year since you uploaded this video but love youu
Sheema Khan: how is the painting at the back made.....is their a tutorial for that or is it store bought
This Butterfly Is ugly: Gorgeousand talented
QUOKKA-COLA: Does it work on pretty thin hairs???
Gimmine Twin: This is very helpful my love Rosè...Im very impressed...thank you sm....❤❤...u look gorgeous ... Stay safe ❤
Manjula Ruwanwella: Your hair is amazing
Kerelle Jackson: That brush is so pretty❤
Yun dara: will you do hairstyle video i will love to see you doing cool and nice hairstyles
Taozi: listening to you talk always feels like listening to an old friend .. if that doesn't sound weird nice tutorial tho!! your hair is soooo pretty
حرا: ur stunning!!!
1608루시: You're so pretty!
Queen..😜: 잘생겼어 이 영상 너무 좋아 .
Bhuvana Bhuvi: U look alike my favorite kdrama actress bae suze and love your vedios want more tips
wakala: Daebaek
ayie: You look like The girl in Weightlifting K-Drama Kim Bok Joo!
saira gulbaz: Love from Pakistan ♥️❤️❤️
Gả cho 于文文 😘: Love from Vietnam ❤️
💜ᗷTS⟭⟬💜FANFICTION: 안녕하세요 너 너무 귀여워.. 나는 당신의 모든 비디오 와 튜토리얼을 사랑합니다 ..... 계속 ❤ 사랑해❤
Cmhoysala Cmhoysala: Can you please recommend solution to become slim Iam tired of being fat and ugly Iam feeling i am burden between slim girls
Rashu Tamang: Love from Nepal
Suk min Yoon: Good day! Greeting from Germany
AF JM: Love from Saudi Arabia
li jason: amazing video, can we collab?
Molika Das: Hello unnie
cuizy: Wish me luck
Manjula Ruwanwella: Remind me if there is a another video