Diy Shower Cap (Cotton Polyester Lining) For Bigger Hair
- Posted on 29 January, 2021
- Long Hair
- By Anonymous
Hope you enjoy the video and learn from it. Questions are welcome
The struggles of polygel part 1 : https://youtu.be/Qr2ncsPiYE8 Want to know more about me : https://youtu.be/0FdfHf0nu24. Applying polygel yourself at home : https://youtu.be/VBWeXBPWYq0
10 mins face mask tutorial https://youtu.be/-B4tzGEWK00.
Manicure nail time video: https://youtu.be/7gzL3kofXgE My social medias: @negestyles for instagram https://www.instagram.com/negestyles/
Facebook https://www.facebook.com/negestyle/
Soundtrack for my intro video I do not own the right to that soundtrack : lean on instrumental by the harmony group - topic
Editing: iMovie
Thanks for watching please subscribe like share and click on notification bell to be informed when I post a new video
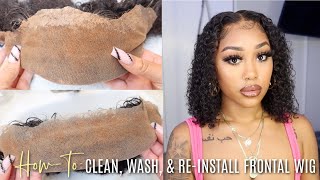
Hello guys welcome back to my channel. My name is geradine from naji style in today's project. I'M going to show you step by step on how to sew a shower cap. I'M going to sew a cotton polyester line shower cap from a shower cotton. I bought from the dollar tree, so i'm so excited to share this project with you guys, because, like many others, when you wear braids or you have thick hair, the shower cap you buy from the store, sometimes are too small or the bigger ones are way expensive. So today, i'm going to teach you how to make your own shower cap based on the length of your hair, so stay tuned and learn from nature style. These are the things i need for the project, uh shower curtains, as i said, and now some elastic. Oh, you have two options: you could use satin like a satin fabric or you could use cotton polyester, as you can see, i'm using the plate to help me like draw the perfect circle. So i place my plate on the plastic shower curtain and i'm taking my centimeters my tape, measurements and i'm gon na add 12 centimeters around just the plate is just like a good direction to help me create a perfect circle. After i draw my circle, i'm cutting out like a square because it's still the whole cut satins and i just need to cut out the part. I need i'm getting on the square that i'm gon na fold in four to ease my circle. So you see, i have the dotted lines of 12 inches i added to the plate, so i'm just tracing it out before i fold my fabric and have like a perfect even circle. While i'm cutting foreign, you hey, oh i'm, placing the color plastic under the lining. The cotton polyester lining, i'm using i'm placing it to cut it out the same size and now i'm cutting it out. As you can see, it's all the two pieces, i'm ready to sew and i'm gon na go ahead and start sewing all right and yeah go the sewing process. As you can see, i went ahead and um overcast of all over lock how you call it the cotton polyester fabric to have like good finishes, and i'm gon na go ahead and place the elastic in between the plastic and the cotton polyester. Guys, don't kill yourself. This is kind of a little difficult and tricky to sew the elastic without seeing it. So i advise you a beginner to place the elastic on top, so you can have control of it and what watch? What you're doing i put in the middle? It was tricky and time consuming to me, but i'd rather put it inside because i want to have good finishes um inside the cap, but you don't have to do it. Put your elastic on top of the cotton fabric while sewing so just keep on watching and i'm showing you how to stitch the elastic on the plastic and polyester. Hey you, hey, hey, so hey here is a finished cap. I hope you did enjoy and learn from the video please make sure to like share and subscribe if you're new to my channel for more interesting video catch, you later


Comments
Beverly Ali: I love the Fabric’ I would like a hat for my Locs !
Akum Vanessa: I need one pls!! So original
Lisa Mcgrowder: Can please do a tutorial on how to do a overlock stitch
caresse creativity: Thank so much negestyle
Chapta DUKMER: